关键词 > MPCS52072
Homework #1 - MPCS 52072 - GPU Programming documentation
发布时间:2024-06-19
Hello, dear friend, you can consult us at any time if you have any questions, add WeChat: daixieit
Homework #1 - MPCS 52072 - GPU Programming documentation
Homework #1
Due: Friday, June 21st at 11:59pm
This homework is intended to server as an introduction to CUDA programming model. It also allows for you to understand how to submit and run your CUDA programs on clusters using SLURM.
Getting started
The following two sections explain the process of setting up your homework workspace for the course and how to re-trieve your private Github repository.
Peanut Cluster and GPU Partitions
If you are not familiar with submitting jobs to a cluster (i.e., the Peanut cluster) please make sure to watch the following video and read over the SLURM documentation provided by our tech-staff before beginning the assignment:
1.0 Using a Cluster and SLURM
Using Visual Studio Code and SSH
We will grade all assignments using the Peanut cluster’s GPUs and all programming assignments must work correct ly on one of these machines. If you have a NVIDIA GPU installed on your local machine then you can work; however, your program must still work on one of the cluster’s GPU nodes, no exceptions.
You have the option batching your programs to the following cluster nodes
PARTITION AVAIL TIMELIMIT NODES STATE NODELIST
gpu-all up 4:00:00 2 idle gpu[2-3]
titan up 4:00:00 1 idle gpu3
pascal up 4:00:00 1 idle gpu2
quadro up 4:00:00 1 idle gpu1
Please be cautious of using titan since it’s been known to have stalling problems so we advise not using it until it’s been reliably fixed.
Creating Your Private Repository
For each assignment, a Git repository will be created for you on GitHub. However, before that repository can be created for you, you need to have a GitHub account. If you do not yet have one, you can get an account here:
https://github.com/join.
To actually get your private repository, you will need this invitation URL:
HW1 invitation (Please check the Post “HW 1 is ready” Ed)
When you click on an invitation URL, you will have to complete the following steps:
You will need to select your CNetID from a list. This will allow us to know what student is associated with each GitHub account. This step is only done for the very first invitation you accept.
Note
If you are on the waiting list for this course you will not have a repository made for you until you are admitted into the course. I will post the starter code on Ed so you can work on the assignment until you are admitted into the course.
You must click “Accept this assignment” or your repository will not actually be created.
After accepting the assignment, Github will take a few minutes to create your repository. You should receive an email from Github when your repository is ready. Normally, it’s ready within seconds and you can just refresh the page.
You now need to clone your repository (i.e., download it to your machine).
Make sure you’ve set up SSH access on your GitHub account.
For each repository, you will need to get the SSH URL of the repository. To get this URL, log into GitHub and navigate to your project repository (take into account that you will have a different repository per project). Then, click on the green “Code” button, and make sure the “SSH” tab is selected. Your repository URL should look something like this: git @ github.com :mpcs52072-sum24/hw1-GITHUB-USERNAME.git.
If you do not know how to use git clone to clone your repository then follow this guide that Github pro vides: Cloning a Repository
If you run into any issues, or need us to make any manual adjustments to your registration, please let us know via Ed Discussion.
Problem 1: Estimating Pi using the Leibniz formula
Inside the p1 directory, open the file called pi.cu and write a CUDA program that uses an infinite series method to esti-mate pi. One of the most widely known infinite series that can be used for this is the Leibniz formula, as described here:
How To Make Pi
Your program should use this formula, and must use the following usage and have the these required command-line arguments:
Usage: pi interval num_blocks
interval = the number of iterations to perform
num_blocks = the number of blocks to launch
The program should read in the interval and num_blocks argument argument and only print the estimate of pi. The program will run in two phases:
Phase 1: Calculate local estimates
Define a kernel named compute_estimates that launches with a grid dimension equal to num_blocks and a block di m ension equal to one. The one thread in each block computes their own local estimate of pi and places their result in an output array named estimates. You have full control on what you pass as arguments to compute_estimates, how to al-locate memory, and how to split up the intervals given to each block.
Phase 2: Aggregation Kernel
After the host code realizes compute_estimates has completed, it will launch a kernel named aggregate that com-bines the results of estimates together to produce a final estimate of pi. The host side can continously lanuch the aggregate kernel multiple times as necessary in order to produce the final estimate (e.g., launching aggregate in a loop on the host side). However, aggregate can only be launched with up-to num_blocks where each block contains a single thread. This means you can launch aggregate with grid dimension between [1,num_blocks] per launch but with only one thread per block. What you pass as arguments to aggregate is up-to you.
Note
In module 2, we will see how this can be done more efficiently without having the host launch aggregate multiple times.
Requirements
All computation must be done on the GPU. The host-side code only reads in the data, prepares it to be trans-ferred to the GPU, launches kernels, and finally prints out the estimate of pi.
Be cautious of memory usage. Reuse memory when possible. We will look for this when grading.
Assumptions: You can assume that interval and num_blocks will always be given as integers and be provided. Thus, you do not need to perform error checking on those arguments. You also will not need to print out the usage statement for this problem. The usage is given here for clarification purposes.
Problem 2: 2D Translations
2D translation is a process of moving an object from one position to another in a two dimensional plane. In this problem, you will write a program that performs 2D translation on a set of points using 3D homogeneous transformation matrices.
What is 2D Translation with Homogeneous Coordinates?
In computer graphics, homogeneous coordinates allow for the representation of translations, rotations, and other trans-formations using matrix multiplication. A 2D point (x, y) can be represented in homogeneous coordinates as (x, y, 1).
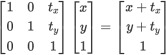
A 2D translation can be represented as a 3 x 3 matrix:

When this matrix multiplies the homogeneous coordinate (x, y, 1), the result is a translated point (x', y', 1):
For example, consider we had the points (1, 1), (2, 3), and (3, 1). If we apply a translation vector (2, 1) to this shape us-ing the homogeneous transformation matrix, each point of the triangle will move 2 units to the right and 1 unit up. The new positions of the vertices will be (3, 2), (4, 4), and (5, 2), respectively.
Make sure you understand how to perform matrix and vector multiplication. You may want to do a google search as refresher on that formula.
Task
Inside the p2/translate.cu directory, implement a CUDA program that performs 2D translation on a set of points using 3D homogeneous transformation matrices. The program will take in three command line arguments: points_file, matrix_file and iterations with the program having the following usage statement
Usage: translate points_file matrix_file iterations
points_file - the filepath to the file containing all the points
matrix_file - the filepath to the file containing the 3D matrix
iterations - an integer representing how many times to translate the points
The points_file file has the following format
The first line represents the total number of points in the file.
All remaining lines represent a 2D point where each integer coordinate is separated by a single whitespace.
Inside the p2 directory, there is a file named points-001.in that provides an example of this format:
3
1 1
2 3
3 1
The matrix_file contains a single 3 x 3 matrix, where each line represents a single row of integers, where the columns are separated by a single whitespace. For example, inside p2/matrix-001.in provides an example of this format:
1 0 2
0 1 1
0 0 1
Finally, iterations represents how many times to translate a point by the provided matrix. For example, if iterations=3 then given point (1, 1) and a translation vector (2, 1) then the following represents the final location for the given point:
1. (1, 1) + (2, 1) = (3, 2)
2. (3, 2) + (2, 1) = (5, 3)
3. (5, 3) + (2, 1) = (7, 4)
The program outputs the final translated location for each point after applying the matrix to it iterations number of times. The order of the output must be the same order of how the points appeared in the original points_file. Each point in the output is on a single line and each coordinate is separated by a single whitespace.
Requirements
All computation must be done on the GPU. The host-side code only reads in the data, prepares it to be trans-ferred to the GPU and finally prints out the final locations of the points.
There can only be a single kernel launch in this program unlike in problem 1.
How you format the data in memory and determine the grid and block dimensions is up to you.
Assumptions: We will always provide translate with the correct number of arguments and valid input. The file argu-ments points_file and matrix_file will always be formatted as specified in the above description and iterations will always be a positive integer.
Testing
Professor Samuels, will provide a few more test-cases at the beginning of the second week. I first want you to test your own code and then will provide some additional tests later on to help you further debug.
Grading
Programming assignments will be graded according to a general rubric. Specifically, we will assign points for complete-ness, correctness, design, and style. (For more details on the categories, see our Assignment Rubric page.)
The exact weights for each category will vary from one assignment to another. For this assignment, the weights will be:
Problem 1: 50%
Problem 2: 50%
Submission
Before submitting, make sure you’ve added, committed, and pushed all your code to GitHub. You must submit your final work through Gradescope (linked from our Canvas site) in the “Homework #1” assignment page via two ways,
Uploading from Github directly (recommended way): You can link your Github account to your Gradescope ac-count and upload the correct repository based on the homework assignment. When you submit your homework, a pop window will appear. Click on “Github” and then “Connect to Github” to connect your Github account to Gradescope. Once you connect (you will only need to do this once), then you can select the repository you wish to upload and the branch (which should always be “main” or “master”) for this course.
Uploading via a Zip file: You can also upload a zip file of the homework directory. Please make sure you upload the entire directory and keep the initial structure the same as the starter code; otherwise, you run the risk of not pass-ing the automated tests.
Note
For either option, you must upload the entire directory structure; otherwise, your automated test grade will not run correctly and you will be penalized if we have to manually run the tests. Going with the first option will do this auto m atically for you. You can always add additional directories and files (and even files/directories inside the stater direc t ories) but the default directory/file structure must not change.
Depending on the assignment, once you submit your work, an “autograder” will run. This autograder should produce thesame test results as when you run the code yourself; if it doesn’t, please let us know so we can look into it. A few other notes:
You are allowed to make as many submissions as you want before the deadline.
Please make sure you have read and understood our Late Submission Policy.
Your completeness score is determined solely based on the automated tests, but we may adjust your score if you attempt to pass tests by rote (e.g., by writing code that hard-codes the expected output for each possible test input).
Gradescope will report the test score it obtains when running your code. If there is a discrepancy between the score you get when running our grader script, and the score reported by Gradescope, please let us know so we can take a look at it.
