关键词 > COM2004/3004
COM2004/3004 Assignment
发布时间:2021-11-21
Hello, dear friend, you can consult us at any time if you have any questions, add WeChat: daixieit
COM2004/3004 Assignment
Developing a Chessboard Diagram classifier
1. Objective
You will build and evaluate a system that can take a printed chessboard diagram and report which piece is on each square. The input to the system is a set of images in jpeg format. The output is a sequence of labels representing the pieces, e.g. ‘k’ = King, ‘q’ = Queen, etc. You are given labelled data sets for training and evaluation, and some template code to help you get started.
2. Background
In the lab classes, you have been experimenting with techniques for classification and dimensionality reduction. In this assignment, you will use the experience you have gained to build a system for transforming diagrams of chessboards (taken from books) and converting them into a representation of the chessboard state. This involves taking the diagram of the full board, cutting it into 64 separate squares and then working out what is on each square. The squares can either be empty or they can contain a piece. A piece is either a white or a black pawn, bishop, knight, rook, king or queen.
The images you will be processing have come from a classic book on chess published in the early 20th century,
● Chess Fundamentals, José Raúl Capablanca (1921)
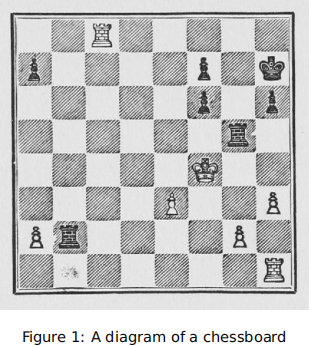
The task is not as straightforward as you might imagine because the mechanical printing process, used at the time of publication, produces images that have a lot variability (see Figure 1). Note that there are a lot of imperfections. However, you are provided with a hand-labeled set of training data and if you use appropriate techniques you should be able to build a very robust classifier.
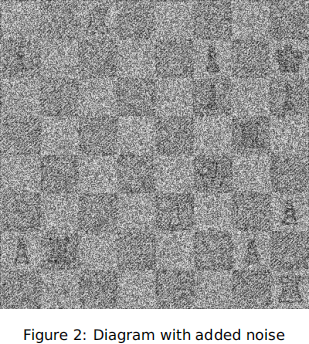
To make the task more challenging:
1. You are also given a dataset in which the images have been corrupted, i.e., by the addition of artificial noise. (Figure 2)
2. Your classification system can use no more than 10 features to represent each square.
Two versions of the classifier are required.
1. Independent Square classification. In this version, the classifier has to make a decision for each square using only the image of that square and no other information, i.e., the system does not know the position of the square within the board, or the appearance of other squares on the board.
2. Full-board classification. In this version, the system has access to additional context: it knows the location of the square within the board and the appearance of all 64 squares that make up the board.
The second version is more challenging. It will be possible to get a good mark on the assignment even if little progress is made on this component.
3. What you are given
You have been given,
1. data for training and testing your systems, and
2. some template code to get you started.
The template code will run but it will produce poor results. The dimensionality reduction and classification stages have been given stub implementations: they return the correct type of value but do nothing useful. You will need to replace these implementations using ideas that you have learnt during the course.
3.1. The data
There are two types of data.
1. Image files. These are jpg images of chessboard diagrams. The images have all be pre-processed to be exactly 400 by 400 pixels, i.e., each square is 50 by 50 pixels.
2. Label files. There are two label files: boards.train.json which provides labels for the training data, and boards.dev.json which provides labels for the test data. They are stored in JSON format and contain a list of dictionaries. Each dictionary represents one board and has the structure shown below,
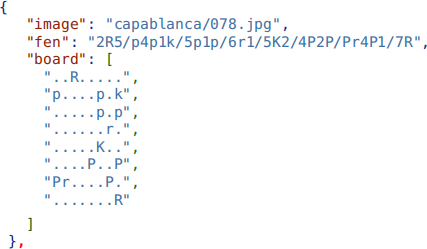
In the dictionary, the fields have the following meaning:
● image field is the name of the board image.
● fen is a representation of the board in FEN notation. This field is not used.
● board is a string representation of the board.
The string representation is interpreted as follows. A list of 8 strings provides the state of each board row. Each string is a sequence of 8 characters, one per each square in the row. The . represents an empty square. Uppercase letters represent white pieces, and lowercase letters are black pieces. The letters have the following meaning: k = king, q = queen, r = rook, n = knight, b = bishop and p = pawn.
3.2. The code
The code is organised into four Python files: train.py , evaluate.py , utils.py and system.py . train.py and evaluate.py will train and test the system, respectively. They will do this by using code in system.py . Your task is to rewrite the code in system.py to produce a working system. No other Python file should be changed.
In brief, the code files have the following function.
● train.py - this runs the training stage. It will train two models: one using the clean data and one using the noisy data. For each model, train.py will read the corresponding training data, process it, and store results. Results are saved in a pair of files called model.clean.json.gz and model.noisy.json.gz stored in the directory, data/ . The training code uses functions in system.py that you will need to modify and extend. Do not change the code in the train.py file.
● evaluate.py - this runs the evaluation stage. It will run two evaluations: one using clean data and one using noisy data. For each dataset, evaluate.py first reads the corresponding model file, i.e., model.clean.json.gz or model.noisy.json.gz . It will then perform the classification on the test set. Finally, it will use the test set labels to evaluate the classifier and provide a score. It will run the evaluation in two modes: isolated square mode and full board mode . It will print out the overall percentage of squares classified correctly for each mode. Again, it uses functions in system.py that you will need to modify and extend. Do not change the code in the evaluate.py file.
● utils.py - these are simple utility functions that read the chessboard images and read/write data to the model files. Do not change the code in this file.
● system.py - the code in this file is used by both train.py and evaluate.py . It implements the key system functionality, including the dimensionality reduction and classification steps that you will develop. The provided version contains dummy code that will run but which won’t produce good results. The dummy dimensionality reduction just returns a vector of 0’s. The dummy classifier outputs the label for ‘empty square’ regardless of the input.
Your task is to write a new version of system.py . Your solution must not change train.py , evaluate.py or utils.py . Once finished, you will run train.py to generate your own versions of model.clean.json.gz and model.noisy.json.gz . You will then submit the system.py along with the model.clean.json.gz and model.noisy.json.gz files. The assignment assessors will then run the program evaluate.py using your copy of system.py and your model files. We will evaluate using a new set of test board images that you have not seen during development. The performance on these unseen test boards will form part of the assessment of your work.
4. How to proceed
The plan below has been written to help you get started. Steps 1 and 2 should be completed first. Steps 3 to 6 are not necessarily sequential, and you are free to use any process you wish. However, it is recommended that you read through this section carefully before considering how best to proceed.
Step 1: Read and understand the code provided
The code provided does all the file handling and some of the initial processing steps for you, e.g., segmenting the board into squares. Spend time to understand how it works before planning your solution.
Step 2: Test the code provided
Check that you can run the code provided. You can download it to your machine and run it in your local environment, or you can run it directly on CoCalc. If using CoCalc, then open a terminal in CoCalc and then navigate to the directory containing the assignment code,
cd com2004_labs/chess_assignment/code
Run the train step
python3 train.py
Then run the evaluation step
python3 evaluate.py
The code should print out the percentage of correctly classified board squares for the various test conditions. The dummy code will produce a result of 63.8% for all conditions.
Step 3: Working on the training stage
The function process_training_data in system.py processes the training data and returns results in a dictionary called model_data . The program train.py calls process_training_data and saves the resulting model_data dictionary to the files model.clean.json.gz and model.noisy.json.gz . These files are then used by the classifier when evaluate.py is called. So, any data that your classifier needs must go into this dictionary. For example, if you are using a nearest neighbour classifier then the dictionary must contain the feature vectors and labels for the complete training set. If you are using a parametric classifier then the dictionary must contain the classifier’s parameters. The function is currently written with a nearest neighbour classifier in mind. Read it carefully and understand how to adapt it for your chosen approach.
Step 4: Implementing dimensionality reduction
You are free to use any dimensionality reduction technique. PCA should perform well but is not necessarily the best approach. Start by looking at the function reduce_dimensions in the existing system.py code provided. This function cur-rently just returns the first 10 pixels of each image and will not work well. It will need to be rewritten.
Step 5: Implementing the classifier
You are free to use any classification technique. A nearest neighbor classifier should work well but is not necessarily the best approach. Start by looking at the functions classify_squares and classify in the system.py code provided. These func-tions currently just returning the empty square label (‘.’) regardless of the input. They will need to be rewritten.
Step 6: Full board classifier
If you get the basic classifier working well then you can consider the full board classification mode. This requires you to implement the function classify_boards that appears in system.py . classify_boards is passed the squares in the same order as they appear in the board. This means that you can work out the position of the square within the board, and you can see the contents of other squares on the same board. You can potentially use this information to improve the classification performance. Currently, the classify_boards function simply calls the simpler classify_squares function, so it will not produce a better result. Improving upon the classify_squares result might be quite difficult but credit will be given for any good ideas even if they do not work well.
5. Additional rules
Some additional important rules must be obeyed. Read these carefully.
● The file model.clean.tar.gz and model.noisy.tar.gz must each be no bigger than 3 MB
● The evaluate.py program should not take more than 120 seconds to produce a result when it runs on the CoCalc servers.
● You may make use of any code from the lab classes, even code appearing in the solutions (but you may want to improve it!)
● Python modules: You may only import numpy , scipy , or modules in the Python standard library. For a list of modules in the standard library see http://docs.Python.org/3/library/. If in doubt, please ask.
● 3rd party source code: With the exception of code from the labs, you should not be using source code from 3rd parties. If you do use code that is not your own you must provide clear attribution, i.e., place it in a separate function with a comment that provides the URL of the original code. Failure to do so may be considered a case of Unfair Means.
6. Submission
Submission will be via Blackboard. You must submit the following.
● A copy of your system.py
● A copy of your data file, model.clean.json.gz
● A copy of your data file, model.noisy.json.gz
● A form (which will appear on Blackboard) in which you will:
– report the performance of your system on the development set;
– explain/justify the design of your feature selection;
– explain/justify the design of the square classifier;
– explain/justify the design of any extra steps performed for full-board classi-fication.
7. How your work will be assessed
The assignment is worth 50% of the module mark.
We will be looking at the Python code quality, the overall design and the performance of your program. Assessors will be looking at your reports, so make sure to describe your work clearly. You will be awarded a mark out of 50 made up from the following five 10-mark components.
Feature extraction (10 Marks)
Assessed via the written report and evidence of implementation in the code.
● Have you employed an appropriate feature extraction technique?
● Have you justified the choice and design of the feature extraction stage?
● Have you implemented the chosen technique well?
Square Classification (10 Marks)
Assessed via the written report and evidence of implementation in the code.
● Have you employed an appropriate classification technique?
● Have you justified the choice and design of the classifier?
● Have you implemented the chosen technique well?
Full-board Classification (10 Marks)
Assessed via the written report and evidence of implementation in the code.
● Have you justified any additional steps taken?
● Have you implemented the additional steps well?
● Does the full-board approach perform better than the simpler isolated square classifier?
Code quality (10 Marks)
Assessed via examination of the code.
● Is the implementation clear? (i.e., concise and simple, compared to verbose and unnecessarily complicated)
● Is there good documentation within the code? (i.e., consistent documentation of functions and comments added where they are required.)
● Does it make appropriate use of Python’s features?
Overall performance (10 Marks)
Assessed by running the code.
● Does the code run correctly?
● How does the performance compare to that achieved using a standard nearest neighbour and PCA approach?
● How does the performance compare to the performances of other students?
For guidance, the table below shows the approximate performance that you should expect using a basic nearest neighbour and PCA-based approach. These figure were obtained using isolated square classification (i.e., each square being classified independently with no use of the surrounding context.)

