关键词 > Excel代写
A/B TESTING AMAZON A/B TESTING SITE
发布时间:2023-06-28
Hello, dear friend, you can consult us at any time if you have any questions, add WeChat: daixieit
A/B TESTING
USE CASE: AMAZON A/B TESTING SITE – REMOVAL OF BUY NOW BUTTON
Background
Amazon currently has two buttons for check-out on its product pages: “Add to Cart” and “Buy Now.” Amazon is looking to test the removal of the “Buy Now” button and see the impact to items purchased. The "Add to Cart" button appears first and moves the customers into a shopping cart/check out screen with potential additional products for consideration. The "Buy Now" button skips the shopping cart screen and sends the customers one step ahead into the shipping address selection page.
Amazon believes that removing the “Buy Now” button would mean that the consumers can only go through the “Add to Cart” option to the shopping cart/check out screen and thus may add more items to their cart for purchasing. The Variation that removes “Buy Now” thus should see higher items purchased.
The Minimum Detectable Effect (MDE) is 5% for the minimum improvement over the conversion rate of the existing asset (baseline conversion rate) that Amazon wants the experiment to detect. Amazon wants to see 95% statistical significance.
Provided is a baseline campaign from a previous timeframe for the baseline/control asset.
Amazon has created another site version (Variation) without the “Buy Now” button. The only product this will be tested on is the Colgate Total Whitening Toothpaste product.
Metrics provided are:
● Date
● Landing Page Visits: number of visits to the Colgate Total Whitening Toothpaste product page
● Add To Cart Clicks: number of clicks on the Add to Cart button
● Items Purchased: total items in the checkout bag for purchasing (all items are considered purchased at this point)
Setting up the A/B Test
Utilizing the A/B testing framework workbook: this workbook helps to calculate the sample size and length of time required for statistically significant results. The workbook also helps to provide if the results are indeed statistically significant with enough sample size. The sample size calculator is one method for calculating sample size, other online tools may have different methodology and account for macro trends other factors in deciding the minimum sample size needed.
1. Step 1: Define the variable you want to test
The independent variable is “Add to Cart” – this is the variable that is being tested by removing the “Buy Now” button. Amazon is expecting changes based on the “Add to Cart” button being the only one left for checkout
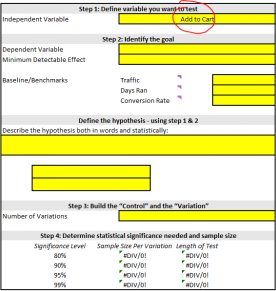
2. Step 2: Identify the goal
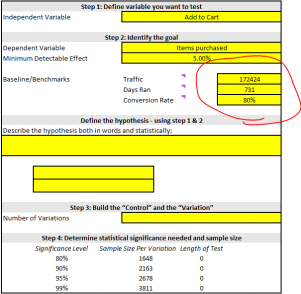
The dependent variable is Items purchased. The goal is to see the change in items purchased based on the changes to the independent variable.
The MDE is 5% - the minimum improvement over the conversion rate of the existing asset (baseline conversion rate) that Amazon wants the experiment to detect.

Define the baseline/benchmarks:
Provided is a baseline campaign. The goal is to see an increase in items purchased per click on the Add to Cart button. As such traffic and conversion rate is based on those two metrics:
● The traffic would be clicks on the “Add to Cart” button (=SUM(Baseline!C:C))
● Days Run would be 2 years of data (=COUNT(Baseline!A2:A732))
● Conversion Rate is Items Purchased/Add to Cart clicks (=SUM(Baseline!D:D)/J9)
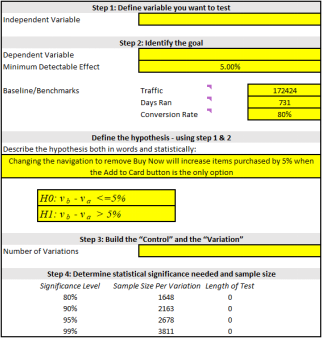
GROUP EXERCISE: Define the hypothesis based on steps 1 & 2
Defining Va as the Control which should mirror the baseline performance, Amazon expect the difference between Vb and Va to be at least 5%
3. Step 3: Build the “Control” and the “Variation”
Amazon has built the Variation website version. As a result, there are two variations being tested for this experiment
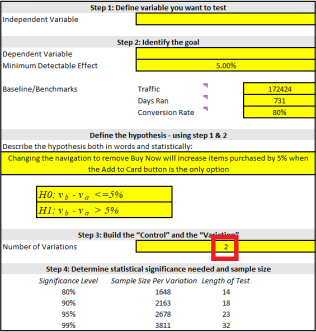
4. Step 4: Determine statistical significance needed and sample size
Amazon is looking for 95% statistical significance. The workbook provides the sample size per variation and length of test. Length of test would be useful for site experimental tests where the traffic is not finite
Calculation Source: https://julienlenestour.com/maths-behind-minimum-sample-size-ab-testing/
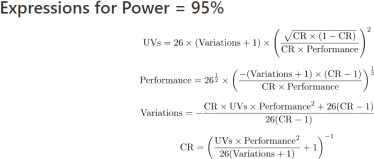
Variables used in the equations are:
● Variations: the number of NEW variations tested, not including the Control version
● CR: the current Conversion Rate of the page(s) tested, i.e. your Baseline Conversion Rate
● Performance: the relative increase of the Conversion Rate that your winning variation is seeing. For example, if your Baseline CR is 5% and the CR of your winning variation is 5.5%, then the Variation Performance is 10%, since your variation increases your CR by 10%.
● UVs: the minimum sample size to reach for your test to be statistically valid, measured in Unique Visitors tested.
5. Step 5: Run the test & gather data
Data for the Control and Variation has been provided. The test ran for one full month even though it was not needed per the testing framework. Using the A/B testing workbook for results, input the control and variation traffic and conversions
● Traffic: Add to Cart clicks
● Conversions: Items purchased
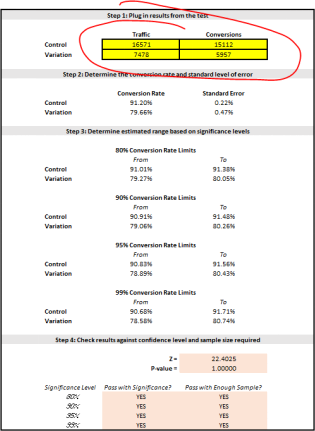
6. Step 6: Analyze results
The results pass at 95% significance. Results show that the Control has a stronger conversion rate vs. Variation (91.2% vs 79.66%). For success, Amazon wanted to see at least 5% MDE which the Control has seen over the baseline conversion (91.20% vs. 80%)
Additionally, at 95% there was enough sample as a double check that we have enough data.
RUNNING AN A/B TEST – FREE FOR PRACTICE
There are many different options for running an A/B test along with different software and platforms that help with the experimental design (e.g., creative A/B testing on Facebook). Many of these tools and platforms require either media budget to spend to serve an ad or a fee to host the website and run analytics for an A/B test.
As a student, if you are interested in setting up an A/B test for free – the best option would be a free website hosting with free Google Analytics or Google Tag Manager integration so that you can run an A/B test using Google’s Optimize platform at no cost. Alternatively, if you have a website that allows for html editing, you do not need Google Tag Manager. Doing an A/B test for creative would require serving ads which would not be free.
Note, a lot of website hosting sites that are free do not have Google Analytics and Google Tag Manager integrations for free. They also do not allow for HTML editing for free. The best option found is Weebly.
Below are steps you can take to setup a free website A/B test utilizing Weebly as the website hosting, Google Analytics as the analytics tracking platform, Google Tag Manager as the tag deployment for the website and Google Optimize to setup the A/B test.
Website Setup
Wix.com, Google Sites, WordPress and Squarespace all have free basic website building and hosting options however either do not have Google Analytics and/or Google Tag Manager integration or do not allow for HTML to be edited for free. The best option would be to utilize Weebly as you can edit the HTML to place code for Google Tag Manager which will have Google Analytics and Google Optimize tags that fire on page load.
Site: https://www.weebly.com/
1. Build the website
You can build a new website from a template or from scratch. Recommend building the website first to completion and then placing the Google Tag Manager code onto the website. Make sure to publish your website as you will need the website to be live for the Google Analytics and Google Optimize setups.
2. Install Google Tag Manager
Within the settings, copy and paste the GTM tags from step 4b in Google Tag Manager setup.
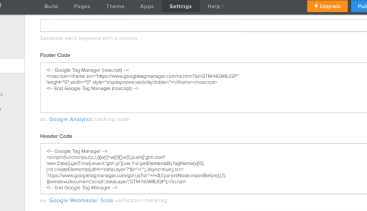
Make sure to publish the changes
Google Analytics Setup
Site: https://analytics.google.com/. It can take up to 48 hours for Google Analytics to start seeing data. Please note that GA is now switching over to GA4 which is the next generation of Google Analytics.
1. Setup a google analytics account
You will need to create or use an existing Google account.
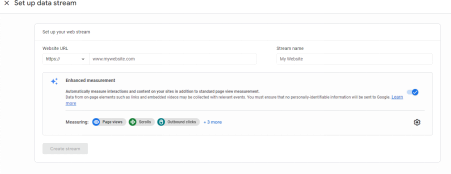
2. Setup Data Stream
Once created, you will need to setup Google Analytics for the A/B test using the data stream setup. For further instructions: https://support.google.com/analytics/answer/9304153?hl=en&utm_id=ad#stream
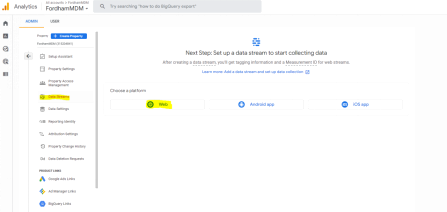
Select Data Streams -> Web. Input the website(s) you published.
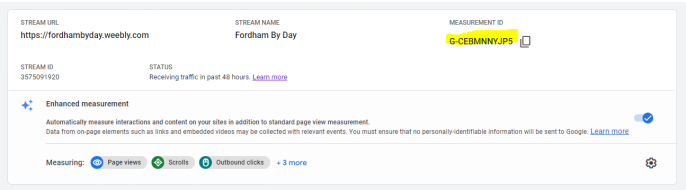
3. Retrieve the measurement ID
Once the data stream is setup, you will have a measurement ID associated to the stream/URL. That measurement ID is what you use in Google Tag Manager to ensure Google Analytics is setup on your site for tracking
Google Tag Manager Setup
Site: https://tagmanager.google.com/. Google Tag Manager will allow you to deploy tags for tracking purposes so that you can track the analytics on your website. You will also setup a Optimize tag for the A/B test on your website. The first step is to create a tag for Google Analytics and then you will setup a tag for Google Optimize. Then you will need to place the GTM installation tags onto your website.
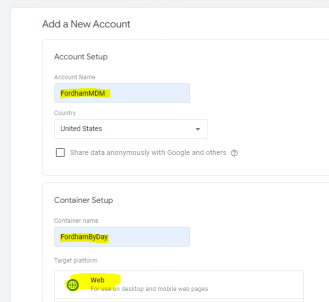
1. Setup new account
Name the account and container similar to what your website and GA account are. Select Web as the target platform
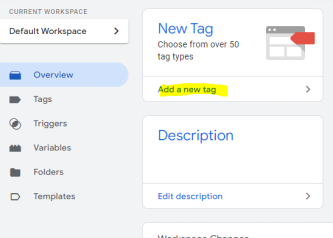
2. Setup GA tag
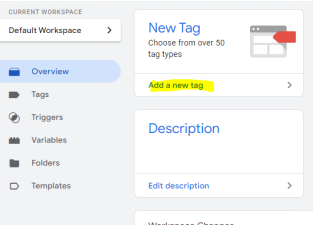
a. In your workspace, select to create a new tag
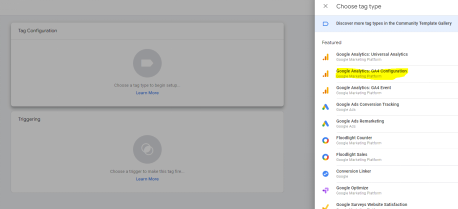
b. In configuration select “Google Analytics GA4 Configuration”
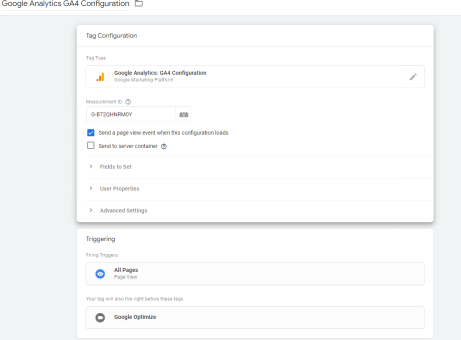
c. Name the tag accordingly as something like “Google Analytics Tag”
d. Input the measurement Id from step 3 in the Google Analytics step into the measurement ID box
e. In the Triggering options, select “All Pages”
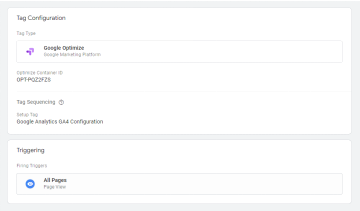
3. Setup Optimize tag
a. In your workspace, select to create a new tag
b. In configuration select “Google Optimize”

c. Name the tag accordingly as something like “Google Optimize”
d. Input the Optimize ID from step 2b in the Google Optimize step into the Optimize Container ID box
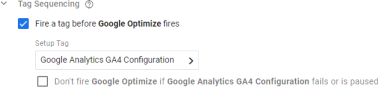
e. Under Advanced Settings->Tag Sequencing select “Fire a tag before Google Optimize fires” and check off the GA tag you step up in step 2 earlier
f. In the Triggering options, select “All Pages”
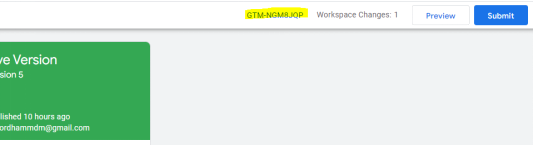
4. Install Google Tag Manager
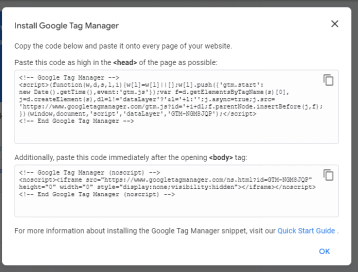
a. You need to edit the HTML of your website to install GTM containers. Retrieve the GTM from the top menu by selecting the GTM ID:
b. You now have the code that you need to place in the header and body of your website:
c. Follow step 2 in Website Setup instructions to install GTM on the Weebly website
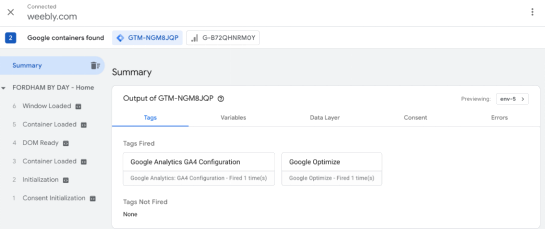
d. Once installed, make sure to preview the two tags you have setup:

Input the website for testing and allow the website to open with a Tag Assistant pop up. Go back to new tab window “Tag Assistant [Connected]” and under Summary->Fires you should see both the Google Analytics and Google Optimize tags have fired.
Google Optimize Setup
Site: https://optimize.google.com/. For this you need to use Google Chrome as your browser and will need to install the Google Optimize plug-in extension.
1. Setup Account
Create account and name it similar to the GA and GTM accounts you setup earlier
2. Link to GA and retrieve Optimize Container ID
a. Select the container you just created and go to settings
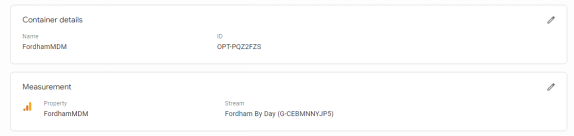
b. Copy the Optimize Container ID – this is used for step 3d in the Google Tag Manager setup
c. Click Link to Analytics account under Measurement to link the Optimize account to the Google Analytics account you previously setup
3. Create Experience
a. Exit settings and select create an experience to setup the A/B test
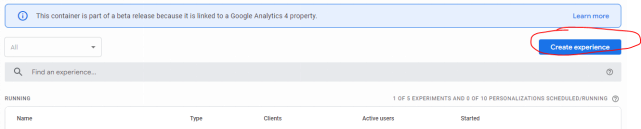
b. Name the experience and set the base homepage for the A/B test:
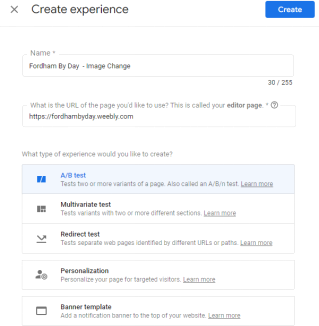
4. Setup the A/B test
a. In the targeting and variants section, add a variant:
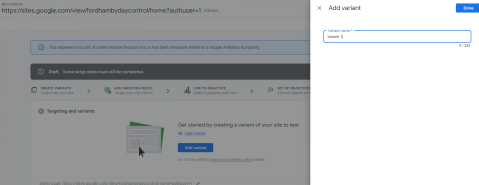
c. Once named, select Edit on the variant that was added. You will need to have the extension to edit the page for the variant type. Follow instructions to have the Chrome extension installed so you can make the variant changes directly using Google Optimize.

d. This will take you to a webpage editor that allows you to change text, colors, images etc. You will need to adjust the website per what you are testing. Make sure to adjust only one variable.
e. Under Measurement and objectives, setup the main objective. Link to your Analytics should already be done. Select your main objective

f. Check that you have Optimize setup completely. You need to have the extension and the Optimize tag on your website (either directly with the site html or use Google Tag Manager)

g. Once you have all settings verified, click Start to start running the A/B test
