CS5281 Internet Application Development More On HTML 1
CS5281 Internet Application Development
More On HTML

HTML Lists
• Lists are used to display data in an ordered format.
• There are several mechanisms for specifying lists of information.
– Unordered / Bullets
– Ordered
• Advantage: for ordered list, there’s no need to renumber items after the new ones are inserted
• List can be recursively defined (list-of-lists)
Creating Unordered Lists
• Unordered lists are generally used to list any series of items that have no particular order.
• Items in unordered lists have solid round bullets by default.
<ul>
<li> … </li>
<li> … </li>
…
</ul>

Creating Unordered Lists
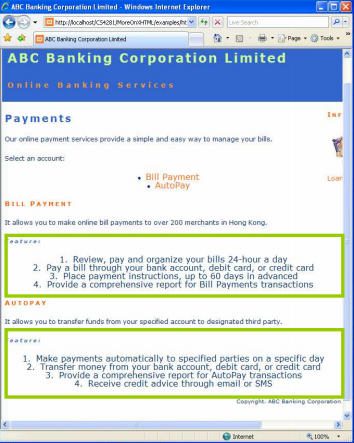
31 <p>Select an account: </p>
32 <ul>
33 <li><a href="#billPayment">Bill Payment</a></li>
34 <li><a href="#autopay">AutoPay</a> </li>
35 </ul>
...
39 <p >Feature:</p>
40 <ul>
41 <li>Review, pay and organize your bills 24-hour a day</li>
42 <li>Pay a bill through your bank account, debit card, or credit card </li>
43 <li>Place payment instructions, up to 60 days in advanced </li>
44 <li>Provide a comprehensive report for Bill Payments transactions </li>
45 </ul>
Creating Ordered Lists
• Ordered lists contain information where order should be emphasized.
Creating Ordered Lists
40 <p>Feature:</p>
41 <ol>
42 <li>Review, pay and organize your bills 24-hour a day</li>
43 <li>Pay a bill through your bank account, debit card, or credit card </li>
44 <li>Place payment instructions, up to 60 days in advanced </li>
45 <li>Provide a comprehensive report for Bill Payments transactions </li>
46 </ol>
... Numbering start from 1 again
50 <p>Feature:</p>  To specify the first index, use <ol start="???">
51 <ol>
52 <li>Make payments automatically to specified parties on a specific day </li>
53 <li>Transfer money from your bank account, debit card, or credit card </li>
54 <li>Provide a comprehensive report for AutoPay transactions </li>
55 <li>Receive credit advice through email or SMS </li>
56 </ol>
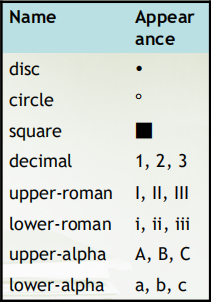
Setting the Bullet Style
• The bullet style of <ol> and <ul> can be set by the CSS using the style attribute.
• Syntax:
– <li style = "list-style-type: XXXX;">
<ul>
<li style="list-style-type: square;">one</li>
<li style="list-style-type: circle;">two </li>
<li style="list-style-type: disc;">three </li>
</ul>
■ one
○ two
● three
Reference: http://www.w3.org/TR/REC-CSS2/generate.html#propdef-list-style-type
Setting the Bullet Style
<ol>
<li style="list-style-type: decimal;">one</li>
<li style="list-style-type: lower-roman;">two </li>
<li style="list-style-type: lower-alpha;">three </li>
</ol>
1. one
ii. two
c. three
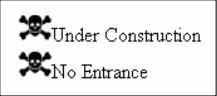
Creating Your Own Bullets
• Your own graphics, in GIF, JPEG, and PNG formats, can be used as bullets.
<ul>
<li style="list-style-image : url(test.gif);"> Under Construction </li>
<li style="list-style-image : url(test.gif);"> No Entrance </li>
</ul>
list-style-image: <filename>
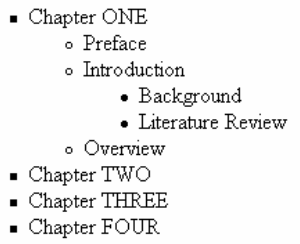
Indented content / list of lists
<ul style="list-style-type: square;">
<li> Chapter ONE </li>
<ul style="list-style-type: circle;">
<li>Preface</li>
<li>Introduction</li>
<ul style="list-style-type: disc;">
<li>Background</li>
<li>Literature Review</li>
</ul>
<li>Overview</li>
</ul>
<li> Chapter TWO </li>
<li> Chapter THREE </li>
<li> Chapter FOUR <li>
</ul>
HTML Forms
• Forms enable users to send files / information from browser to server page (PHP/JSP/ASP…)
– Feedback / registration
– Take a survey
– Message board
– Online shopping / bidding
– User login
– Write webmail
– File upload…etc.
Form: Structure
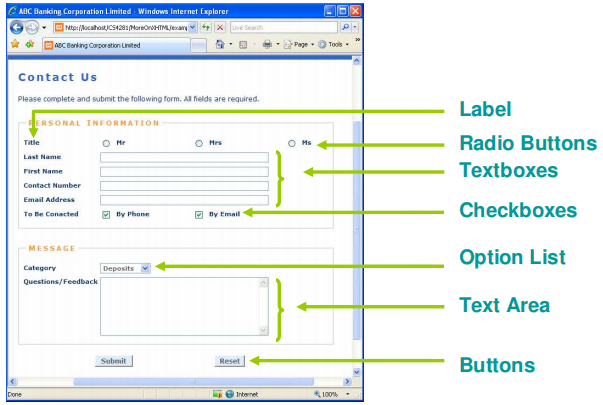
• It consists of form elements, including fields, labels, and buttons, that the visitor sees on the page.
Form: Processing Script
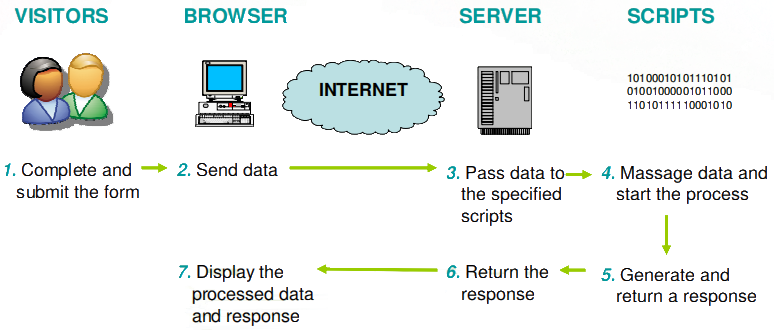
• How it works
1. The users fills out the form and activates the submit control.
2. The browser (user agent) sends the form data to the server
3. The server recognizes the processing call and passes the associated data to the specified server-side scripts.
4. The processing script massages the data and starts the process.
5. The script generates and return a response to the server.
6. The server passes the processed data and response back to the browser.
7. The browser displays the processed data and response to the user.
Form: Processing Script
Form Basic Syntax
• A form contains three important components:-
– <form> Tag, which indicates the server-side URL to which form data will be sent. (URL is compulsory.. at least for (X)HTML before ver. 5)
– Different types of input elements (boxes, radio buttons..etc.)
– Submit Button, sends the data to the script on the server.
1 <form method=" … " action=" … " enctype=" … " >
2
3 ... form elements ...
4
5 <input type="submit" value="submit" />
6 </form>
Form Basic Syntax
• Line 1, Action Attribute
– It specifies a URL to which form data will be submitted.
• A processing script on a server
• An email address
• Line 1, Method Attribute
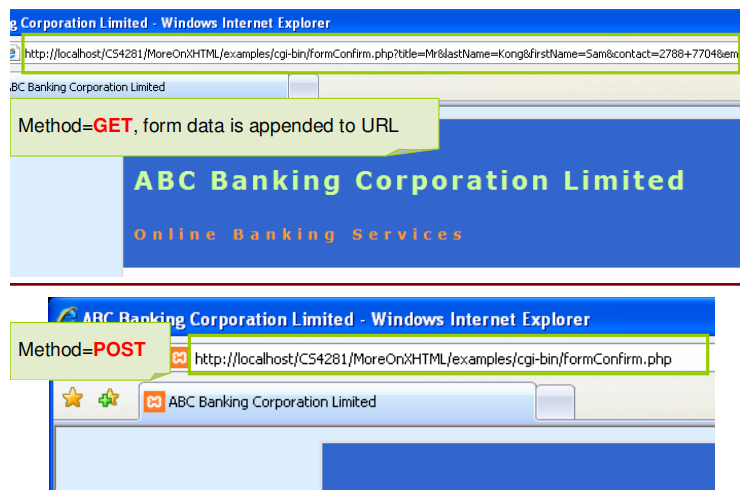
– It determines how form data will be submitted.
– The two options for this attribute are GET and POST .
• GET option, appends form data as one long string to the URL specified by the action attribute
• POST option, sends form data as a transmission separate from the URL specified by the action attribute
– The default option is the GET.
– The preferred option is POST, because it allows the server to receive the data separately from the URL.
– POST is better if the form consists of binary file attachment.
Form Basic Syntax
• Line 1, Enctype Attribute
– It specifies the Multipurpose Internet Mail Extensions (MIME) type of the data being submitted.
– Usually you may omit it and accepts the default, but you need to set it explicitly if you’re uploading files
– The default value is application/x-www-form-urlencoded, which uses the following conventions.
• All spaces are converted to plus signs (+).
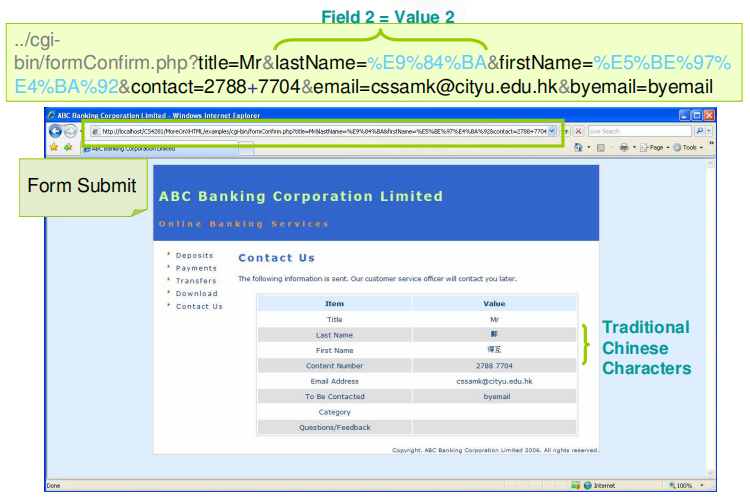
• Non-alphanumeric characters are represented by their ASCII code, that is as a two-digit hexadecimal preceded by a percent sign (%).
• Each field name except the first is preceded by an ampersand (&).
– Another encoding is multipart/form-data.
• It encloses the data in a form as several parts of a single document.
• It is normally used to send binary data files, or files that contain non-textual characters.
Form Basic Syntax
All field values can be read from the URL when the GET option is used.
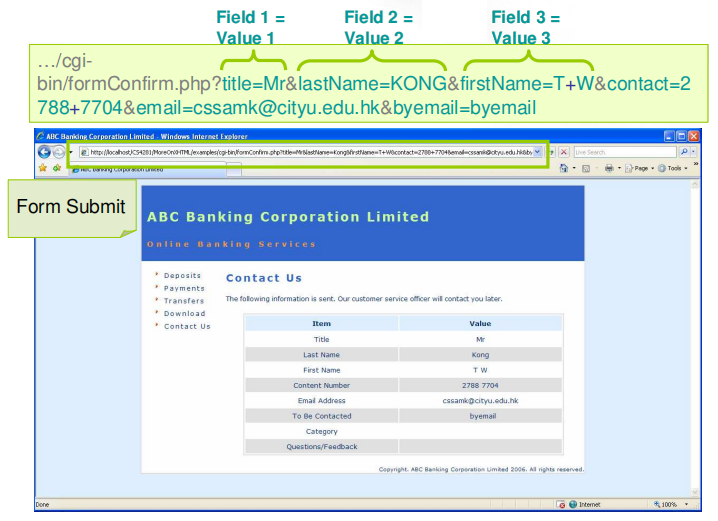
All field values can be read from the URL when the GET option is used.
Non-alphanumeric characters are represented by their ASCII code.
Form Basic Syntax
• Line 3, Form Elements
– They can be the following elements that visitors interact with:-
• Input fields
• Drop-down menu or scrolling lists
• Radio buttons
• Checkboxes
• Buttons
– Details will be discussed later.
• Line 5, input Element with a type of "submit"
– It is used to create a submit button, which is one of the form elements.
– Visitors can click this submit button to deliver the form to the server.
– You can change the prompt (message) by writing value=“Text”.

Creating a Form
Creating a Form
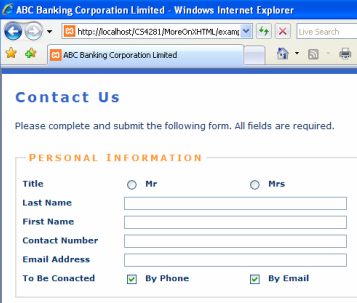
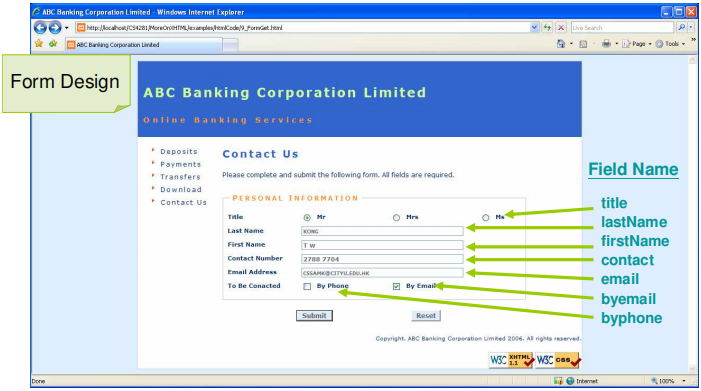
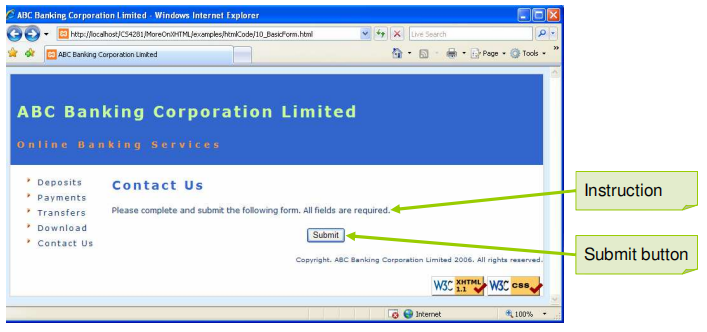
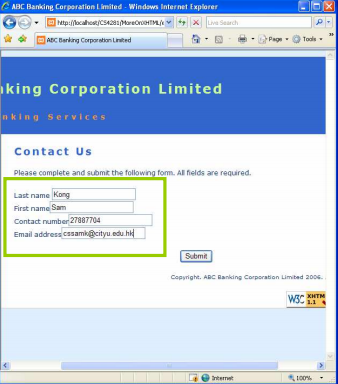
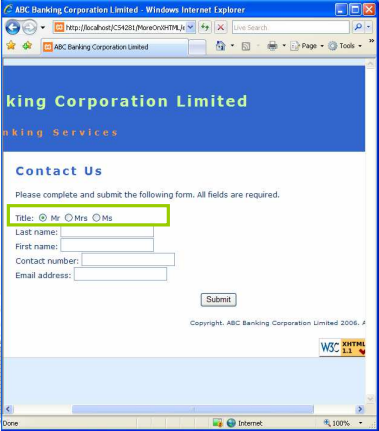
36 <h3>Contact Us</h3>
37
38 <p>Please complete and submit the following form. All fields are required.</p>
39
40 <form method="post" action=". formConfirm.php"
enctype="application/x-www-form-urlencoded">
41 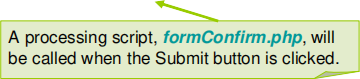
42 <!-- form elements -->
43
44 <input type="submit" value="Submit" />
45 </form> 
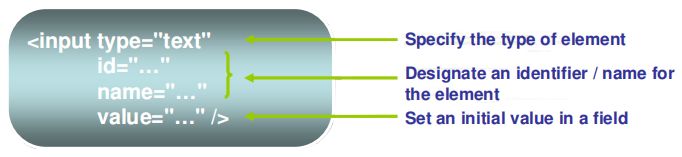
Creating Text Boxes
• Text boxes contain a single line of free-form text.
• Visitors can enter anything in the box.
• Entered data will be stored in the value attribute.
• The value will be sent to the server when the Submit button is clicked.
Creating Text Boxes
40 <form method="post" action="formConfirm.php" >
41
42 <!-- form elements -->
43 <p> 
44 Last name <input type="text" id="lastName" name="lastName" value="" />
45 <br />
46
47 First name <input type="text" id="firstName" name="firstName" value="" />
48 <br />
49
50 Contact number <input type="text" id="contact" name="contact" value="" />
51 <br />
52
53 Email address <input type="text" id="email" name="email" value="" />
54 <br />
55 </p>
Name Attribute
• The name associates with the data when passed back to the server.
• Guideline for selecting a good and useful name:-
– Make the name meaningful
– Start the name with an alphabetic character
– No spaces in name
– Avoid using Asian/foreign character name (e.g. Chinese/Japanese/Thai)
Creating Password Boxes
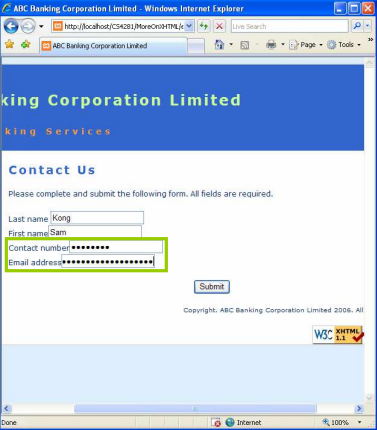
• Like text boxes, password boxes contain a single line of text.
• The difference is that whatever is typed in the password boxes is hidden by asterisks (*).
• It prevents shoulder surfing when visitors type in their confidential information.
• The information is not encrypted when it is sent to the server.
<input type="password"
id="…"
name="…"
value="…" />
Creating Password Boxes
40 <form method="post" action="formConfirm.php" >
41
42 <!-- form elements -->
43 <p>
44 Last name <input type="text" id="lastName" name="lastName" value="" />
45 <br />
46
47 First name <input type="text" id="firstName" name="firstName" value="" />
48 <br />
49
50 Contact number <input type="password" name="contact" value="" />
51 <br />
52 
53 Email address <input type=" password" name="email" value="" />
54 <br />
Creating Radio Buttons
• A group of radio buttons (same name) provides more than one options
• Only one radio button can be selected at once.
• The value (data) will be sent to the server if the radio button is checked.
• The keyword checked can be used to make the radio button active by default when the page is opened.
<input type="radio"
id="…"
name="…"
value="…" />
Creating Radio Buttons
40 <form method="post" action="formConfirm.php" >
41
42 <!-- form elements -->
43 <p>
44 Title: 
45 <input type="radio" id="mr" name="title" value="Mr" checked />Mr
46 <input type="radio" id="mrs" name="title" value="Mrs" />Mrs
47 <input type="radio" id="ms" name="title" value="Ms" />Ms
48 <br /> 
49
50 Last name <input type="text" id="lastName" name="lastName" value="" />
51 <br />
52
53 First name <input type="text" id="firstName" name="firstName" value="" />
54 <br />
2021-01-30