Assignment 2 - Developing database using Microsoft SQL Server
Hello, dear friend, you can consult us at any time if you have any questions, add WeChat: daixieit
Assignment 2 - Developing database using Microsoft SQL Server
Total points: 100
The objective of this assignment is to learn how to build and access a database using Microsoft SQL server. To avoid unnecessary try-and-error effort, it is essential to review the corresponding lecture note and book chapters on SQL, and learn and practice Microsoft SQL tutorial before starting doing the assignment.
Mark distribution:
|
1 |
Table creation |
20 points |
|
2 |
Relational diagram and integrity control |
20 points |
|
3 |
Sample data entry |
10 points |
|
4 |
Information search query |
40 points |
|
5 |
Report on learning experience |
10 points |
Note: You can download and print out Tutorial for Microsoft SQL from avenue course web site. Following the guidelines you can do the similar tasks in this assignment much easier. The help function from Microsoft SQL Server is also very useful.
A consulting company stores data to track all charges to project. The charges are based on the hours each employee works on each projects. Each employee may be assigned to work for many projects and each project may have many people assigned to work with. A project is managed by only one employee and one employee may manage no project or many projects.
The relational database structure and contents are shown below:
Relational Schema
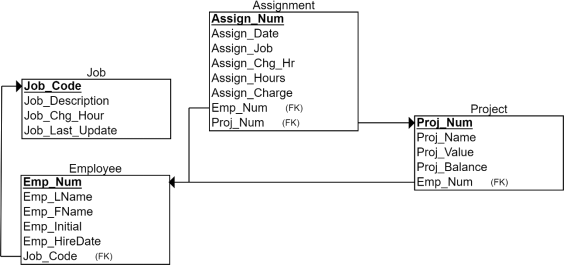
Table: Job
Table: Employee
Table: Project
Table: Assignment
TASKS
1. Write and run SQL statement to create above tables using Microsoft SQL server.
Use the above table names and field names exactly in upper case in order to make assignment easy to implement. Please do not use space in table names and field names. Based on the data showing above, specify the appropriate data type for each column. For instance, for the column JOB_CHR_HOUR in JOB table, you may use data type NUMERIC(6, 2), which means you can have 6 digits of number including 2 decimal digits, the value can be entered is up to 9999.99. For JOB_CODE in JOB table, you may define the data type as INT, NUMERIC(3,0), or CHAR(3) (if you enter and store a job code starts from 0, such as '002'). You need to make sure that the data type of the primary key JOB_CODE in JOB table should be the same with the corresponding foreign key JOB_CODE in EMPLOYEE table and ASSIG_JOB in ASSIGNMENT table. This rule applies for all foreign keys. When you write Create statement for each table you need to specify primary key and foreign keys in your table definition statement. Here is an example:
CREATE TABLE JOB(
JOB_CODE INT NOT NULL,
JOB_DESCRIPTION VARCHAR(25),
JOB_CHG_HOUR NUMERIC(6,2),
JOB_LAST_UPDATE DATE,
PRIMARY KEY(JOB_CODE));
Please notice that ASSIGNMENT table does not meet third normal form. You may design it as is, or normalize it as the ASSIGN table by writing the following table definition query:
CREATE TABLE ASSIGN (
ASSIGN_NUM INT NOT NULL,
ASSIGN_DATE DATE,
PROJ_NUM INT,
EMP_NUM INT,
ASSIGN_HOURS NUMERIC (5,1),
PRIMARY KEY (ASSIGN_NUM),
FOREIGN KEY (PROJ_NUM) REFERENCES PROJECT,
FOREIGN KEY (EMP_NUM) REFERENCES EMPLOYEE);
Run table creation statements and make sure all tables are created successfully. You may run table creation statements one by one. Note that when defining a foreign key in a table, the corresponding table must already be defined with a column corresponding to a unique constraint. For example, in above query, ASSIGN table can only be defined after defining PROJECT and EMPLOYEE tables because ASSIGN table has foreign keys referring to the columns of these two tables. Save the queries and report it in your assignment report. Notice that the create table statement can only run once. If you want to change your table design, it is better to drop the table first, then create a new one.
2. Using database diagram to create and show the relationships between tables. Specify relations and table constrains for integrity control. Print out the relation diagram. It is essential to learn and understand what the integrity control is and how different integrity control should be used before set up the integrity control. For instance, for reference integrity: foreign key constrains (such as deletion restrict or update cascade) that you have established on the links between EMPLOYEE and ASSIGNMENT (or ASSIGN) and the reasons why you implemented them. For entity integrity: primary key constraints that you have defined, and for domain integrity: data type definition for ASSIGN-DATE assures that all records in the table conform to “Date” type. Report all the integrity control you have established, i.e. entity, reference and domain integrity control.
3. Enter sample data for the tables you created. You can enter data by using a SQL Insert statement, or via wizard by editing top 200 rows. Be careful not to violate your integrity control when you enter data. For instance, you need to enter JOB data before entering EMPLOYEE data. You need to enter PROJECT data before entering the ASSIGNMENT data for that project.
For entry date, please use four digits for the year. For example, enter date '20-Nov-2017' or '2017-11-20' rather than '20-Nov-17'. Please remember you cannot use INSERT query to insert the same data you have already inserted. In other words, you cannot run the same insert query with the same data twice.
Please notice that in the ASSIGNMENT table, ASSIGN_JOB can be determined by EMP_NUM. Also ASSIGN_CHG_HR can be determined by ASSIGN_ JOB and ASSIGN_CHARGE can be calculated by ASSIGN_CHG_HR x ASSIGN_HOURS. ASSIGNMENT table does not meet third normal form and there is data redundancy for data entry and storage. But in practice, such data can be automatically copied from JOB table and EMPLOYEE table when assignment was made. With this design, the historical assignment data can be saved without restriction of later change of job code for an employee or hourly charge for a job code.
Another approach is that you create an ASSIGN table first and insert data into it, then use the SQL query to create a virtual ASSIGNMENT table to see and use the data. In this case, the data in the virtual ASSIGNMENT table will be automatically updated when ASSIGN table is updated.
You could insert multiple records in one statement to avoid writing the insert statements several times. See below:
INSERT INTO ASSIGN VALUES (1001, '22-Mar-2018', 18, 103, 3.5), (1002, '22-Mar-2018', 22, 117, 4.2)…;
CREATE VIEW ASSIGNMENT AS
SELECT ASSIGN_NUM, ASSIGN_DATE, PROJ_NUM, EMPLOYEE.EMP_NUM, JOB.JOB_CODE AS ASSIGN_JOB, JOB_CHG_HOUR AS ASSIGN_CHG_HR, ASSIGN_HOURS, JOB_CHG_HOUR *ASSIGN_HOURS AS ASSIGN_CHARGE
FROM ASSIGN, EMPLOYEE, JOB
WHERE ASSIGN.EMP_NUM = EMPLOYEE.EMP_NUM AND
EMPLOYEE.JOB_CODE = JOB.JOB_CODE;
You may check if the data in the virtual ASSIGNMENT table is the same as expected.
To make sure your work is different from other students, please enter your name as an employee in EMPLOYEE table and enter your job assignment in one project in ASSIGNMENT table. Report the insert statement you used to enter your own data.
4. Design queries for information search
a. Create and run a query to list employees who were hired before the year 1995.
b. Create and run a query to list job code, job description, and employee last name, first name sorted by job description and employee last name.
c. Create and run a query to list the name of employees who were assigned to the Evergreen project.
d. Create and run a query to list the project name, the number of employees worked for the project, and the total hours and total charges assigned to each project sorted by project name.
You need to save each query. You may use a Snipping tool to copy and paste your screenshot to show the query and the query result. Make sure the result of the query is correct and readable.
5. Write a learning report for the above tasks with sample results. Combine all the results in a single report. Report how many hours you have spent in this assignment, what difficulties you faced, and what you have learned. If you used generative AI to assist you to do the assignment, explain how you used AI and what part was generated by AI. Make sure you insert your name and student ID on the first page.
Note:
1. The assignment should be done individually. You are allowed to discuss with other students on how to do the assignment, but you must implement it in your own ProjDB database and cannot copy other student’s assignment report.
2. The report should be saved in Microsoft word file. The file name should be ASS2+section number + your mac id. For instance, if you are in section C1 and your mac id is stevej, then your file name will be ASS2C1stevej
3. The assignment should be submitted by the due date as indicated in the class schedule of the course outline and the drop box of assignment 2 in Avenue.
4. Please submit your assignment online to avenue course web site http://avenue.mcmaster.ca.
2026-02-27