ANTH 005 Exercise 1: Introduction to GIS
Hello, dear friend, you can consult us at any time if you have any questions, add WeChat: daixieit
ANTH 005 Exercise 1: Introduction to GIS
Due in section & online by 4/18/2025
Please download a free version of Google Earth Pro at: https://www.google.com/earth/about/versions/ and bring your laptop to class with it already installed.
Introduction:
This lab offers an introduction to Geographic Information Systems (GIS). Archaeologists use GIS* applications to facilitate the organization of diverse arrays of spatially-arranged data – maps, aerial photographs, satellite images, data collected on the ground through reconnaissance and systematic survey, etc. Once a GIS database has been assembled, it can be used as a basis for spatial analysis – the investigation of spatial patterning between archaeological sites and features. GIS is particularly useful as a tool for studying large regional settlement systems but can also be used at the level of site excavation and is one of the best available ways to create digital maps.
The most common suite of professional GIS software applications is the ArcGIS package manufactured by ESRI (Environmental Systems Research Institute). However, basic map-making and now even some basic spatial analysis are possible using Google Earth, a free application you can download off the internet. The backbone of Google Earth is a massive database of sub-meter resolution commercial satellite images from Digital Globe's Quickbird satellite – the highest resolution imagery currently available on the market. In this lab, you will do the following:
1. Learn basic navigation techniques in Google Earth
2. Get to know UCR Campus and archaeological sites a bit better from the air
3. Learn how to interpret satellite imagery to recognize ancient anthropogenic features on the landscape
Part 1: Basic Navigation Techniques in Google Earth
You may already be familiar with the Google Earth interface and have used the program to thoroughly comb the surface of the globe from Isfahan to Iguazú. But if you don't yet have any experience working in Google Earth, don't worry: it's pretty straightforward stuff. Also, congratulations: you're about to encounter one of the most efficient procrastination devices around. And if you're studying archaeology, it's easy to write off the time you spend messing around in Google Earth as critical training in GIS skills – and even research reconnaissance.
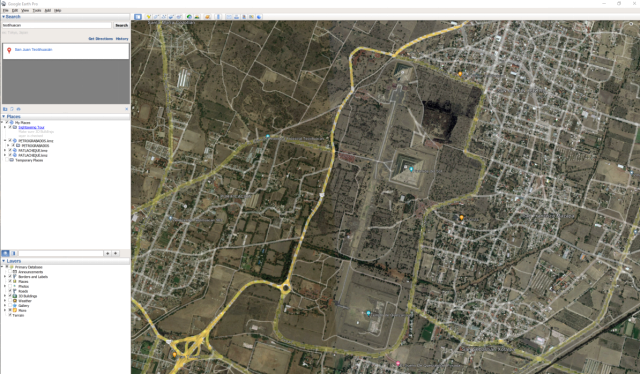
1. Open Google Earth. The window is divided into a three-part toolbar at left and a viewer at right.
2. In the Search toolbar, type in “University of California, Riverside”
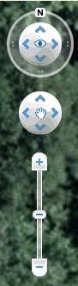
3. In the upper right hand corner of the viewer, you will find a schematic image of a compass that combines Google Earth's navigation tools into a nifty console (see on the left). Click the “+” at the top of the vertical bar to the right of the compass to zoom in; then click the “-” at the bottom of the bar to zoom out. (You can also hold down the SHIFT and CONTROL keys and use your keyboard's up and down arrows to zoom in and out.) Remember, you can always reset your view if you get too disoriented to the North to up by pressing the “n” key, and to a top-down orientation by pressing “u”. If you want a top-down and North up view, just press the “r” key.
4. Click the arrows in the interior of the compass (or click, hold, and toggle the nob at the compass center – or use the keyboard arrows, without holding down control) to surf in the horizontal plane. Notice how the latitude and longitude readings at the bottom of the window change, indicating the coordinates of the center of the image, as you surf back and forth.
5. Click and hold the circular “rim” of the compass and toggle it clockwise and counterclockwise to spin around the central point of the satellite image. When you're done, click the “N” on the compass rim to realign your view.
6. Make sure that “3D buildings” is turned on in the “primary database” layer of the layers sidebar. Then, click on the bar above the compass and drag the tab at its center to the right to tilt your view until your eyes are level with the “ground” of the satellite image. (You can also do this by holding down the SHIFT key and using the keyboard arrows.) Find the Tomas Rivera Library, UC Riverside; it has a 3-D model of this structure embedded. Try getting to the ground level and looking at the building. Can you go inside?
7. In the toolbar at the top of the Google Earth window, you'll find an icon that looks like a thumbtack. Click this icon and the placemark directly over the Bell Tower. A new toolbar window has opened. Name your new placemark and press “okay.”
Part 2: Putting Yourself on the Map
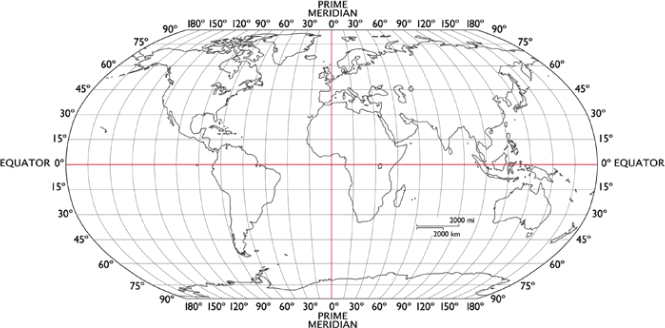
GIS coordinates are usually given as a sequence of three numbers; degrees, minutes and seconds based on the latitude and longitude from the equator (see above).
1. Using the Viewing Controls, find the following local sites. Move your cursor over the center of each site and find the coordinates for each (at the greatest detail possible).
a. Tomas Rivera Library (turn on “3D buildings” in the Layers sidebar for fun)
Latitude: Longitude:
b. Orbach Library
Latitude: Longitude:
c. Your favorite location on campus:
Latitude: Longitude:
Now fly over to the National Mall in Washington D.C.
d. National Museum of Natural History
Latitude: Longitude:
e. The White House
Latitude: Longitude:
f. Your favorite museum/memorial in D.C.:
Latitude: Longitude:
Do you see the ruler on the top of the tool bar? This tool can be used to measure distances between two points on the map. Click one on the starting location and a second time on the end point. Then change the map length measurement to Meters on the drop down menu. Tell us the distance/size of the following:
A. Distance between the Capital and the Washington Monument (m):
B. The width of the Pentagon (m):
Part 3: Interpreting Satellite Images
1. Fly to the Dahshur pyramids of Sneferu, in Egypt and zoom out to around 16.5km above ground (look at eye alt on lower right). If your eye alt is set to feet, simply go to Tools>Options, find the tab 3D View and change the Units of Measurements to Meters, Kilometers. You will see two of the oldest pyramids in Egypt, the Red Pyramid and the Bent Pyramid. (For MAC, go to Google East Pro>Preferences, find the tab with 3D View and change the Units of Measurements to Meters, Kilometers)
The rectangles of different hues that seem to overlay the landscape here are the borders of individual high resolution satellite images, which have been georeferenced (“tacked” to their proper coordinates) and mosaicked together by a bunch of overpaid people with amazing stock options at Google, Inc.. Why do you think the individual satellite images vary in hue and brightness?
Now zoom out even more (around 80km) and click on the Clock with a little arrow going counter clock-wise along the toolbar. This tool allows you to look at historical satellite photographs. Try playing with the bar to look at this same region across time. What are some of the variations you notice on the landscape in different times?
2. Take a closer look at the landscape around Dahshur. Locate the Nile River and note the stark contrast between the green vegetation near the river and the desert beyond it. Note the locations of Giza and the Step pyramid as well (just north of Dashur, look up Giza and step pyramid if hard to find by entering in search bar).
a. What do the locations of the Dahshur, Giza, and step pyramids have in common?
b. Why do you think all of these sites are found in similar locations with respect to the river course?
3. Fly to Archaeological site, Monte Alban, Mexico (Zona Arqueologica de Monte Alban)
Monte Alban was the largest city of the Zapotecs, a Formative period polity in Mesoamerica, built as novel settlement on a mountaintop overlooking three fertile valleys. Much of Monte Alban has been excavated by archaeologists, and most of the site's buildings have been restored. Spin around to the north side of the site. Tilt the Viewer angle to better see the northern face. Note how the trees on this side appear to be growing in curving horizontal lines. Play with the satellite images to find a good shot where the vegetation cover conveys these lines clearly.
a. What archaeological features do you think underlie these lines of trees?
b. Why might such features cause trees to grow in this way?
4. The Zapotec elites tended to build their houses and temples on mountaintops. Locate the large ancient elite satellite community just to the north of Monte Alban. (Hint: look for another mountaintop settlement with traces of ancient architectural features.) Unlike Monte Alban, this site has not been extensively excavated, but you should still be able to make out some rectilinear architecture. List the Latitude and Longitude of the center of the site here:
Latitude: Longitude:
Do you find similar alterations along the slopes of this site? Where?
5. Now fly to Cerro Corbacho/Cerro Corvacho in Peru.
This site has a distinctive surface appearance; what might account for the thousands of small dark spots that cover its surface?
Part 4: Explore Google Earth!
Now it is time for you to do the exploring! Pick and archaeological site, anywhere in the world that you would like to visit someday (has to be one we have not searched yet, and please do not use Machu Picchu, Teotihuacan, or Chichén Itza). Then imbed a ground picture that you find on the web, or another source, to your place mark. Include with the ground photo on your own description of the place (how big is the site based on the measuring tool, when it was used, and who lived there or used it). Do not copy this off the web directly, it must be in your own words! Also include a description of what you observe when viewing the landscape where the site is located. What does the location of the site suggest about its function? For example, do you believe that it was a defensive site, situated in an area ideal for agriculture, an important crossroad in a trade network, or used as a palace for a king? Buen voyage!
Directions:
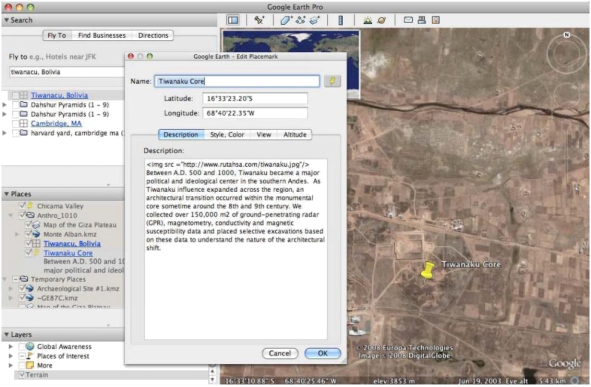
1. Under the “Add” tab select “Placemark”, a dialog box will open
2. Drag the Placemark to exactly where you want it to go
3. Change the name from “Untitled Placemark” in the dialog box to the name of the site
4. Find a photo on the web of the site and right click on the photo.
5. Select “Copy Link Address”
6. You will now go back into Google Earth and you will need to type into the description box:
7. paste link here”>
8. Hit “return”
9. Add your personal site description and information below the link (see above, part 4, for directions on what to include)
10. Hit “ok”
11. Locate your placemark on the left-hand side of the screen and right click on it.
12. Select “save place as” and save it as a .kmz file to the desktop or the file folder you are working in.
13. Upload the file to the CANVAS under Assignments.
Other things to try out in Google Earth
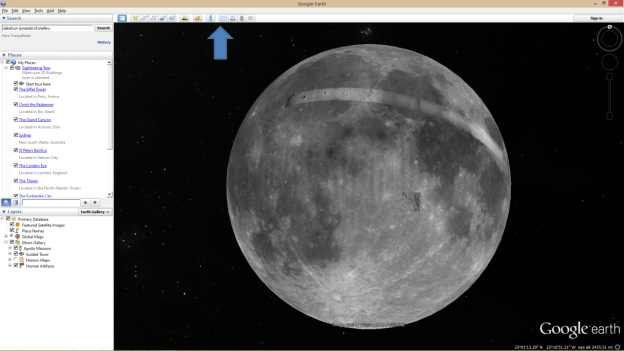
Did you know Google Earth has imagery for not just for Earth, but also for the sky, Mars, and the Moon? Find the yellow Saturn like icon on the tool bar (see image below). Try looking at each of these settings…happy exploring!
2026-01-15