MG-GY 6203 - Data Visualization for Business Intelligence Assignment 3
Hello, dear friend, you can consult us at any time if you have any questions, add WeChat: daixieit
MG-GY 6203 - Data Visualization for Business Intelligence
Assignment 3
You will need the following data sets (available on Brightspace)
1. Citibike_Tripdata.xlsx
2. Hex-States-Shapefile.zip
3. India_Population.xslx
4. Office_Destination.xlsx
5. Superstore.xls
• Submit your work on Brightspace by 11:59pm on Sunday, October 19.
• For each section of the assignment (corresponding to a different dataset), submit a different Tableau packaged workbook.
• Each section has a "Customize it" part. Create and submit a PowerPoint (.ppt) presentation (20-25 slides altogether) to show the different visualizations you generate through the "Customize it" parts, and share your insights from those.
You can be selective while putting visualizations in the PowerPoint. For example, if a filter can generate 10 visualizations, you can choose 2-3 most important/interesting ones for the PowerPoint, and give a reference to the Tableau file for others.
• For each "Customize it" part, you must also provide an explanation in the PowerPoint (add a Notes box on each slide for this) as to which filters/fields/parameters, etc. you created.
• You will be penalized if you do not submit the files in the correct format.
1a. Point Map
Using Citi Bike dataset
1. Connect Citibike_Tripata.xlsx in a new Tableau workbook.
2. Make sure that Start Lat, End Lat, Start Lon, End Lon all have the correct geographical role.
3. Create new calculated fields named Start Point and End Point using built in MAKEPOINT function, using Start Lat, Start Lon and End Lat, End Lon.
4. Add Start Point to the canvas.
5. Add Start Station Name to the label mark.
6. Add Count of Ride Id to the color mark.
7. Add a copy of Count of Ride Id to the size mark.
8. Set the mark to circle.
9. Set opacity to 75% and add a border.
10. Customize it: Create at least two filters and two sets to add additional features to the map.
1b. Origin-Destination Map
Using Citi Bike dataset
1. In the Citibike workbook create a new worksheet.
2. Add a new calculated field "Route" using the inbuilt MAKELINE function on Start Point and End Point.
3. Add Route to the canvas.
4. Reduce the size mark as much as possible, change the color mark to black, set opacity to 25%, and remove borders (if any).
5. In MapLayers change the style to Outdoors and washout to 35%.
6. Add Start Station Name and End Station Name to the details mark.
7. Customize it: Create at least two filters and two parameters to add additional features to the map.
2. Hex Graphics Map
Using office destination dataset and Hex state shape file
1. Download and unzip Hex-Sates-Shapefile.zip.
2. Make a spatial data connection to HexStates.shp.
3. Check that State and StateAbbr have a geographical role.
4. Add a connection to the OfficeDestination dataset.
5. Drag Superstore_Orders sheet to the canvas (in Data Source tab) and create a relationship on State between the datasets.
6. Create a new Sheet and add Geometry to the canvas.
7. Remove all details from the MapLayers so the background is plain.
8. Add StateAbbr to the label mark and State to the tooltip mark.
9. Customize it: Create at least four meaningful calculated fields, and use them in your visualization for comparison among the states.
3. Filled Map
Using India Population dataset
1. Connect India_Population.xlsx in a new Tableau workbook.
2. Check that State is recognized as geographic data.
3. Give District the Geographic Role of County.
4. Right click on State and create a geographic hierarchy "India Map".
5. Add District to the India Map hierarchy under State.
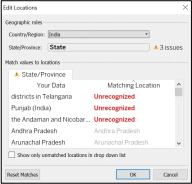
6. Add State to the canvas and create a filled map. If the locations are not recognized by Tableau, then click on "unknown" at the bottom of your Map, and do the following.
7. Edit Locations and set Country/Region to India.
8. Manually edit locations for the States that are still unrecognized (as far as possible).
9. Remove unnecessary items from Map Layers.
10. Create a copy of the map and repeat the above process to show Districts on the map.
11. Create a dual axis map to show both States and Districts.
12. Customize it: Create at least two meaningful calculated fields, two parameters, and two "group" fields for comparison among the states/ districts.
4. Map with Tooltip
Using Superstore dataset
1. Connect Superstore.xls in a new Tableau workbook.
2. Create a new calculated field "Profit Ratio" as SUM([Profit])/SUM([Sales]).
3. Create a filled map with US states and color them by Profit Ratio.
4. In a new sheet, create a sorted Bar Chart of Profit Ratio by Cities.
5. Insert the Bar Chart sheet as a tooltip in the US states Map.
6. Customize it: Create two other meaningful chart insertions in the US states Map tooltip.
2025-10-22