PLS 021 Autotutorial 1: Photo Editing – Creating a Business Card
Hello, dear friend, you can consult us at any time if you have any questions, add WeChat: daixieit
Autotutorial 1: Photo Editing – Creating a Business Card
Due: 11 Days After Your Registered Lab Section at 11:55 PM
Total Points: 20 Course: PLS 21
Assignment Overview
This autotutorial guides you through using Pixlr.com, an online image editing tool, to create a personalized business card. You will complete three major editing steps: (1) Replace background, (2) Add a watermark logo, and (3) Insert business card text.
Note: You must use Pixlr.com to receive full credit. Autotutorials are weighted more than homework assignments.
Learning Objectives
• Understand raster image editing principles.
• Edit backgrounds and layers using Pixlr.
• Add watermarks and formatted text to an image.
• Submit images in proper format with naming conventions.
Background
Before we begin the exercise, there is some background information that you will need to know. Image files come in many formats.
Image files are separated into two broad categories. There are raster based images and vector based images. Raster images are those that consist of individual pixels (dots) to make up the image. Vector images use lines and shapes to create the image. For the purpose of this exercise, we will ignore line art (vector based graphics). While there is a place for them in image editing, we will be focusing on photo editing.
As with editing videos, some file formats are better for editing, while others are better for viewing on the web or printing. So, we want to start with the biggest file type possible. We also want to make sure that it is in an uncompressed format. Many file formats compress information to conserve space. Such formats are considered “Lossy”. While the uncompressed formats are considered “Lossless”.
There are pros and cons to each. When posting an image on the web, it is important to consider the size of the file, the number of images, and the depth of color. In computer graphics, color depth or bit depth is the number of bits used to indicate the color of a single pixel in a bitmapped image
Table 1: Characteristics of common image formats
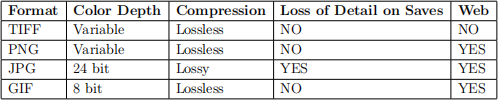
Note: Conversion to GIF suffers from an immediate loss of color depth from 16 million colors to 256. After that there is no further loss. There is an example in the next section.
or video frame buffer. This concept is also known as bits per pixel (bpp), particularly when specified along with the number of bits used. Higher color depth gives a broader range of distinct colors.
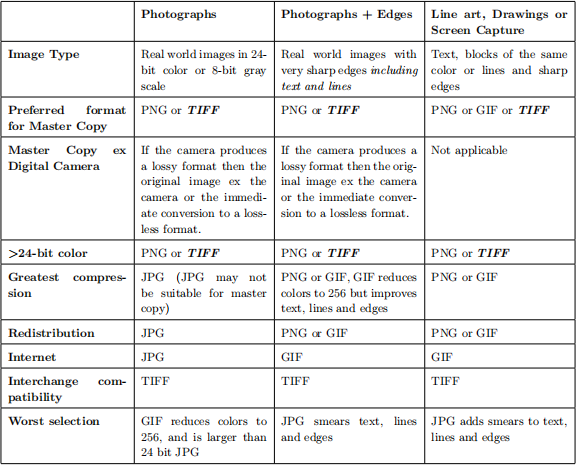
So, files such as TIFF and/or PNG are good for editing. Tables 1 and 2 provide an overview of the core knowledge needed about each file type. Please use it as a resource!
Table 2: Suitability of each format to particular applications
Editing for Print Vs. Web
Images look different on paper than on the computer screen. Thus, they have different requirements. A printed image will need to be of sufficient pixels to be clearly visible at a given size. An image that is 1008 x 576 (pixels) will appear blurry and pixelated when enlarged to 8 x 10 inches (also known as canvas size). Pixelation occurs when the individual dots that comprise the image are clearly visible to the naked eye. On the flip side, the same image printed at a smaller scale (e.g., 4 x 6 inches) will look much better.
Pixel size and canvas size are only two considerations. Color is represented differently on a monitor than through ink/toner/sublimation cartridges. Monitors typically look for Red, Green and Blue (RGB). Yet, most printers are designed to work from Cyan, Magenta, Yellow and Black (CMYK). These settings can make a big difference, especially in print. For large format printers made for poster printing, there are typically six archival-quality ink colors: black, photo black, grey, cyan, magenta and yellow. By working from a CMYK color file, these six colors can add depth that is totally lost in an RGB file. This is why it is important to start with a file that has the largest amount of information and pixels possible.
Editing Image and Canvas Size and Cropping the Image
It is important to be able to change the size of an image, especially for web design. An image consists of two elements. One is the image size. The other is the canvas size. The image size refers to the actual pixels. The canvas size refers to the total area of the image. A canvas size may be set to 1,008 x 576 yet the image size could be much larger. That means that when printed, cropping will occur (cutting away the part of the image that is larger than the canvas). If the image size is smaller than the canvas, the empty areas will be seen as white space.
Because we need to be able edit both the image size and the canvas size, we will use a few specialized tools. We can easily scale an image up or down as needed using the scale tool. While scaling has no effect canvas proportions, it will affect canvas size. However, to change the canvas size to meet our specific needs, we will need to make adjustments in the properties section. To change the canvas size to meet our pixel specifications, we can adjust the width and height dimensions. We can also crop an image to retain only the desired portions, which can be used to resize the canvas without distortions as well. In this assignment, you will need to crop your image so that the canvas is the proper pixel size. This way your image is displayed clearly at the correct pixel size, without distortion.
Layers
Layers are a useful tool in image editing. Layers allow you to create a transparent sheet or overlay that can be placed over other images. This is especially useful when adding or editing your image. It allows you to identify where the edit was done, so you can go back and modify your image easily.
Basically, if you edit an image as only one layer, you will have difficulty changing it’s specific properties, whereas if you can toggle to the layer where you executed a specific operation, it is simple to make your desired edit or adjustment. For this reason, we recommend doing only one operation per layer for this assignment. For example, it is a good idea to have one layer as your background image, a second layer as your foreground image or photo, and a third layer as your manipulated text. Using layers in this way will allow you to adjust each of these information types independently. You will find the best method for you, but there is a lot of flexibility with using layers.
Specific Software for Image Editing
There are many different software options for image editing. The first consideration is to decide what type of image you will primarily be working with. If you are doing photo editing, you will be working with raster image formats. While programs like Corel Draw can handle raster graphics, the industry standard is Photoshop by Adobe. And while Adobe Illustrator is quite good at handling vector graphics, Corel Draw is the industry standard. These are expensive programs and packages that have some high-end features.
But, there are other options out there. In the open source realm, there is GIMP for raster editing and Inkscape for vector editing. Neither is quite as good as Photoshop, although there are many users who can edit at high levels with open source software. For accessibility and uniformity, we will use an online raster editor called Pixlr Editor.
Your Task
YOU MUST USE PIXLR.COM/EDITOR FOR ALL STEPS FOR FULL CREDIT
Create a business card with the following elements:
1. Create a 1008 x 576 pixel business card using a simple, yet professional, background image relevant to your theme. Once in Pixlr, be careful to resize your background image to the specified dimensions without distortion. (Hint: don’t scale!)
2. Include a professional photo of yourself (headshot). Mask out the background of your headshot.
3. Use a logo or brand that relates to your education, major, or career field to cast over your photo as a watermark, such that your headshot is still clearly visible..
4. Add a separate layer that includes your business and contact information.
Helpful Tip: Log in with your UCD email for unlimited .pxz downloads
Project Resources:
So, now you need to learn how to do things in Pixlr. Pixlr is very similar to photo editing programs such as Photoshop or GIMP, but here are some tutorials that specifically cover aspects of Pixlr.
1. These are fantastic tutorials that take you through adding layers, using layer masks, and go into great detail about adding and styling text. (Though the portion of the video that covers styling text is NOT required for this assignment, feel free to experiment with these tools if they interest you):
• Layers
• Text
2. This tutorial covers the concept of masks and shows how you can alter a photo’s original background while keeping the foreground the same. This works really well for when you want the main focus to be the foreground or if you want to add artistic elements to your photo.
3. Watermarking: This tutorial covers the basics of how to watermark over an image. It works the same for text and pictures
Although these tutorials are available, do not feel constrained to do the assignment only using these methods. If you have pre-existing knowledge of how to mask layers in image editing, feel free to do what works best for you within the Pixlr Editor software. You may also use any other Pixlr tutorials you can find.
Example Photo
Examples of images and files for this assignment are provided within the assignment on Canvas.
Where/How to get an image
First, you will need to find a photo of yourself or go out and take one. It is best to use a good quality, brightly-lit headshot with a solid background. You will be editing yourself from this photo onto a new background, which is easiest when the photo has minimal activity (not too many people, no crazy poses). Pro Tip: Make sure your headshot photo is larger than the background image you are overlaying it onto in order to avoid any distortion during your editing. For your background image, you can find one through a simple Google search, or feel free to use a picture of your own. Be sure your background image is professional and well-suited to your theme.
What to use
You will be using the online photo editor called Pixlr. To access Pixlr, simply Google Search ‘Pixlr’ or type ‘pixlr.com’ into your URL bar. Once you are on pixlr.com, choose “Pixlr Editor”. You will be able to do all necessary photo editing through Pixlr as long as you have internet connection. See below for help with using Pixlr.
Project Steps
• Placing your headshot on a new background
1. Open your headshot photo in Pixlr.
2. Mask the photo and delete the existing background.
3. In a separate layer, insert your professional background image.
4. Resize this background image appropriately and then adjust the image canvas to 1008 x
576, such that there are no distortions to the image.
5. Save the image as a .jpg and .pxz (Layered Pixlr Image) and name the two files as Section LastName FirstName EditedImage.
• Watermarking your photo
1. Find a logo that relates to your professional interests. This can be anything from a UC Davis logo to a symbol that is well known in your field (like a stethoscope for those interested in health science).
2. Take this logo (appropriately sized for your photo) and watermark it over your photo at an appropriate size, location, and opacity.
3. Save the image as a .jpg and .pxz (Layered Pixlr Image) and name the two files Section LastName FirstName Logo.
• Adding text to your business card
1. Full name
2. Career or education title (Ex: Undergraduate Student, Technical Assistant, Financial Analyst Intern, etc).
3. Major
4. Address of School or Employment
5. Phone Number (does not have to be your actual phone number)
6. Email
• All of this text needs to follow the typography guidelines listed below. After following all the typography requirements, save the image as a .jpg and .pxz (Layered Pixlr Image) and name the two files Section LastName FirstName Final.
• Typography: Typography is “the visual component of the written word”. Typography in- cludes differences in font, font size, letter spacing, and placement of text. For text on something such as a business card, you want to keep it simple, straightforward, and clean. The guidelines for the font and font size of your business card are:
1. Stay in between font sizes 24-36.
2. Use one of the following fonts: Times New Roman, Helvetica Neue, Courier New, Arial, Palatino, Cambria, or Calibri.
3. Your text should not take up the whole business card, just a small section of it.
4. To learn more about typography, here is a great resource.
What you need to submit
You will need to submit your business card file, edited image files, and the original image files, for grading on Canvas (seven files total). Please use the following names for your files. Make sure that all of your layers are viewable and not compressed, if your TA cannot view your layers (ie: watermark, text, etc.) then you will lose points.
• Section LastName FirstName Original. jpg: The original image of you with the original background
• Section LastName FirstName EditedImage. jpg and
Section LastName FirstName EditedImage. pxz: The edited image of you with a new back- ground
• Section LastName FirstName Logo. jpg and Section LastName FirstName Logo . pxz: Your edited image with the watermarked logo over it
• Section LastName FirstName Final. jpg and Section LastName FirstName Final . pxz: Your final product including text, logo and your edited image
2025-10-17
Application of Computers in Technology