4CCE1PHC Assignment: Building a Robot Arm
Hello, dear friend, you can consult us at any time if you have any questions, add WeChat: daixieit
4CCE1PHC
Assignment: Building a Robot Arm
1 Introduction
In this coursework, you will build a simple robot arm and control interface capable of basic pick and place tasks. The arm should use three servomotors for actuation, two for moving the arm itself, and one for moving its gripper. It is also designed to be controllable through a simple control interface, consisting of two knobs for adjusting the arm postion, and a button to open and close the gripper.
2 Background
Materials
Make sure you have everything you need to com- plete this assignment.
The hardware items should be included in your lab kit.
The following software should be installed on your computer: (i) a terminal program (e.g., xterm or similar on Linux/Mac OS, cygwin on Windows), (ii) a text editor (e.g., gedit or similar on Linux/- Mac OS, notepad++ on Windows), (iii) avr-libc (including avr-gcc, avr-objcopy and avrdude) and (iv) scopy.
|
Item |
Qty |
|
Orangepip Kona328 Development Board USB Type A - B cable Breadboard TowerPro SG90 Micro Servo Rotary Potentiometers Push Button Switch Lollipop Sticks Double sided tape Cotton Reels Jumper wires |
1 1 1 3 2 1 10 1 3 20 |
Preparation
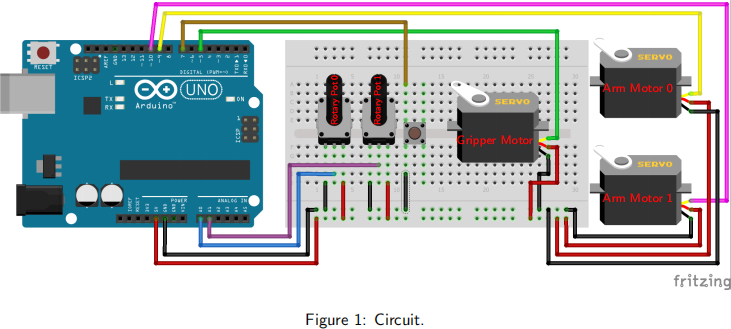
Use the items in your lab kit to build the robot arm and its control panel. An instructional video on how to build the arm is provided on KEATS. You are permitted to make minor alterations to the mechanical design provided your robot follows the same basic layout of two rotary joints and one gripper. Use the diagram in Fig. 1 to build the circuit connecting the arm to the development board. To aid debugging, you may choose to do this in stages as you work through the tasks in 53 instead of completing the entire build in one sitting.
To complete the assignment, you will need the following files:
● robot.c
● librobot.h
● librobot.c
● k0000000.c
Download these from KEATS and save them to your computer.
Use the following commands to compile the program and download it to your development board:
|
$ avr - gcc -g - Os - mmcu = atmega328p librobot . c k0000000 . c $ avr - objcopy -O ihex robot . elf robot . hex $ avrdude -p atmega328p -c arduino -P COM8 -b 115200 -D |
robot . c -o robot . elf -U flash : w : robot . hex : i |
You should find that it compiles without errors. Adjust the port settings in the avrdude command if necessary to enable the program to be downloaded to the development board 1
3 Tasks
Complete the following tasks.
1. The first task is to set up the push button to control the action of the gripper motor.
To complete this part of the assignment, find and modify the following lines in the template file:
|
/* - - - - - - - - - - - - - - - Begin Answer to Task 1 a Here - - - - - - - - - - - - */ /* - - - - - - - - - - - - - - - End Answer to Task 1 a Here - - - - - - - - - - - - - - */ |
and
|
/* - - - - - - - - - - - - - - - Begin Answer to Task 1 b Here - - - - - - - - - - - - */ /* - - - - - - - - - - - - - - - End Answer to Task 1 b Here - - - - - - - - - - - - - - */ |
Implement code in the function init_button_sensor() to configure the appropriate digital pin of the development board as an input, so that it can detect when the push button is pressed. The function should make appropriate use the Atmega328P’s internal pull-up resistors to ensure that the state of the pin is well-determined at all times.
Implement code in the function read_button_sensor() to read the state of the appropriate digital pin of the development board. The function should return 0 if the button is pressed, and 1 otherwise. [6 marks]
2021-12-08