ITEC 4020 Internet Client-Server Systems
Hello, dear friend, you can consult us at any time if you have any questions, add WeChat: daixieit
ITEC 4020
Internet Client-Server Systems
Assignment 3
1 Introduction and Assignment Goal
The goal of this assignment is to put everything we have learned together and create a movie information website (likehttps://imdb.com) with server-side rendering, search functionalities, and deploy this website on the internet (accessible anywhere). This helps you create a nice-looking website for your project portfolio to show potential employers in future. To get started, we will be using assignment 2 as a starting point that includes MongoDB and mongoose integrations and some of the queries that we will be using.
The following is a broad description of different stages in this assignment and their respective grade breakdown:
- Design a simple frontend and render it with proper templating in handlebars, including showing a list of movies (paginated), search page (paginated), and movie details page. (60%)
- Search functionality, including a textbox to search in the movie title, a drop-down list for production country, a drop-down list (or checkboxes) for genres. (20%)
- Deploy the website to the internet and make it accessible from anywhere being served with HTTPS. (20%)
In the next section, we will go into the details of each of the aforementioned stages.
Note: To hand in your assignment, read the “Submitting Your Assignment” section below. Please read and follow the instructions below carefully.
2 Website Description
In this section, we will go over the details of the different stages for this project that you need to carry out.
2.1 The User Interface
Design a simple interface that the user will interact with using HTML/CSS and render them using handlebars. In this part of the assignment, you are asked to create proper layout and templates. You need to install any necessary packages and create any folder structure as needed (use lectures as a reference). At this stage, you will be judged by the quality of the developed user interface (frontend) as well as the quality of the template developed (using proper structures and avoiding repetition in the template). You can use whatever frontend framework you are most comfortable with including the following:
- No framework (simple HTML/CSS)
- Bootstrap (https://getbootstrap.com)
- Materialize CSS (https://materializecss.com)
However, I suggest using Boostrap (if you can pick it up quickly) as it is easy to learn and can simplify the process of creating the UI a lot. Note that you are not allowed to use off-the-shelf templates available on the internet and I suggest you keep it simple and clean.
The following endpoints require a user interface:
- Homepage (root): Similar to the root path (“/”) in assignment 2, this will return a paginated list of movies. You need to include the following information for each movie:
o Poster (https://image.tmdb.org/t/p/w500+ poster_path): The poster image of the movie. For example, to get the poster for the movie Jumanji (/vzmL6fP7aPKNKPRTFnZmiUfciyV.jpg), you need to use this url: https://image.tmdb.org/t/p/w500/vzmL6fP7aPKNKPRTFnZmiUfciyV.jpg. Note that the poster url will be missing for some movies, you don’t need to handle those situations, an error showing up is OK.
o Genres
o Vote average (vote count): for example: 7.6 (12300 votes)
o Production Countries
o Title (links to /movies/:id)
o Overview
o Pagination: showing page information and links to go to the first, previous, next, and last page. You can see bootstrap example for inspiration:
https://getbootstrap.com/docs/5.1/components/pagination/
- Search page (/search): Similar to the homepage, shows a paginated list of movies, but based on the search criteria specified on the top of the page. The search should have the following fields:
o Title (you can use a keyword to search in movie titles)
o Genre (you can use this to search for specific genres)
o Production Countries
o Note that the search form should be submitted to the same path (/search) with a GET method.
o Tip: try to re-use the movie items you developed for the previous section.
- Movie Details Page (/movies/:id): Should show the details of a movie that includes all of the information about the movie listed on the homepage path. Clicking on the movie title on any of the previous paths should bring the user to this page.
2.2 Search Functionality
The search functionality uses the UI developed in the previous stage, works with query parameters (/search?title=…&genres=action+comedy&countries=Canada), allows for multiple criteria to be specified, and only returns movies that have ALL requirements. For example searching for text “Toy” with genre set to “animation”, and country set to “United States of America” should return movies that have the string “Toy” in the title AND have the genre of animation AND production country that includes the US.
2.3 Deploy The Website to The Internet
At this stage, you need to deploy the code that you have written to the internet. To do so, we will be using the free tier of Heroku (https://www.heroku.com/). Note that you don’t need to add a credit card to your account to be able to use the free tier. The process, along with extra information is outlined
here:https://developer.mozilla.org/en-US/docs/Learn/Server- side/Express_Nodejs/deployment#example_installing_locallibrary_on_heroku
However, note that there are a couple of minor changes you need to make when deploying your code:
- You need to set the MongoDB connection URL as follows:
o heroku config:set
MONGO_CONN_URL=mongodb+srv://web:[email protected]/a2-
movies?retryWrites=true
- If you cloned the project using git (instead of downloading the zipped version of the code), you need to remove the folder .git to be able to connect the folder to a new repository.
- If you are using WSL in windows to run your code, you need to install the Heroku cli by running the following command on your WSL terminal: curl https://cli-assets.heroku.com/install.sh | sh
After this stage, you should be able to see the website you created by running the command: heroku open. Take note of the public url to your deployment and submit it with your code to eClass.
3 Setup
First, you will need to download and extract the assignment base code onto a path where you can start working on it. You can then open this folder in Visual Studio Code (VSCode for short). You will need to have Node.JS installed on your computer to be able to work on the assignments. You can head to their website (https://nodejs.org/en/) and download and install the latest LTS (Long Time Support) version.
3.1 Get The Code
The code for this assignment is hosted on GitHub (https://github.com/nima-teaching/itec4020-a2- movies-students). If you know how to use git, you can clone this repository. Otherwise, go to the GitHub repository, click on the green “<> Code” button -> “Local” tab -> “Download ZIP” to download a zipped version of the code.
3.2 Create .env File
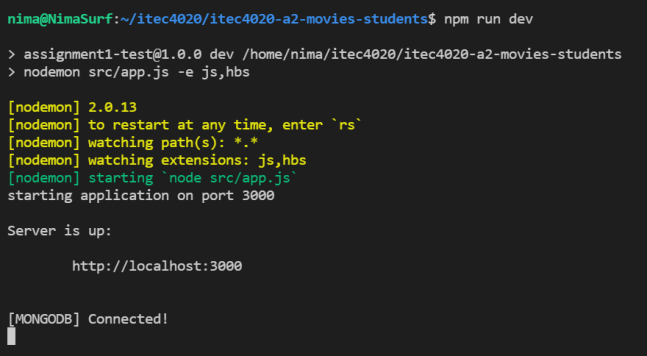
To connect to your MongoDB database, you need to create an environment variable file in the root of the project called “.env”. Then, populate the .env file with your MongoDB connection string (the one you used to connect MongoDB Compass to your database). Your “.env” file should look like the following (note the highlighted name of the database in the connection string):
MONGO_CONN_URL=mongodb+srv://web:*************@YOUR_MONGODB_CLUSTER/a2- movies?retryWrites=true&w=majority
If the connection string is correct, you should see an output like the following screenshot (after installing the dependencies). Please note that in some buildings in York University, MongoDB network traffic is blocked for security. Try using a proxy, VPN, or another Wi-Fi or use a local MongoDB installation to get around this issue.
Note: based on the .gitignore configurations of the project, this .env file will not be pushed to GitHub. Thus, you will need to add your database configuration to the deployment as described earlier.
3.3 Import Movies Collection to Database
To import the movies information, go to MongoDB Compass and connect to your database. Then, create a database called a2-movies and a collection inside it called “movies”. Then go to that collection, click on “Add Data” and then “Import File”. Select the “movies.json” file located in the “database” folder and choose input file type of JSON. Then, click on “import”. You should see something like the following:

3.4 Install Dependencies
We have a few dependencies (libraries we rely on that other people have written and are available on npmjs.com) that need to be installed before we can continue. To install these dependencies, open a command line terminal (e.g., cmd.exe or terminal) in the folder containing package.json file. Then, run the following command to install all dependencies:
npm install
This will download and save all the necessary dependency files to a folder named node_modules/ in the current directory. You should see a node_modules folder next to your package.json. If the installation was interrupted (e.g., internet was disconnected during the installation), delete the node_modules folder and run the installation command again.
3.5 Learn How to Navigate The Code
To know more about the code, you can refer to the assignment 2 instructions. However, note that for this assignment you need to install any extra packages you might need and create any extra
files/schemas necessary. However, reuse the movie router located at src/routers/movie.js for all paths on the website.
4 Submitting Your Assignment
When you have completed your assignment, you need to prepare your submission. To do so, use the npm command:
npm run prepare-submission
This will do a number of things automatically for you:
- Create a submission folder, deleting existing one if if present
- Copy all files under src/ to submission/src
- Copy package.json to submission/package.json
- Zip the submission/* directory to submission.zip
You can then upload your submission.zip to eclass along with a file named website-url.txt that includes the public url to your website on the internet (this url should work on devices other that the one you used to develop the code, try the url on your phone before submission to make sure it works).
2021-11-30