CMPT 215: Introduction to Computer Organization and Architecture
Hello, dear friend, you can consult us at any time if you have any questions, add WeChat: daixieit
CMPT 215: Introduction to Computer Organization and Architecture
Lab 2: Introduction to RISC-V assembly
January 15, 2024
RISC-V Toolchain & QEMU
During this course, you will be writing short assembly programs in RISC-V assembly lan- guage. A toolchain for compiling/assembling/linking/debugging RISC-V code has been built and made available on the lab computers and the tuxworld computers. After building your code, you can use QEMU (also available on tuxworld and lab computers) to emulate a RISC-V system and run your programs.
1 Introduction
We will first start by introducing some basics and setting up your git repository, then con- tinuing with the main programming task. If you have already done this in CMPT 214 last term, you can skip ahead to Section 2
As you make progress, make sure you understand the steps you are doing and ask your TA if you have any questions. It is highly advisable to complete this lab during your lab section.
1.1 Accessing the department’s Linux computers
1.1.1 Access using a department computer
If you are using a campus Linux computer (a lab computer in Spinks S311 or S320, or the Spinks open lab),
1. You need to make sure you are booted into Linux (if you are looking at a Windows system, you need to restart the computer and choose Linux during boot)
2. The next step is to open a terminal. You can do so simply by using the ‘super’ key on your keyboard (usually the key with the ‘Windows’ icon on it) and type the word “terminal”. You should see one or more matches. Any option is fine.
1.1.2 Access using an off-campus or personal computer
If you are using an off-campus computer, you will need to ssh into tuxworld. To do so, you need to open a terminal (or ‘command prompt’ on Windows), and type the following command (replacing ‘abc123’ with your actual NSID):
ssh abc123@tuxworld. usask. ca
You should then type your password (it’s okay that you don’t see any characters being typed on the screen) and hit enter.
1.2 You are in!
You should now be at a terminal (remote or on a lab computer) and ready to go! If you are having difficulty reaching this point, ask your TA for help.
1.3 Using the terminal
The terminal prompt will look something like this,
user@machine ~ $
To exit your terminal (or ssh connection), you can simply type
$ exit
1.4 Creating (or finding) your SSH key
The next step is to create (or find) your SSH key using the following command (if you are curious how this command works, by the end of the term you will be able to understand and put together commands like this!)
$ cd ~ && ls .ssh/id_rsa.pub > /dev/null 2>&1 && echo "Found" || echo "Not found"
If the previous command shows the message ”Found”, you can skip to Section 1.5 (because you already have an SSH key). Otherwise, you will have to create a new key using the command ssh-keygen.
$ ssh-keygen
When prompted for the path to save the key, don’t type anything and hit ‘enter’ . When prompted to set a passphrase, it is recommended to not type anything and hit ‘enter’ .
1.5 Getting your SSH key
You should now have your SSH key. You can view your public SSH key using the command,
$ cat ~/. ssh/id_rsa. pub
The output of the previous command should look similar to this,
ssh-rsa AAAAB3NzaC1yc2EAAAADAQABAAABgQDXIN8AFqXEsU+uPktz2a97kDmnNgnCV1qScsxYCJ86 JksnzswEHiK8x/Fr20xIpnJNW6EXsUCgoMacU0SeiI426J46YrQPlbHKdNOyGF3orv7Jp5kl7kBfD6sx O97Vjr+7erF5W5jnb5hNv6VAy1tC0iq+YG5bN6udGFzFx9WqWgkOcIkspmFhUs= user@machine
Do not close your terminal. You are going to need this key for the following step. If you are having difficulty reaching this point, ask your TA for help.
1.6 Adding your public SSH key to GitLab
1. Go to https://git.cs.usask.ca using an internet browser. This is the department’s GitLab server.
2. Log on using your NSID and password.
3. In the top left corner you should see something that looks like this

4. Click on your user image to open the following menu
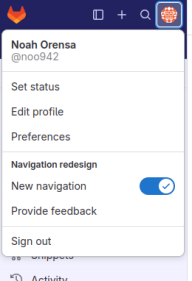
5. Click on “Preferences”, then choose the “SSH Keys” submenu from the left side bar. 6. On the right you should find an “Add new key” button.
7. In the “Key” text box, copy and paste (copying from- and pasting to the terminal is done by using ctrl+shift+c and ctrl+shift+v) the public SSH key that is displayed on your terminal.
8. Click the “Add key” button
1.7 Setting your username and email
We will now set up your username and email as follows:
$ git config --global user. name "Jane Smith"
$ git config --global user. email "abc123@usask. ca"
Replace “Jane Smith” with you actual full name, and “abc123” with your actual NSID.
2 Cloning your git repository
A Git repository has been already created for you, and you should be able to have access to it. If you have never logged onto https://git.cs.usask.ca, your repository should be created approximately 5 minutes (while our script finds you and creates the repository for you) after you have logged on for the first time. You can clone your repository using the following commands (replacing ‘abc123’ with your actual NSID):
$ git clone git@git. cs.usask. ca:cmpt215-winter2024/abc123.git cmpt215 $ cd cmpt215
$ echo abc123 > nsid. txt
$ git add .
$ git commit -m "initial commit"
$ git push --set-upstream origin master
If you see a warning that you are cloning an empty repository, this is completely fine. If you are having difficulty reaching this point, ask your TA for help.
3 Hello RISC-V!
3.1 Source code
Using your favourite text editor, type in the following program into a file named hello world. s . Don’t forget to do git add and git commit after writing your code.
1 # function numbers for environment calls
2 .equ SYS_exit, 93
3 .equ SYS_printStr, 248
4
5 # read-only data section
6 .section .rodata
7 str:
8 .string "Hello World! "
9
10 # code section
11 .section .text
12 .globl _start
13 _start:
14 la a0 , str # print string
15 li a7 , SYS_printStr
16 ecall
17
18 li a0, 0 # exit(0)
19 li a7 , SYS_exit
20 ecall
Lines 2 and 3 use the .equ directive to tell the assembler about some constants and gives names to them. This is analog to the #define statement in C.
Line 6 is an assembler directive that tells the assembler that the following is to be stored in the “rodata section” (read-only data) of the program. Line 7 is a label that takes the value of the current address in the rodata segment. Line 8 is another assembler directive that defines a null-terminated string (an ascii string terminated with a zero or null byte). The address str is the address of the first byte of the string.
Line 11 is another assembler directive that tells the assembler that the following is to be stored in the “text section” (code section) of the program. Line 12 makes the start symbol global for linking. The code section starts at start which is another label (that points to the first byte of the following la instruction). Line 14 loads the address str into register a0. Line 15 loads the immediate (constant) value corresponding to SYS printStr into register a7. Line 16 is an environment call instruction that performs some function indicated by the function code in register a7, and takes its arguments through one or more of the ‘a’ registers. Lines 18 through 20 perform another environment call that terminates the program.
3.2 Makefile
Copy the starter Makefile from /student/cmpt215/starter/lab2/Makefile to yourcmpt215 directory and make any necessary edits. The TOOLCHAIN PATH should be set to the path of the RISC-V toolchain which is located under /usr/local/riscvmulti/bin. The linking rule (line 40) should also be completed to link all object files and libraries (in this case we have just the one object file, hello world.o, which will be created under build/qemu-riscv32)
 and create the hello world binary.
If you have any questions, make sure to ask your TA.
3.3 BASH script to run/debug our RISC-V programs
In this section you will write a short BASH script called run (without a . sh suffix) to allow you to quickly launch and debug your RISC-V programs. We can do so by using the RISC-V QEMU emulator located at /student/cmpt215/qemu/bin/qemu-riscv32 .
To run your program,
$ /student/cmpt215/qemu/bin/qemu-riscv32 <binary>
where <binary> is the binary that you obtained by running make.
To debug your program,
Terminal 1
$ /student/cmpt215/qemu/bin/qemu-riscv32 -g <port_num> <binary>
Terminal 2
$ /usr/local/riscvmulti/bin/riscv64-unknown-elf-gdb <binary>
where <binary> is the binary that you obtained by running make, and port num is a port number between 30000 and 40000 that allows gdb in Terminal 2 to connect to the QEMU process running in Terminal 1.
To simplify the above process, you will write a BASH script that takes two command-line arguments: (1) the mode argument, and (2) the pathname of a RISC-V binary. The mode argument can be one of --qemu, --qemu-gdb, or --gdb.
In --qemu mode, the script will simply run QEMU:
/student/cmpt215/qemu/bin/qemu-riscv32 <binary>
In --qemu-gdb mode, the script will run QEMU in debugging mode using the -g option and some random port number between 30000 and 40000 (hint: you can randomize your port choice by using ✩((30000 + ✩RANDOM % 10000))):
/student/cmpt215/qemu/bin/qemu-riscv32 -g <port_num> <binary>
Make sure to echo the port number before you run QEMU.
In --gdb mode, the script will run gdb:
/usr/local/riscvmulti/bin/riscv64-unknown-elf-gdb <binary>
Don’t forget to chmod +x you BASH script and add the shebang line #!/bin/bash at the beginning of the script.
If you have any questions, make sure to ask your TA.
4 Debugging with GDB & QEMU
Copy the starter file /student/cmpt215/starter/lab2/strlen.s to your cmpt215 direc- tory and modify the Makefile to also build the strlen binary. Once the strlen binary is built, try to run the program using
$ ./run --qemu strlen
This program is supposed to read a string (max 100 characters) and display its length. You will notice that the program causes a segmentation fault after reading your input string. Now it’s time to debug!
In one terminal run the program again using --qemu-gdb mode:
$ ./run --qemu-gdb strlen
In another terminal (it is preferable to have both terminals on the same lab/tux computer; it can work across different machines but it’s somewhat slower), run the following:
$ ./run --gdb strlen
GNU gdb (GDB) 13.2
.
.
.
Reading symbols from strlen . . .
(gdb) target remote <hostname>:<port>
Remote debugging using <hostname>:<port>
_start () at strlen. s:26
26 la a0, prompt # print prompt string (gdb) c
Continuing .
The target remote command allows you to connect to the QEMU process running in Ter- minal 1. Your script should echo the randomized port before running QEMU. Once the connection is made, the output should look like the above. You will see that the program is stopped at the first instruction at start. Use c or continue to allow the program to run.
gdb will catch the segmentation fault, but this doesn’t tell us much on its own. Run the program again and set up a breakpoint using b <line num> or break <line num> (e.g., line
 37) to step through the loop. One the breakpoint is reached, execution will pause and you can use n or next to step through the instructions. info registers will show you register values.
Once you find and fix the error, the program should correctly output the length of the string (including the newline character at the end of your input).
2024-04-05
Lab 2: Introduction to RISC-V assembly