CIT 593 | Assignment: Connecting C to Assembly and to I/O devices
Hello, dear friend, you can consult us at any time if you have any questions, add WeChat: daixieit
CIT 593 | Assignment: Connecting C to Assembly and to I/O devices
Setting up Codio for this assignment
1) Review the “PennSim” video tutorial, as we will use PennSim again in this HW
2) Once you’ve logged into Codio via Coursera, follow the same instructions from the first Codio assignment (LC4 Assembly Programming) to open up PennSim in the XServer window.
3) From the Codio File-Tree click on: os.asm
a. Copy the os.asm from your LC4 Assembly & I/O assignment into this os.asm, or use the os.asm solution on Coursera (unlocked when HW8 grades are released)
4) From the Codio File-Tree click on: factorial_sub.asm
a. Copy the factorial_sub.asm from your LC4 Assembly Programming assignment into this factorial_sub.asm file
Problem 1: Calling an Assembly Subroutine from C
As you have learned in the lecture, C is a procedural language; this means that all code in C must be contained within a function. C-Functions are translated into subroutines in Assembly. When a C-file is compiled, producing assembly, the names of the functions, become the labels of the corresponding subroutines.
In HW #6 you wrote a subroutine called: “SUB_FACTORIAL”, it took as its only argument an integer in R0 and returned the answer, an integer, in R1 once it was complete. For this problem, I want you to call your previously written subroutine “SUB_FACTORIAL” from a main() function in a C program.
There is one “problem” with the way we wrote SUB_FACTORIAL. It uses the register file to take in arguments (like R0) and to pass back its return values (like R1) to and from the caller. As you’ll recall from lecture, LC4’s C does not use the register file to pass arguments or return values; instead, C uses the “stack” in data memory to do this. So the challenge in this problem is to convert your “SUB_FACTORIAL” to take arguments and return values from the stack, instead of the register file.
From the Codio File-tree, open up the file entitled: problem1.c
int a = 5 ;int b = 0 ;
b = SUB_FACTORIAL(a) ;return (0) ;
Try compiling this C-file into LC4 Assembly. To do this, you’ll use the LC4 C-compiler called “LCC”. As you’ll recall, a C-compiler takes in C and generates the corresponding Assembly Code. Assuming you have run the setup steps on page #1 of this assignment, you can open up a terminal on Codio and type the following this simple command:
./lcc problem1.c
“lcc” is the name of our compiler (it stands for Little Computer C-compiler), and problem1.c is the name of the C-file you wish to “compile” into assembly.
If there aren’t any errors (and their shouldn’t be if you’ve set things up properly), you will notice a new file has been created by the “lcc” compiler: problem1.asm. Using the Codio file-tree, open up this newly created file: problem1.asm. It is the implementation of your “main” function in assembly. You will notice that “main” is indeed a subroutine, it has a .FALIGN, a PROLOGUE, a BODY, an EPILOGUE and a RET. Now, look specifically on lines 12-19, to see how it packs up arguments before it calls your subroutine “SUB_FACTORIAL”
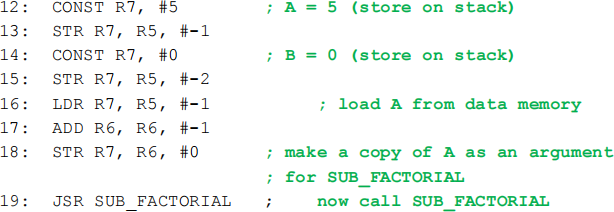
I have added the comments to lines 12-19 so you can see what is going on. Notice, how the LCC compiler has stored A and B on the stack, and then placed a copy of A on the top of the stack so it can call SUB_FACTORIAL? It is critical that you draw out a little picture (like we’ve done in lecture) so you can determine exactly where on the stack these things are located.
Calling “main()” – USER_START.ASM
Since “main()” is a subroutine, you may be wondering how it gets called? Open up the file from the ZIP, entitled: user_start.asm. User_start.asm is the ONLY file that will contain the directive: .ADDR. It is a simple subroutine that will get loaded into program memory at address x0000. It has 3 important functions: setup R5, R6, and call main(). Look carefully at the file’s contents and see how it works. Notice that it finds the address of “main” by label (using LEA). BUT, main itself isn’t in user_start.asm. So how does this work? Read on…
Gluing it all together: LINKING (the act of connecting .OBJ files together)
Open up the PennSim script file called: problem1_script.txt. Look carefully at the line: as problem1 user_start factorial_sub problem1
It takes as input: problem1.asm (generated by the C-compiler), user_start.asm, and your HW #6 file: factorial_sub.asm. Then it outputs one single file called: problem1.obj. Recall that USER_START performed an LEA on the label: main. And your problem1.asm called SUB_FACTORIAL by label? By assembling them all together, into one single file problem1.obj, the assembler “links” the files together as if they were one long .ASM file, calculating the addresses properly when labels are used. This is known as LINKING and you’ll hear this term a lot as you write programs that have many separate files that depend on one another.
What you need to do (modifying SUB_FACTORIAL)
As you recall, your subroutine from HW6 uses the register file to take in arguments and return values. BUT, the subroutine: “main” in problem1.asm, wants to pass SUB_FACTORIAL arguments using the stack and return values using the stack. Your job is to modify factorial_sub.asm and make it use the stack to accept arguments and return values (instead of the register file). To do this, 1st follow the following steps:
1) Open up factorial_sub.asm and remove the call to SUB_FACTORIAL.
2) Remove (from factorial_sub.asm) your “main” label
3) Remove (from factorial_sub.asm) your “END” label
4) Remove any .ADDR statements you may have had in the file
5) Your factorial_sub.asm should have its first two lines look like this:
6) The last line of your file should be only:
Next, you need to make a PROLOGUE inside the SUB_FACTORIAL, similar to the one showed in lecture and showed in problem1.asm. After your prologue, you’ll need to find the arguments to SUB_FACTORIAL on the stack and copy them into R0. You will also need an EPILOGUE that will properly store the return value (from R1) to the right place in the stack (so that main() knows where to find it). These tasks will require you to review the lecture slides, to look carefully at how main() inside problem1.asm packs up and unpacks the stack. It will take you a little time and a fair amount of debugging.
How to run everything:
After you’ve completed the last section, you will now open up PennSim (if you haven’t done so already). Remember, LCC only creates the .ASM files, now you need to use our Assembler and Loader to test it out…that’s PennSim!! You will now use PennSim to assemble, load, and test: problem1.asm, factorial_sub.asm, lc4_stdio.asm. You can do this by running problem1_script.txt inside PennSim. From there you work with PennSim as you have done in the last few HWs. You may get errors at first, so you’ll need to carefully address them one by one. Once you have it loaded, look for USER_START, MAIN, and SUB_FACTORIAL in program memory.
On the right hand side of PennSim, look at the panel that looks like this:
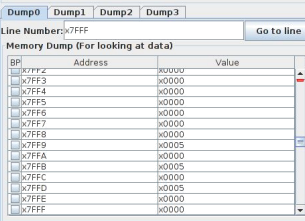
In the “Line Number” field, type in: x7FFF, then click the “Go to line” button. This is the starting address for the stack. Now, STEP through your program and watch the stack grow as your program runs. You should see the local variables A=5, B=0 on the stack. You should then see A=5 get “pushed” onto the stack before SUB_FACTORIAL is called. You can debug any mistakes you are making with stack using this little part of PennSim, it is very handy.
Showing me the stack (the written part of this HW):
Once you have your program running and working, create a small table (like the one shown on slide 51 in the video called pow( )'s Prologue: Setting up the Frame). In your table, show me what “main’s” frame and “sub_factorial’s” frame look like on the stack. Identify where the variables are on the stack, and list (on the right, as in slide 51) what each row of the stack does and what its holding. Show the state of the stack, right before the “return” instruction is executed in “sub_factorial”. The instructions given in the last section (for how to examine the stack) will help you complete this section.
To submit the written part of this HW, upload the completed template to your Codio workspace
Problem 2: Calling a TRAP subroutine from C
How could you call a TRAP from C? The larger question at hand is, how does C do I/O? It would have to work with TRAPs of course! But, the problem is that a C-compiler doesn’t generate TRAP calls and this is by design, because TRAPS are system specific (and it wouldn’t make C very portable if it directly supported TRAPs). Recall from problem #1, that the C-compiler only generates JSR’s and really has no mechanism to generate “TRAP” instructions from your C code. In this problem, you will attempt to make the TRAPs from HW #7 compatible with the C-stack so that you can call them from C.
From the setup instructions on page 1, you should have copied your entire os.asm file from HW7 into the os.asm file located in this assignment. If you haven’t done that yet, make certain to go back and do that before continuing on.
From the Codio file-tree, open up the file: problem2.c. Inside that file you’ll see a simple C program:
char c = 'A' ; /* ASCII A = x41 in hex, #65 in dec. */lc4_putc (c) ;return (0) ;
Compile this file using the LCC compiler and look at the output file: problem2.asm. You’ll see the very same pattern as in the last problem, (problem1.asm), a prologue, body, epilogue. Notice one other interesting thing, that “char c = ‘A’’ really just gets converted into a CONST with A being converted to decimal #65 from the ASCII chart! The C-compiler knows ASCII ☺
So what is lc4_putc() ? It is meant to be your TRAP, PUTC from HW#7. But notice, the C-Compiler simply used a JSR call; because it is unable to generate a TRAP call. So how do we remedy this? We need to make our own Assembly file of special subroutines that call the TRAPs in our OS. This is a process known as “wrapping” a subroutine.
Open the filed entitled: lc4_stdio.asm. Inside this file you will see our “bridge” or “wrapper” subroutine. Look for the label entitled: “LC4_PUTC”. It is an incomplete subroutine. When your problem2.asm is loaded into PennSim, and the JSR to lc4_putc is executed, the program counter will jump to this subroutine. Your job is to add a prologue, to manage the stack (as you did in problem #1 to SUB_FACTORIAL). Then, using problem2.asm as a guide, find where the arguments to lc4_putc are on the stack. Next, copy that argument into R0 (as you did in problem #1). That is the register TRAP_PUTC is expecting to find the character to print. Then you’ll see the “TRAP x01” call, if you recall, that it the trap vector for TRAP_PUTC. Once you return back from TRAP_PUTC, make sure to restore the stack to the way it was before, so you can safely return to where you left off in main().
How to run everything:
For this problem you will be working primarily in the file: lc4_stdio.asm. If you examine the file: problem2_script.txt, you will see how problem2.asm, lc4_stdio.asm, user.asm are “linked” together and how the OS from your last HW will be loaded. To get things running, open up PennSim in the HW08 folder. Once you’ve modified your lc4_stdio.asm file to work with the stack, load the script: problem2_script.txt. You may get errors at first, so you’ll need to carefully address them one by one. Once you have it loaded, look for USER_START, MAIN, and LC4_PUTC in program memory.
In terms of debugging, it will help tremendously if you look at the STACK as it grows and shrinks in PennSim. So use the window discussed in problem1 to view the STACK in data memory as you are stepping through your program. You will know that you’ve made a success for this problem when you see the character “A” on the ASCII display in PennSim!
Problem 3: Getting Input from the Keyboard
Once you complete problem #2, repeat the process to get TRAP_GETC to work. You will need to create a new wrapper subroutine, called “LC4_GETC” in lc4_stdio.asm. This trap returns data from the keyboard in R0, so that will need to put back on the stack after the trap is called.
To test your work, create the files:
problem3_script.txt (A PennSim script to load all necessary files)problem3.c ( A C file to call LC4_GETC and LC4_PUTC)
Inside your problem3.c file, implement the following pseudocode in C:
while ( “enter key” is not pressed ) {
get a character from the keyboardput that character out to the asci display
}
Extra Credit Problem 4 (2.5 points): Printing strings to the console
Once you complete problem #2, repeat the process to get TRAP_PUTS to work. You will need to create a new wrapper subroutine, called “LC4_PUTS” inside lc4_stdio.asm. Remember, this trap takes as input an address where a string has been stored in memory. This will require you to write problem4.c with a pointer to the string to output.
To test your work, create the files:
problem4_script.txt (A PennSim script to load all necessary files)problem4.c ( A C file to call LC4_PUTS, send it “I LOVE CIT593”)
Extra Credit Problem 5 (5 points): Printing rectangle to the display
Once you complete problem #2, repeat the process to get TRAP_DRAW_RECT to work. You will need to create a new wrapper subroutine, called “LC4_DRAW_RECT” inside lc4_stdio.asm.
To test your work, create the files:
problem5_script.txt (A PennSim script to load all necessary files)problem5.c ( A C file to recreate all those boxes from HW7)
Extra Credit Problem 6 (7.5 points): PONG – the game – sort of ☺
Now that you have all the traps working, can you create a small game? Draw a yellow rectangle on the screen. Ask the user to type a letter: “j” or “k” If they press “j” move the rectangle 10 pixels to the left. If they press “k” move the rectangle 10 pixels to the right. Do it in a loop so the user can move the rectangle back and forth! This is the start of a lovely game.
To test your work, create the files:
problem6_script.txt (A PennSim script to load all necessary files)problem6.c ( A C file to recreate all those boxes from HW7)
2021-11-06