CS 120: Introduction to Computer Programming II
Hello, dear friend, you can consult us at any time if you have any questions, add WeChat: daixieit
CS 120: Introduction to Computer Programming II
Carcassonne Project, Short A
1 Overview
Carcassonne is a classic board game, where you place tiles on a grid to build a city.
This project will span 4 phases: 2 short and 2 long projects. By the end, we will not have built the entire game, but we will have implemented some of the core mechanics.
This project builds upon itself; what you do in the first short project will feed directly into the long project that follows, and so on. Because of this, the autograder for each of the parts of the project will include all of the testcases from the former parts. So don’t try to “skip” any part of the project - if you do, you’ll only be making things hard for yourself, in the next part!
1.1 Special Late Work Policy
Since I don’t want one bad day or one bad project to ruin you, I am offering a special Late Day rule, which applies only to the Carcassonne projects: you may turn in any one (or many) of these projects, up until the due date of Carcassonne Long B, and earn half credit for it. And no, you won’t have to have multiple versions of your code - each progressive project will add to the requirements, not change them. Therefore, if your code passes the last project’s autograder, it should also pass all of the ones before it, as well.
2 Two Classes
In this project, you will be developing two classes: CarcassonneTile and CarcassonneMap. The first one represents a single tile, which has certain fea-tures on it, and which can be rotated to face any one of four directions. The map represents a bunch of tiles which have been placed on the board, in some particular arrangement.
In Short A, you will implement the CarcassonneTile class (most of it, anyway), along with the first 4 required tiles.
In Long A, you will add the rotate() method to CarcassonneTile, and implement the first part of CarcassonneMap, which mostly involves putting tiles into the grid. You will also implement 8 more tiles.
In Short B, you will add a new feature to the Map class: the ability to follow a road through the map, to see where it ends. You will also implement 4 more tiles.
In Long B, you will extend your road logic so that it can search a road in both directions, and also to determine whether it is “closed” on both ends. You will write similar logic for cities (which are more complex because they are not linear in shape). You will not have to add support for any new tiles.
Throughout the projects, the class CarcassonneTile will be defined in carcassonne_tile.py, along with all of the tile* objects. The class CarcassonneMap, which you won’t implement until Long A, will be in carcassonne_map.py.
3 How Tiles Work
In this project (all 4 parts), you will define a certain set of tiles. You must rep-resent each tile with a CarcassonneTile object, and I will call various methods on these objects to make sure that your class works as required.
However, I will never actually create any of these objects myself; instead, you must do so! You must define what parameters the constructor for your class takes, and you must store information about each tile in private variables inside the object. I will access these tiles directly, by importing your code and then accessing variables that you have defined.
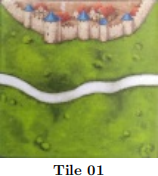
For example, the first tile that you must represent is this one:

You must have an object, defined inside the file carcassonne_tile.py, which is named tile01. When I want to use Tile 1, I will access this object; I can place it all over the map, any where I want (and as many times as I want).
3.1 The Point is to Design a Class
This is important: the purpose of this project is for you to design a class that has some private variables, which hold properties about the tile. For example, to represent the tile above, you should have some way to store that there is a city on the North edge, and that there is a road which goes from the West to East edges.
I am not going to tell you how to do this; you need to design it yourself. It’s OK if your design isn’t perfect, or as optimal as it might be - but you should take some time to plan ahead for the future. What sorts of features will you have to support in the future? Can you design your Tile so that it won’t be hard to support them, when the time comes?
However you choose to implement your Tile, it must store information about the file (like where cities and roads exist), instead of storing information about which tile it is. What do I mean by this? Let’s use the edge_has_city(self,edge) method as an example.
edge_has_city(self,edge) asks a simple question: does the edge have a city on it, or not? It returns a boolean value. Your implementation should do something like this:
def edge_has_city(self, edge):
if edge == N:
... does the North side have a city? ...
return True/False
elif edge == E:
... etc ...
Or perhaps, you might have something more advanced and compact, like this:
def edge_has_city(self, edge):
return self._edge_info[N].has_city
or
def edge_has_city(self, edge):
return self._edge_type[N] == "city"
But this type of code is forbidden:
def edge_has_city(self, edge):
if self._what_tile_am_i == "tile01":
... do this ...
elif self._what_tile_am_i == "tile02":
... do that ...
Stated another way, tile01 must be a CarcassonneTile object, which has properties that tell you that there is a city on the North side, and an East-West road. But it must not “know” that it is called Tile 1.
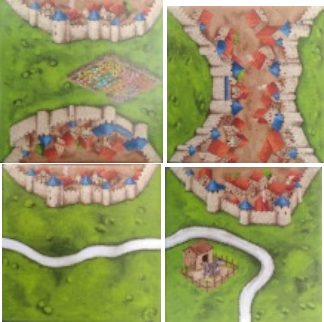
4 Required Tiles (Short A)
These tiles are required for the Short A part of the Carcassonne project. Refer to the specs for the other parts, to see what additional tiles we add later.

(Ignore the farmland on all tiles. We won’t be using it.)
(This tile has a crossroads - meaning more than two road segments meet in the middle.)

(Ignore the farmhouses, too.)
5 Required Methods of CarcassonneTile
In Short A (we will add more in the future), you must support the following methods.
NOTE: In all of these methods, we will use the convention N=0, E=1, S=2, W=3. That is, your parameter will actually be an integer, but it will represent a direction.
● get_edge(self, side)
Returns a string which indicates what is on that side of the tile. It may be "grass", "grass+road", or "city".
side is a parameter which indictes which edge you are looking for: 0=N, 1=E, 2=S, 3=W.
● edge_has_road(self, side) Returns True or False, based on whether that edge has a road.
● edge_has_city(self, side) Returns True or False, based on whether that edge has a city.
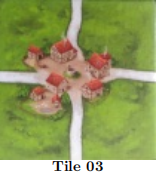
● has_crossroads(self) Returns True or False, based on whether that tile has a “crossroads” in the middle of it, like Tile 3, Tile 13, etc.
● road_get_connection(self, from_side) Returns the side that a given road is connected to. You may assume that the side is definitely a road.
If the road in question is connected to another edge, then return the integer for that edge. But if it is connected to a crossroads in the middle of the tile, return -1.
EXAMPLES:
tile04.road_get_connection(E) should return S, and tile04.road_get_connection(S) should return E.
tile03.road_get_connection(W) should return -1.
● city_connects(self, sideA,sideB) Returns True or False, based on whether or not the two sides are both cities and they are connected. (See Tile 7 for an example of a tile with two city sides that are not connected.)
NOTE: This method ignores how the two city parts might be connected, elsewhere in the map. Only give information about how these parts are connected in this tile.
You may assume that the sideA is definitely a city; sideB will definitely be a valid side (N,S,E,W) but may or may not be a city.
Return True if sideA==sideB.
6 Turning in Your Solution
You must turn in your code using GradeScope.
2021-11-04