Use MongoDB as the NoSQL database to store data related to this application
Hello, dear friend, you can consult us at any time if you have any questions, add WeChat: daixieit
Getting Started
We will use MongoDB as the NoSQL database to store data related to this application. Follow the instructions in the official MongoDB documentation to install the free community edition.
On Windows, you should unselect the “MongoDB as a Service” option to complete the installation. After you install it, follow the instructions to start MongoDB as a background service. The Mongo Shell (mongosh) should also have been installed when you installed MongoDB. If it wasn’t, then follow the instructions here. The Mongo Shell provides a command line interface that is used to interact with the databases in MongoDB. If mongosh is successfully installed then the command mongosh should connect to the local instance of MongoDB on your system and open an interpreter where we can type commands to interact with MongoDB. Try the command show dbs; you should see a list of existing databases in your local instance.
Note that by default, the MongoDB service will run on 127.0.0.1 (localhost), port 27017. It is recommended that you do not change these settings.
Install Node.js. We will use this to manage React and the packages needed to run our server. When you install Node.js, it will come with the npm package manager, which will also get installed. We will use npm to install dependencies and also to start the react application.
Download/clone your personal GitHub repository. The repository has a server and client directory. Each directory has the package.json and package-lock.json files which list the dependencies of the server and client applications respectively. Use the following commands to install all dependencies from the project’s root:
$ cd client/
$ npm install
$ cd server/
$ npm install
$ cd testing
$ npm install
A successful install should install the packages for mongoose, express, jest, eslint, axios, cors, and nodemon at the very least. A brief description of the relevant packages with links to their documentation is given below.
The express framework to write server-side code. Install express in the server directory using the command npm install express, if the above installation process failed. If you don’t yet understand how to use express, start with the examples discussed in class. For more detailed guidance look at the official Express documentation.
The mongoose data modeling library. Mongoose will help us connect with a MongoDB instance and define operations to manage and manipulate the data according to the needs of our application. Install it in the server directory using npm install mongoose, if the previous installation process failed.
The nodemon process manager, so we don’t have to restart the server every time we save changes to our server during the development process. Install it in the server directory using npm install nodemon, if not already installed. Alternatively, if the local install does not work, you can install nodemon globally using the command npm install -g nodemon. This is a good option for nodemon since it can be used across multiple node projects. To run the server using nodemon use the command nodemon server/server.js instead of node server/server.js.
We will use the axios library to send HTTP requests to our server from our client application. Refer to the code examples discussed in class, which demonstrate how axios is used in conjunction with React and Express. Install it in the client directory using npm install axios, if the previous installation steps did not work.
We will use the cors middleware to enable CORS to enable seamless connection between the client and the server during the development process. The current cors configuration allows all connections to the server for convenience. This is fine for a development environment. In a production environment where the application is deployed on a cloud service, the CORS policy needs to be specified more strictly. Read more about CORS https://developer.mozilla.org/en-US/docs/Web/HTTP/CORS.
Client/Server Application Architecture
The homework repository is structured as a client/server application. It has 2 directories – server and client. The server directory contains a schema of the data model in the models/schema directory in files answers.js, questions.js, and tags.js. These files are empty. You should fill them up with the appropriate schema definition for each corresponding document in our MongoDB collection. A class diagram for the expected schema definition is shown below:
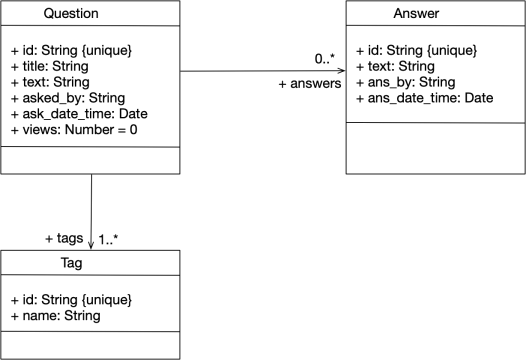
Once the schema is defined, you can run the script in server/populate_db.js using node to verify that your document schema is defined correctly. Read the instructions at the top of the script to see how to run it. If this script throws an error, you will know something is wrong with the schema definition and must fix it. Make sure the mongod process is up and running before you execute the script.
The server/server.js file is the main server script. You should run this script in node to start your server using the command node server/server.js. On running the script, a server should start in https://locahost:8000. Further, the server should connect to a running instance of MongoDB on server launch. The MongoDB instance should run with default settings, that is, mongodb://127.0.0.1:27017/ . The database name must be fake_so.
When the server is terminated (using CTRL+C), the database should also be disconnected and the message “Server closed. Database instance disconnected” should be displayed.
The client directory has the same structure as that of the React application you made in homework 2. You don’t need to change anything in the client code. The client code uses Axios to send HTTP method requests to the server. You should review the client code to understand how axios sends requests and and the response from the server is processed.
Summary of the default host/port settings:
|
Client Instance |
https://localhost:3000 |
|
Server Instance |
https://localhost:8000 |
|
Database Instance |
mongodb://127.0.0.1:27017/fake_so |
Testing
We are using two types of testing in this assignment -- unit testing and e2e integration testing.
The unit tests are written in Jest, a popular testing library in JavaScript. Skim through the Jest tutorial here before attempting to write any code. The e2e integration tests are the familiar Cypress tests which we have used before.
The tests in server/tests are Jest tests. Their purpose is to verify the correctness of the JavaScript functions and web services defined in the server. A brief description of the tests is as follows:
. newAnswer.test.js: The tests here are used to verify that the expected response is received when a request is sent to the server’s defined URI to create a new answer for a question.
. newQuestion.test.js: The tests here are used to verify that the expected response is received when a request is sent to the server’s defined URIs view all questions, view a question, and create a new question.
. tags.test.js: The tests here are used to verify that the expected response is received when a request is sent to the server’s defined URI view all tags and the number of questions for each tag.
. Question.test.js: The tests here are used to verify the functions defined in utils/question.js.
The Cypress e2e tests are in testing/cypress/e2e. The tests cases in fakeso.cy.js are similar to the ones in the previous assignment, except for one difference. This time we are interacting with a server that uses a persistent data store to read and write data . However, to write effective tests that verify the individual features in our application, we need to ensure that before every test, we start with a new database, and after every test the database is wiped clean. To this end, the cypress tests are configured with a beforeEach and afterEach construct to setup and destroy the backend database accordingly.
Running the tests
Use the following command to run the Jest unit tests:
$ cd server/
$ npm test tests/<name-of-test-file>
$ npm test (to run all tests)
Use the following commands to open the Cypress tests in a Cypress controlled browser:
$ cd client/
$ npm start
$ cd server/
$ node server.js
$ cd testing/
$ npx cypress open
Use the following commands to run the Cypress tests in headless mode:
$ cd client/
$ npm start
$ cd server/
$ node server.js
$ cd testing/
$ npx cypress run --spec </path/to/e2e/tests>
Application Behavior and Layout
The client’s functionality and layout are the same as before, except for two additional features. Users can now add hyperlinks in their question-and-answer texts. Furthermore, from the ‘all questions’ page when a user clicks on a tag name in a question, they are shown all questions for the tag. The additional features along with the new ones are already implemented. You don’t have to change any client-side code.
All your changes must be made to the server-side code. Specifically, you must make changes to the following files:
- server/controller/answer.js
- server/controller/question.js
- server/controller/tag.js
- server/models/schema/answer.js
- server/models/schema/question.js
- server/models/schema/tag.js
- server/utils/question.js
Solution Approach
We recommend the following ways in which you can complete the assignment:
1. Open the client application in a browser and interact with it. While interacting, monitor the application tab in the browser’s developer tools. The application tab will give you information about the HTTP requests the client sends to the server. The HTTP requests will contain URIs in their headers. You can use this information to understand the endpoints that need to be added/completed in the server.
2. Read the Jest tests. The Jests tests list all the endpoints the server should have, and the type of HTTP method associated with them. Further, the tests also have information about the Mongoose functions that need to be invoked for the service to send a successful response.
3. Develop the services incrementally. Start with the schemas, then move on to the server/utils. Once you pass those tests, you can start defining the services in the server/controller.
4. If all your Jest tests pass, then the Cypress tests should also pass unless you have changed the client's implementation.
Grading Rubric
1. Jest server tests: 48 pts.
2. Mongoose schema: 12 pts.
3. Cypress e2e tests: 30 pts.
4. EsLint in server/ code: 10 pts.
Total points: 100 pts.
Useful Resources
1. Mongoose Queries: https://mongoosejs.com/docs/queries.html
2. Mongoose Documents: https://mongoosejs.com/docs/documents.html
3. Jest Basics: https://jestjs.io/docs/getting-started
4. Mocking in Jest: https://jestjs.io/docs/mock-functions
5. Mocking Mongoose functions: https://github.com/alonronin/mockingoose
6. Express Tutorial: https://expressjs.com/en/guide/routing.html
2024-03-16