Assignment 3
Hello, dear friend, you can consult us at any time if you have any questions, add WeChat: daixieit
Assignment 3
In this assignment, you will use Matlab to show how the appearance of a 3D object changes as a result of rotation (assuming that the distance to the object is constant, and large as compared to the size of the object).
We will greatly simplify the problem by limiting it to convex polyhedra. The advantage of using convex polyhedra is that it greatly simplifies the problem of determining what parts of the surface are visible; a face of a convex polyhedron is visible if the normal to the face points toward the viewer.
The assigment is to write a function DrawRotatedPolyhedron(M,P). The input parameters are M, a 3x3 rotation (orthogonal) matrix, and P, a data structure representing a convex polyhedron. What the function does is to draw a two-dimensional picture of P after rotation by M in a form to be described below.
The input data structure representing of an n-face polyhedron P is a cellular array of size n, where each cell is a face of the polyhedron. A face of the polyhedron with k vertices is a 3 × k array where each column of the array contains the coordinates of the vertices. The columns are in counter-clockwise order, as viewed by someone outside the solid looking at the face.
For example, the unit cube is represented as a cellular array { X1,X2,Y1,Y2,Z1 Z2 } where X1 is the face at the low end of the x-axis, X2 is the face at the high end of the x-axis, and so on. Specifically,
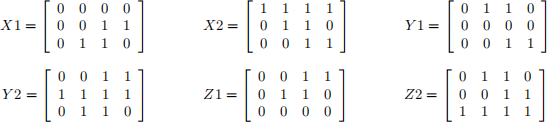
This and other shapes are defined as scripts in file polyhedra.m. The function EulerRotation(Psi,Phi,Theta) generates the 3D rotation with Euler angles Psi, Phi, Theta. These can be found in the course code library, linked from the course web site.
The picture of the shape will reflect the appearance of the rotated shape as seen from below; thus, the projection of the faces that are visible below onto the x-y plane (see figure). The picture will show (1) the visible vertices and edges (2) in the center of each face, the projection of a small circle around the center (which will project as an ellipse).
Constructing this picture involves the following steps:
• Apply the matrix M to each of the points in P, generating a new polyhedron P ′ . (Since the absolute position of of the polyhedron does not matter, you can use natural coordinates and a 3 × 3 rotation matrix rather than homogeneous coordinates and a 4 × 4 matrix.)
• Exclude faces that are not visible from below. To do this, compute the outward normal to each face, and exclude any face whose normal has a positive z-component. To find the outward normal to a face, choose any three consecutive vertices of the face a, b, c; the cross-product (c − b) × (a − b) is the outward normal.
• Project the vertices and edges onto the x−y plane simply by ignoring the z coordinate. Draw these in the picture.
• Compute the central circles on each visible face as follows:
– Compute the center o of the face as the average of the vertices of the face.
– Choose a radius r as half the distance from o to the nearest of the edges (use the formula for the distance from a point to an edge discussed in class)
– Find two orthogonal unit-length vectors ˆu, vˆ in the plane of the face. (If a, b, c are vertices in the face, then you can choose dir(b − a) as one and the perpendicular from c to line ab as the other.)
– Compute points on the circle in 3D as o + r cos(2πt/N)
+ r sin(2πt/N)
for t = 0 . . . N.
– Project these points onto the x − y plane by ignoring the z-coordinate, and connect the points to plot the ellipse.
2024-03-06