INFO1113 Assignment 2
Hello, dear friend, you can consult us at any time if you have any questions, add WeChat: daixieit
INFO1113
Assignment 2
Task Description
You are working for a company called ArcadeRetro which recreates popular arcade games for modern audiences. The company is currently developing a game called Demolition Man. In the game, the player must guide Bomb Guy around the map, destroying walls to reach the goal whilst avoiding enemies.
You have been given the task of developing a prototype of the game. A full description of gameplay mechanics and entities can be found below. An artist has created a simple demonstration of the game and has posted it on your online forum (Ed).
Working on your assignment
You have been given a scaffold which will help you get started with this assignment. You can download the scaffold onto your own computer and invoke gradle build to compile and resolve dependencies. You will be using the Processing library within your project to allow you to create a window and draw graphics. You can access the documentation from here.
Gameplay
The game contains a number of entities that will need to be implemented within your application.
Map
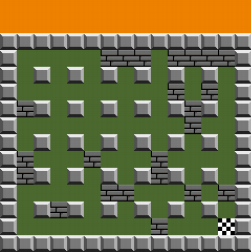
The map designates where Bomb Guy and enemies are allowed to move. Laid out as a grid, enemies can move along rows and columns where there is no wall. Maps are 13 rows tall, and 15 columns wide, with a 64 pixel offset between the top of the screen and the start of the first row. Each grid space is 32x32 pixels.
There are 4 different tile types within the map: solid, broken, empty and goal. Solid tiles cannot be broken and form physical barriers for Bomb Guy and the enemies. Broken tiles also form physical barriers for Bomb Guy and the enemies, however can be broken with the use of bombs. Empty tiles can be traversed through. The goal tile is the target tile for Bomb Guy. Upon reaching the Goal tile, the player has completed the level. Enemies can traverse through the Goal tile.
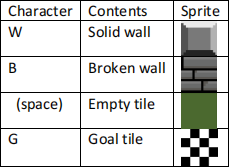
Map layouts are stored in text files, and the name of the map file can be found in config.json under the “path” attribute. Sample Map and config.json files can be found under resources on Ed. Map files store the maps as multidimensional character arrays, where each character represents what is in that cell. Note that a map is valid if it has a bounding border, a starting location for Bomb Guy, and a Goal Tile (all maps used for marking will be valid, but you should write your own tests for invalid maps and handle them as you see fit). There is no minimum requirement for the number of enemies, or the layout of the remainder of the map. Note that if another character is represented in the Map file (for example, ‘P’ to represent the starting location for Bomb Guy), the tile should be empty.
Bomb Guy

Bomb Guy is the player-controlled character in the game. Bomb Guy can move vertically and horizontally on the map and cannot pass through walls. Bomb Guy is controlled with the arrow keys (up, down, left and right). Bomb Guy changes their grid space on the map when the key is pressed (not held). For example, if the player presses down the left key, Bomb Guy should move one grid space to the left (assuming that they are able to). Bomb Guy should not move left again until the player releases the left key and presses it again.
Also present in the configuration file is the number of lives Bomb Guy has. The field is stored under the “lives” attribute. Bomb Guy can lose a life whenever they collide with an enemy or an explosion.
Bomb Guy has four sprites that can be rendered for each cardinal direction that form a walking animation cycle. Each sprite should be rendered for 0.2 seconds before moving onto the next sprite in the cycle. Bomb Guy should face same direction as they have just moved. For example, if Bomb Guy has just moved left, then the left-facing animation cycle should be rendered. Similarly, if Bomb Guy has just moved down, then the down-facing animation cycle should be rendered. On start-up, Bomb Guy should begin with the down-facing animation cycle.
When Bomb Guy reaches the goal tile, the next level should be loaded. Each level is stored in order in the configuration file in the field “levels”. If Bomb Guy reaches the goal tile for the final level, the win screen is shown.
Bomb Guy’s starting location is marked in the map file with the ‘P’ character.
Enemies

Enemies are the antagonists of Bomb Guy. Like Bomb Guy, enemies can move horizontally and vertically on the map. They cannot pass through solid and broken walls, however can pass through each other. All enemies move once every second, according to the AI for the specific enemy type. The Red Enemy moves in a straight line and turns to a random decision every time its path is blocked by a solid/broken wall. The Yellow Enemy moves in a straight line, but on collision with a wall will attempt to move clockwise (if it was moving left, it will try to move up, and if unable to, then try right and then left; similarly if it was moving down, it will try to move left, otherwise up or right).
When an enemy occupies the same grid space as Bomb Guy, Bomb Guy loses a life and the current level is reset. When Bomb Guy loses all of his lives, the game ends.
All enemies have the same animation patterns as Bomb Guy, with a 4 frame walking cycle animation for each cardinal direction, with each frame lasting 0.2 seconds.
Bomb

Bomb Guy has an infinite supply of bombs which they can use to help clear a path to the goal and remove enemies. When the player presses the SPACE key, Bomb Guy places a bomb on the grid space that they are standing on. The bomb remains stationary there for 2 seconds, at which point it detonates, causing an explosion.
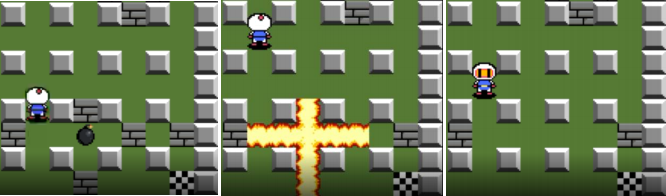
The explosion’s shockwave and fire extend in the four cardinal directions to a maximum of 2 grid spaces away from the location the bomb was placed. The explosion can be stopped earlier than 2 spaces if it comes in contact with a wall (either solid or broken), however broken tiles are then turned into empty tiles if they are caught in an explosion. An example of this can be seen below with before, during and after screenshots of an explosion.
If Bomb Guy is caught in the explosion, they lose a life and the level resets (assuming they have more than 1 life). If an enemy is caught in the explosion, they are removed from the level.
The bomb has 8 sprites used for its animation. Each sprite should last for 0.25 seconds, such that when the final sprite ends, the explosion begins.
There are 3 sprites for the explosion. The centre sprite is used where the bomb was placed. The horizontal explosion sprite is used for explosions in the same row as the original placement. The vertical explosion sprite is used for explosions in the same column as the original placement. The explosion should remain on the screen for 0.5 seconds.
UI
There are two main UI elements present on the screen: the number of lives remaining, and the time remaining for the level. Both should be shown at the top of the screen, using the provided icon sprites and PressStart2P-Regular.ttf font, similar to the screenshot below:
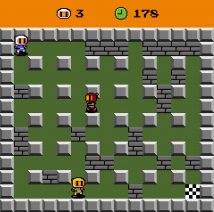
Note that the time remaining in seconds for each level is stored in the configuration file under the field “time”. If the timer reaches 0, the player loses the game.
Game Over Screen
There are two loss conditions for the game: Bomb Guy loses all of their lives, and the level timer reaches 0 seconds remaining. When a loss condition is reached, the Game Over screen is shown as below:
Win Screen
If Bomb Guy reaches the goal tile for the final level before any loss condition is reached, the player wins the game, and the Win Screen is shown as below:
Application
Your application will need to adhere to the following specifications:
● The window must have dimensions 480x480
● The game must maintain a frame rate of 60 frames per second.
● Your application must be able to compile and run on any the university lab machines (or Ubuntu VM) using gradle build & gradle run. Failure to do so, will result in 0% for Final Code Submission.
● Your program must not exhibit any memory leak.
● You must use the processing library (specifically processing.core and processing.data), you cannot use any other framework such as javafx, awt or jogl.
Assets
Artists within the company have produced sprites for your game. You have been provided a /resources folder which your code access directly. These assets are loadable using the loadImage method attached the PApplet type. Please refer to the processing documentation when loading and drawing an image.
Marking Criteria (14%)
Your final submission is due on Friday 5 November at 11:59PM. To submit, you must submit your build.gradle file and src folder to Ed (by pressing MARK) and your UML to Canvas.
Final Code Submission (6%)
You will need to have implemented and satisfied requirements listed in this assignment. Make sure you have addressed the following and any other requirements outlined previously.
● Window launches and shows orange background
● Configuration file is correctly read in
● Map loads and walls are displayed
● Bomb Guy and enemies are correctly loaded in
● Bomb Guy is controlled by input as described above
● Bomb Guy cannot walk through broken or solid walls
● Bomb Guy’s sprite is correctly animated in all directions as described above
● Enemies cannot walk through broken or solid walls
● Enemies move once every second
● Enemies exhibit the correct animation cycles
● The yellow enemy follows its path outlined above (clockwise decision on collision)
● The red enemy follows its path as outlined above (random decision on collision)
● Bomb Guy loses a life and the level resets if they collide with an enemy or an explosion
● Bomb Guy can deploy bombs by pressing the SPACE key
● Bombs have the correct animation sequence
● Bombs detonate after 2 seconds
● Explosions are properly created as explained above
● Explosions use the correct sprites as explained above
● Explosions destroy broken walls
● Explosions are halted by walls
● Bomb Guy loses a life if he hits an enemy or an explosion
● Enemies are removed if they walk into an explosion
● Bomb Guy’s lives are shown at the top of the screen
● The timer is shown at the top of the screen
● The next level is loaded if Bomb Guy reaches the goal tile
● The win screen is shown if Bomb Guy reaches the goal tile in the final level
● The game over screen is shown if the timer expires
● The game over screen is shown if Bomb Guy loses all of their lives
● Ensure that your application does not repeat large sections of logic
Test Cases (4%)
During development of your code, add test cases to your project and test as much functionality as possible. You will need to construct unit test cases within the src/test folder. To test the state of your entities without drawing, implement a simple loop that will update the state of each object but not draw the entity.
Ensure your test cases cover over 90% of execution paths (Use jacoco in your gradle build) Ensure your test cases cover common cases. Ensure your test cases cover edge cases. Each test case must contain a brief comment explaining what it is testing.
UML and Javadoc (4%)
You will need to submit a UML diagram in PDF form to Canvas to provide a brief graphical overview of your code design and use of Object Oriented Principles such as inheritance and interfaces (3%). Markers will use this to determine whether you have appropriately used those principles to aid you in your design, as well as figure out whether more should have been done. A general guideline is that markers will be looking for at least three levels in a class hierarchy (similar to how in Question 2 of the Week 5 tutorial, Teacher extends Employee which extends Person). Note that you should not simply use a UML generator from an IDE such as Eclipse, as they typically do not produce diagrams that conform to the format required. We suggest using software such as LucidChart or draw.io for making your diagrams.
Your code should be clear, well commented and concise. Try to utilise OOP constructs within your application and limit repetitive code. The code should follow the conventions set out by the Google Java Style Guide. As part of your comments, you will need to create a Javadoc for your program (1%). This will be properly covered in week 11 but the relevant Oracle documentation can be found here.
Suggested Timeline
Here is a suggested timeline for developing the project. Note that it is released on October 5 (start of week 8) and due November 5 (end of week 12).
Week 8: Familiarise yourself with gradle and processing, utilising the processing Javadoc and week 8 supplementary lecture. Identify opportunities to utilise Object Oriented Design principles such as inheritance and interfaces and begin to plan a design for the codebase with regards to the classes that you will need to make. Make a rough UML diagram for your design that you can base your codebase off of.
Week 9: Begin writing the actual code for the program. Start small, for example by initially creating the map and the player, and gradually add more elements. At the end of the week, you should have loading in the map and player movement finished, as well as some sprite management. If confident, use Test Driven Development (writing test cases at same time as writing the code). Conduct a large amount of user testing to ensure the initial mechanics work as expected.
Week 10: Develop more gameplay features, such as enemies, bombs, and explosions. Sprite management should be streamlined at this point and animations complete. You should have a fairly high code coverage for your test cases at this stage. If you are noticing any questionable design decisions, such as God classes or classes that are doing things they logically should not be doing (for example, the Bomb sprite being managed by Bomb Guy), this is the time to refactor your code.
Week 11: Finish developing the remaining features for your program, notably the configuration file, level system, timer and lives management. Additionally, finish writing your testing suite. You may find that topics covered this week and in week 10 may assist with cleaning up your code (for example, with the use of Streams and Functional Interfaces), so feel free to modify the code to make it more understandable.
Week 12: Create the UML and Javadoc for the program. Fix any remaining bugs that your code exhibits. Submit your code to Ed (by uploading the entire project and pressing MARK) and submit your UML to Canvas in PDF form.
2021-10-28