CSCI 1133 Homework 06
Hello, dear friend, you can consult us at any time if you have any questions, add WeChat: daixieit
CSCI 1133, Fall 2021
Homework 06
Unlike the computer lab exercises, this is not a collaborative assignment. See the syllabus and read section “Academic Dishonesty” for information concerning cheating. Always feel free to ask the instructor or the TAs if you are unsure of something. They will be more than glad to answer any questions that you have. We want you to be successful and learn so give us the chance to help you.
Purpose
The purpose of this assignment is to gain familiarity with lists and their uses.
Instructions
This assignment consists of 4 problems, worth a total of 30 points. You must edit the given file, called hw06.py, and submit it to Gradescope. If you have questions, ask!
Because your homework file is submitted and tested electronically, the following are very important:
● Submit the correct file, hw06.py, through Gradescope by the due date deadline.
● Your program should run without errors when we execute it using Python 3.
Submit your work to Gradescope under the Homework 06 assignment. Make sure that your file is called hw06.py: if you don’t match the file name exactly then the testing script won’t work and you’ll lose points. You don’t have to submit any other files (such as the .bmp files generated)
The following will result in a score reduction equal to a percentage of the total possible points:
● Constraints not followed (up to 40%)
● Bad coding style (meaningless variable names, break statements, etc.) (10%)
Some of the points in this assignment are given based on the Gradescope autograder, so doing something that breaks the gradescope tests (naming your file incorrectly, naming your function incorrectly, having syntax errors, or using the input() function somewhere the autograder doesn’t expect) are likely to lose you all of those points.
Documentation:
Documentation is provided for you in the hw06.py template for this assignment, so you don’t need any additional documentation
Image Manipulation
Every image rendered on a computer can fundamentally be represented as a three dimensional matrix. An image can be broken down into a two dimensional array of pixels (short for “picture element”), which appear to be tiny squares of a single color that, when combined, make up the images you see on a computer screen. However, this isn’t quite accurate: each pixel is actually displayed as light produced by three tiny light-emitting diodes: one red, one green, and one blue.
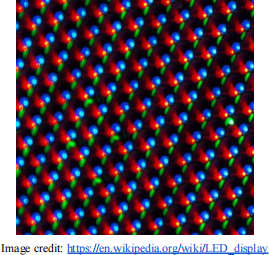
For this reason, pixel data is itself stored as a list of three elements, representing the relative strengths of the red, green, and blue diodes needed to produce the required color for the pixel; these are often given as numbers between 0 and 255. Since images are two dimensional arrays of pixels, and we can represent a pixel as a one-dimensional list of three integers, we can represent an image as a three dimensional matrix (that is, a list of lists of lists) of integers in Python. In the following problems, you will be manipulating matrices of this format in order to alter image files in various ways. You can see an example of how an image is represented as a 3D matrix below:

Download the template file hw06.py from Canvas, along with all of the example .bmp files (They are all in the compressed folder labelled hw06files.zip). Note that you will only be submitting hw06.py, and not the entire folder, so once you have everything working, upload hw06.py, and only hw06.py, to Gradescope (don’t upload the hw06 folder, since we will not be able to find your hw06.py file if it’s inside a folder). We do not need your image files. The template file has a function
transform_image(fname, operation)
which is designed to read in the bmp format image file at fname, convert the data into a pixel matrix as described above, perform an operation on it, and then convert that matrix back into a .bmp file. In particular, the input file is assumed to be in the same directory as hw06.py, and the output file will be named the same as the input, except with <operation>_ appended to the front. For example, transform_image('cat.bmp', 'grayscale') will produce a grayscale version of cat.bmp, called grayscale_cat.bmp.
This function is already working, so you do not need to edit it. However, the function itself doesn’t actually perform any operations on the pixel matrix generated from the .bmp file; it instead calls on one of six functions to do that work: invert, grayscale, rotate, edge_detect, swap_red_blue, and blur. The last two functions have been done for you as examples, but the first four you’ll have to implement.
All of these functions take in a three dimensional matrix that represents an image, as described above, and should return another matrix representing the image with the specified operation performed. It is up to you to decide whether to create a new matrix, or just alter the original to accomplish this. Your task in this assignment is to implement each operation.
Constraints:
● Do not import/use any Python modules except for copy (see part D hints).
● Do not alter the transform_image or big_end_to_int functions in the hw06.py template.
● Do not change the function names or arguments.
● Follow the instructions in the hw06.py template.
● Your submission should have no code outside of the function definitions aside from comments and import statements.
● You are permitted to write helper functions outside of the ones provided in the template.
● You are not required to submit any of the .bmp files to Gradescope: only the hw06.py file will be graded.
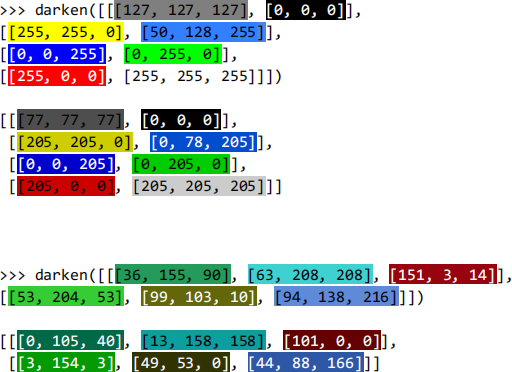
Problem A. (7 points) Darken
First, you will be implementing the darken function. (Reminder: all of these functions take in a three-dimensional list, and return a three-dimensional list: it’s up to you whether to create a new list or alter the original). This function darkens the image by subtracting 50 from each of the pixel color values. Recall that each color component in every pixel is an integer between 0 and 255, inclusive, so if any pixel would be reduced below 0, it should simply be set to 0.
Hint:
● Go look at the red_blue_swap example near the bottom of your hw06.py template if you’re unsure how to loop through the pixels and access specific colors at each pixel.
Examples:
(note that the highlighting and the new line for each row are for clarity purposes only and will not be present in the actual console output, but the numbers should be correct)
Below is the result of using transform_image with the darken operation on the following files found on Canvas, assuming that they are downloaded to the same folder as your hw06.py script. Make sure your code produces the correct values for the small matrices above before attempting to run it on an entire image. You’ll also want to comment out any print statements before running on an image file, since if they’re in the innermost loop they’ll print millions of values and possibly freeze your computer, just due to how many pixels are in an image.
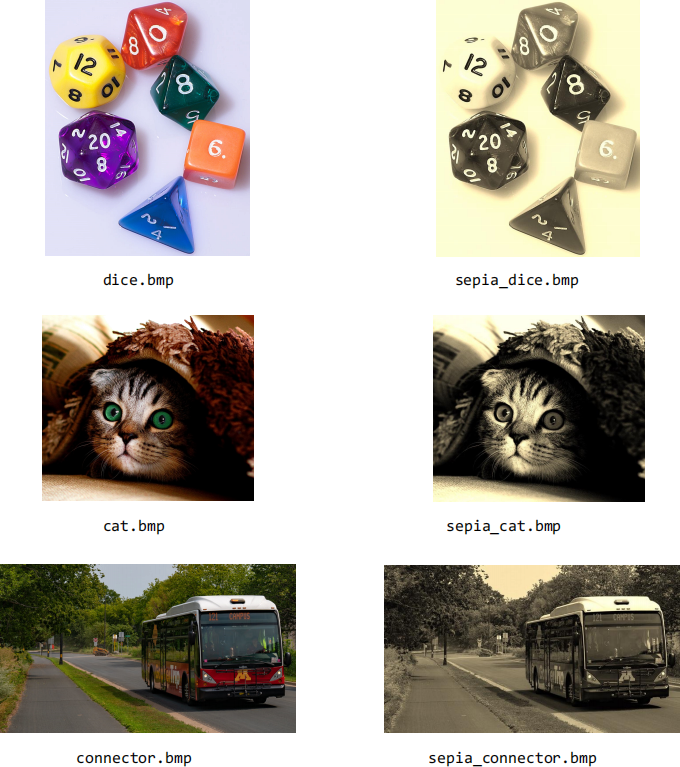
>>> transform_image('dice.bmp','darken')
>>> transform_image('cat.bmp','darken')
>>> transform_image('connector.bmp','darken')

Problem B. (7 points) Sepia Filter
Next, you will implement the sepia function. This function will apply a formula to all the pixels that will result in a faded coloring that gives an image an appearance of being from a long time ago. To do this, we will update every pixel’s color values as follows:
newred = red * .39 + green * .75 + blue * .19
newgreen = red * .35 + green * .69 + blue * .17
newblue = red * .27 + green * .53 + blue * .13
Where “newred”, “newgreen” and “newblue” mean the pixel’s new color value for red, green and blue.
Remember that all these color values should be ints between 0 and 255, so make sure to enforce that is still the case after the filter is applied. To do this, you should truncate the floating point values down to integers using the int() function (not round), and any values above 255 should be set to 255.
Examples:
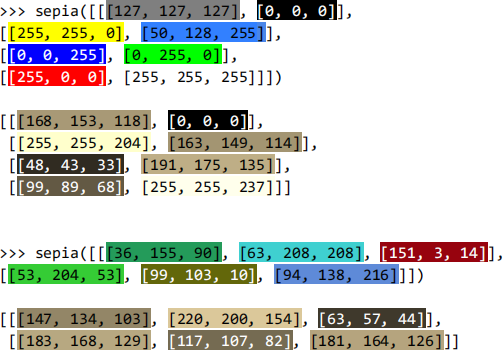
Below is the result of using transform_image with the sepia operation on the following files found on Canvas, assuming that they are downloaded to the same folder as your hw06.py script:
>>> transform_image('dice.bmp','sepia')
>>> transform_image('cat.bmp','sepia')
>>> transform_image('connector.bmp','sepia')
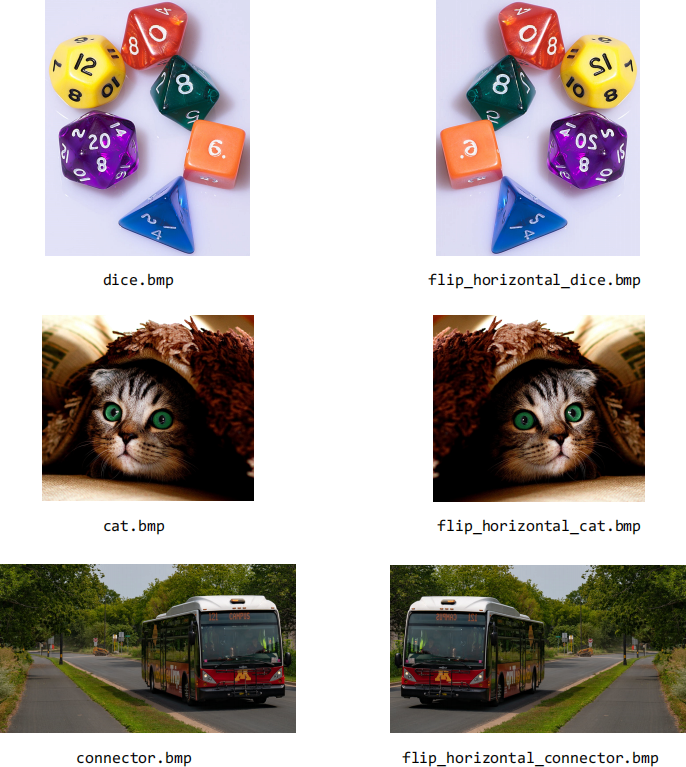
Problem C. (7 points) Horizontal Reflection
Next, you will be implementing the flip_horizontal function. This reflects the image horizontally. Think about what this means in the context of the 3D matrix.
Examples:
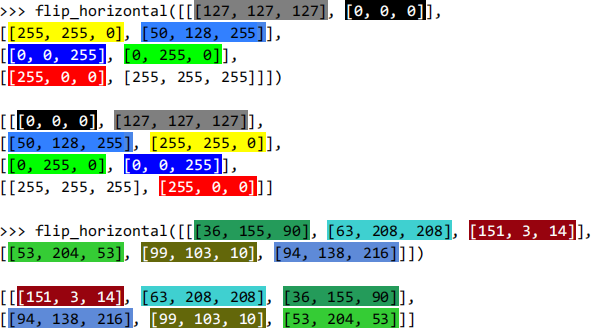
Below is the result of using transform_image with the flip_horizontal operation on the following files found on Canvas, assuming that they are downloaded to the same folder as your hw06.py script:
>>> transform_image('dice.bmp','flip_horizontal')
>>> transform_image('cat.bmp','flip_horizontal')
>>> transform_image('connector.bmp','flip_horizontal')
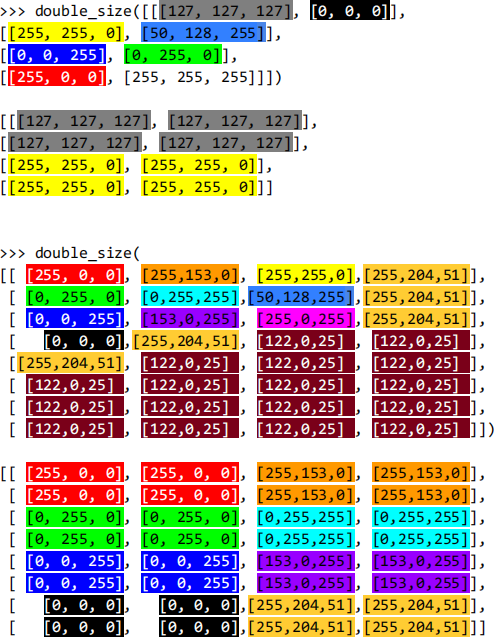
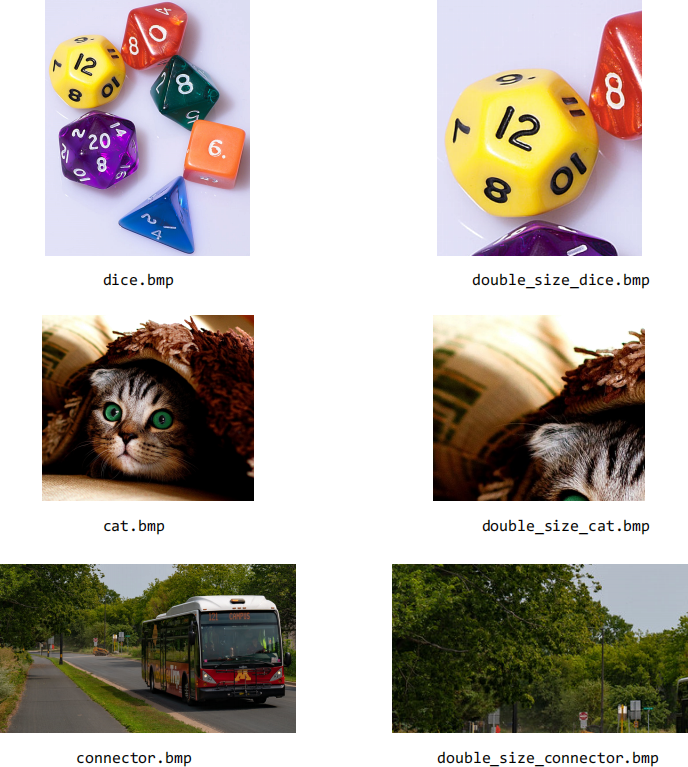
Problem D. (9 points) Double size
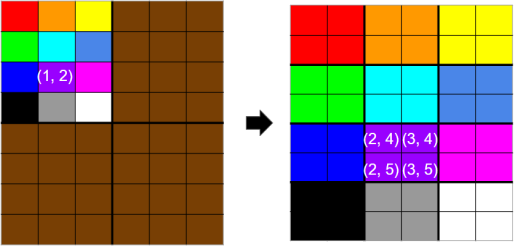
Finally, you will be implementing the double_size function, in which we will double the size of the upper left-hand quadrant of the original image.
Assume for this problem that the width and the height of the image are both divisible by 2. For each pixel in the upper left quadrant of the input image, create four pixels in a 2x2 box in the output image, effectively doubling the size of that part of the image. The other three quadrants of the input image can be ignored.
Notice that unlike the previous four problems, one pixel (x, y) in the input image can be used for multiple different pixels in the output image. This creates a problem: if the input image and the output image are pointing to the same lists, then we’ll be changing the input image as we use it to compute the output. To fix this, make a copy of the entire 3D matrix that represents the input image using the deepcopy method in the copy module:
new_matrix = copy.deepcopy(img_matrix)
Once we have two copies of the same image, we just need to adapt the rule that one of the images can only be read from (this is the input image), and one can only be written to (this is the output image): this will avoid the problem of potentially overwriting the data in a pixel that we need to read from later. In other words, make sure one of the image matrices is never altered, so that you can use that one as a reference for overwriting values in the other one.
Hints:
● See the start of the blur example near the bottom of the template file for an idea of how to use copy.deepcopy. This function will be substantially less complicated than blur, however.
● A pixel with coordinates (x,y) in the upper left quadrant of the input image will be copied to the the 2x2 square of pixels at coordinates (2x,2y), (2x+1,2y), (2x,2y+1), and (2x+1,2y+1) in the output image.
Examples:
Below is the result of using transform_image with the double_size operation on the following files found on Canvas, assuming that they are downloaded to the same folder as your hw06.py script.
>>> transform_image('dice.bmp','double_size')
>>> transform_image('cat.bmp','double_size')
>>> transform_image('connector.bmp','double_size')
Uploading to Gradescope
Once you have completed your code, run the file one last time to ensure that you didn’t accidentally introduce any syntax errors. You should always run the file one last time before submitting, on every homework assignment. Losing 30% of your grade on an assignment because you accidentally forget a single # somewhere and caused a syntax error feels awful, so ensure it doesn’t happen to you.
Then navigate to the Gradescope site for the course, and submit your file to the correct assignment. If you submit before the due date on Tuesday evening, you should see a series of automated tests that are run on your submission. Passing these is not a guarantee that you will get full credit on the assignment, since there are aspects of your code that need to be graded manually, but it is a good sign. If you fail a test, you’re welcome to submit a new file as many times as you want. Note that if you are submitting late, you will not see any automated test results.
If you run into difficulties on this step, post your issue on the forums, or come into office hours, and we’ll help you get it fixed.
2021-10-26