CPSC 314 Assignment 2: Transformation
Hello, dear friend, you can consult us at any time if you have any questions, add WeChat: daixieit
CPSC 314 Assignment 2: Transformation
Due on Feb 16, 2024
1 Introduction
In this Assignment you will utilize your knowledge of transformations to make things move. Here we will study how to build and animate with object hierarchies.
1.1 Getting the Code
Assignment code is hosted on the UBC Students GitHub. To retrieve it onto your local machine navigate to the folder on your machine where you intend to keep your assignment code, and run the following command from the terminal or command line:
git clone https://github.students.cs.ubc.ca/CPSC314-2023W-T2/a2-release
1.2 Template
❼ A2.html is the launcher of the assignment. Open it in your preferred browser to run the assignment, to get started.
❼ A2.js contains the JavaScript code used to set up the scene and the rendering envi-ronment. You will do most of your work here for this assignment.
❼ glsl/ contains the vertex and fragment shaders for eye and sphere.
❼ js/ contains the required JavaScript libraries. You do not need to change anything here.
❼ glb/ contains the geometric model which needs to be loaded in the scene.
❼ images/ contains the texture images used.
2 Work to be done (100 points)
Here we assume you already have a working development environment which allows you to run your code from a local server. (if you do not, check out instructions from Assignment 1 for details). Once you have set up the environment, Study the template to get a sense of how it works.
2.1 Part 1: Required Features
a. (15 points) Load the glTF armadillo model.
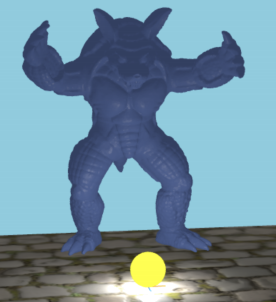
Figure 1: Question 1.a. Starter scene.
In this assignment, we’ll shift from a OBJ model to a glTF model which is more powerful. A rigged glTF armadillo is provided in glb/. Your task is to load the armadillo into the scene as in Figure 1. Specifically, fill in function loadAndPlaceGLB() in js/setup.js and make necessary changes to A2.js. You can check THREE.js’s website for glTF loader and function loadAndPlaceOBJ() for reference.
Resource: https://threejs.org/docs/examples/en/loaders/GLTFLoader
b. (20 points) Armadillos have Eyes. Your task here is to bless the Armadillo with a pair of googly eyes. One eyeball model is already provided. Your job is to place two copies of this eyeball onto where the eyeballs should be on the Armadillo using an appropriate modelMatrix. The result should look similar to Figure 2.
Hint 1: You can do this entire question in A2.js.
Hint 2: Don’t worry if the eyes are initially pointing backwards into the Armadillo’s head; in the next question you will have the opportunity to orient them correctly.
c. (20 points) Staring at the sphere. What good are eyes if they don’t lookAt anything? Direct the Aramdillo’s gaze towards the nefarious floating sphere. Ensure that the eyes look at the sphere as it moves around the scene as shown in Figure 3.
Hint 1: THREE.Matrix4 and THREE.Object3D have a method called lookAt that may be of use.
d. (20 points) Laser eyes! Arm the Armadillo with eye lasers. Shoot the lasers from the Armadillo’s eyes at the sphere when it gets too close. A distance threshold (units in world
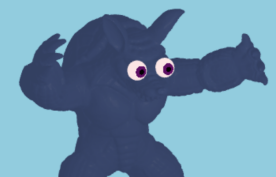
Figure 2: Question 1.b: Give the Armadillo eyes.
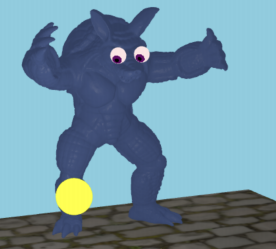
Figure 3: Question 1.c: Rotate the eyes to look at the sphere.
space) named LaserDistance is provided in A2.js. To be more specific, create two lasers from the eyes to the sphere. You need to create the geometries and shaders by yourself. Figure 4 shows a possible result.
Hint 1: You may use any kind of material for the lasers (even a ShaderMaterial).
Hint 2: Note that the distance threshold between the sphere and the eye is given in the world frame, but the scale of the laser will likely be in a different frame.
e. (25 points) You’re too close! Make the Armadillo wave its left arm, and wave more vigorously when the Orb is “too close” to it, as if it is scared. By “too close” we mean when the horizontal distance (measured on the x-z plane in world space) between the sphere and the Armadillo’s center is within a threshold distance waveDistance (units in world space). Also, when the distance is within the threshold, make the waving even more vigorous as the Orb gets closer.
Hint 1: To animate the Armadillo, you may want to access bones within the Armadillo’s skeletal structure. To do this, you can make changes at where you called loadAndPlaceGLB().
Hint 2: Beware that Javascript callbacks are asynchronous, if you ever need to access a variable defined within a callback function from somewhere outside of the callback’s scope.
Hint 3: You may use the clock variable for implementing the Armadillo’s periodic waving
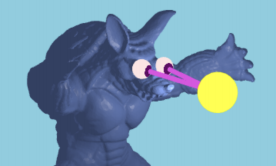
Figure 4: Question 1.d. Give the Armadillo laser eyes!
2.2 Part 2: Creative License (Optional)
You have many opportunities to unleash your creativity in computer graphics! In this op-tional section, and you are invited to extend the assignment in fun and creative ways. We’ll highlight some of the best work in class. A number of exceptional contributions may be awarded bonus points. Here are a couple of ideas we can think of:
❼ Create more complex motions for the Armadillo, e.g. making its head move around, while also making the eyes and the laser beams move along with the head.
❼ Make the Armadillo dance!
❼ Implement an inverse kinematic solver for one of the Armadillo’s arms.
3 Submission Instructions
3.1 Directory Structure
Under the root directory of your assignment, create two subdirectories named “part1” and “part2”, put all the source files and everything else required to run each part in the respective folder. Do not create more sub-directories than the ones already provided.
You must also write a clear README.txt file which includes your name, student number, and CWL username, instructions on how to use the program (keyboard actions, etc.) and any information you would like to pass on to the marker. Place the file under the root directory of your assigment.
3.2 Submission Methods
Please compress everything under the root directory of your assignment into a2.zip and submit it on Canvas. You can make multiple submissions, but we will grade only the last one.
4 Grading
4.1 Point Allocation
Part 1 has 100 points in total; the points are warranted based on
❼ The functional correctness of your program, i.e. how visually close your results are to expected results;
❼ The algorithmic correctness of your program;
❼ Your answers to TAs’ questions during F2F grading.
Part 2 is optional and you can get bonus points (0-10 points) at the instruction team’s discretion. The max score for each assignment is 110 points.
4.2 Face-to-face (F2F) Grading
For each assignment, you are required to meet face-to-face with a TA during or outside lab hours to demonstrate that you understand how your program works. To schedule that meeting, we will provide you with an online sign-up sheet. Details regarding when and how to sign up will be announced on Canvas and on Piazza.
4.3 Penalties
Aside from penalties from incorrect solution or plagiarism, we may apply the following penalties to each assignment:
a. Late penalty. You are entitled up to three grace (calendar) days in total throughout the term. No penalties would be applied for using them. However once you have used up the grace days, a deduction of 10 points would be applied to each extra late day. Note that
(a) The three grace days are given for all assignments, not per assignment, so please use them wisely;
(b) We check the time of your last submission to determine if you are late or not;
(c) We do not consider Part 1 and Part 2 submissions separately. Say if you submitted Part 1 on time but updated your submission for Part 2 one day after the deadline, that counts one late day.
b. No-show penalty. Please sign up for a grading slot at least one day before F2F grading starts, and show up to your slot on time. So a 10-point deduction would be applied to each of the following circumstances:
(a) Not signing up a grading slot before the sign-up period closes;
(b) Not showing up at your grading slot.
If none of the provided slots work for you, please contact the course staff on Piazza before the sign-up closes. Also, please note that
(a) we would not apply the no-show penalty if you are unable to sign up/show up on time because of a personal health emergency, and in such cases we would like to see a written proof of the situation.
(b) if you decide to make a late submission and only get graded after the F2F grading period ends, you need to show the TA your submission time on Canvas so he/she knows you submitted late and will not apply the no-show penalty.
(c) In the past some students reported that they got their names overwritten by others, or their names disappeared mysteriously due to technical glitches. Therefore we suggest you to take a screenshot of your slot after sign-up just to prove you have done it.
2024-02-08
Computer Graphics