Mini-Project 1
Hello, dear friend, you can consult us at any time if you have any questions, add WeChat: daixieit
Mini-Project 1
The primary goal of this assignment is to provide an introduction to using cryptographic APIs. Specifically, you will need to specify a secure AES mode of operation (we are using GCM), correctly generate and use initialization vectors, and ensure both message integrity and confidentiality. You will also be getting first-hand experience in how Diffie-Hellman works, and its susceptibility to on-path attacks.
Mini-Project 1 is due on the due date shown on the class schedule before 11:55pm EST. The assignment will be submitted via Gradescope. If your Gradescope account was not automatically created and linked, click on the “Mini-Project 1: Gradescope” assignment in Moodle and it should set you up. Contact the TA and Instructor if you are having trouble.
Collaboration: You may not collaborate on this mini-project. The project should be done individually. You may search the Internet for help, but you may not copy (either copy-and-paste or manual typing) code from another source. You may use code from the official Python documentation, PyCryptodome documentation, or from the instructor or TA.
Posting Solutions: You are explicitly forbidden from posting your solution in a public form (e.g., GitHub). If you need to share your solution as part of a job interview, you should create a private repository and grant that individual access. Please ask the instructor if you have any questions or concerns.
Programming Language: You will use Python 3 for this assignment.
Using a Single Host: While we are performing network socket programming, you can test all parts on a single host. Use localhost or the loopback address 127.0.0.1 for the destination server and it will work. For Part 4, you will need to specify different ports for the proxy and the server, since two processes cannot listen on the same port on the same host.
What to submit: You should submit to Gradescope a README text file containing your name and UnityID, as well as the Python 3 source code files for parts 1-5 (5 is optional). The filenames for the source code files are specified in each part: uft, eft, eft-dh, dh-proxy, and lj-proxy. Note that there is no .py on the ends of these filenames; however, adding .py is okay.
Autograder: This assignment uses an autograder that will automatically grade your work. You will submit your program for autograding by uploading it to Gradescope. Any program that does not have a perfect score will be manually graded after the due date. You may submit the assignment an unlimited number of times. If you find a bug with the autograder, please notify the TA.
Autograder Environment: Your program will be executed with Python version 3.10. PyCryptodome is the only python package that is installed by default. No additional packages are needed to complete the assignment but you may include a requirements.txt file if additional packages are needed by your program.
Points: Mini-Project 1 has a maximum of 100 points with an additional 10 points for extra credit. Partial credit may be awarded at the discretion of the grader in some cases, but it is not guaranteed.
A Last Note: While PyCryptodome replaces the no longer maintained (and insecure) PyCrypto module, some source code analysis tools (e.g., bandit) suggest that PyCryptodome should only be used when compatibility with PyCrypto is needed. If you are developing a new project, you are encouraged to use pyca/cryptography which doesnt ask developers to deal with low level cryptographic primitives. Well ... it exposes them through a hasmat API. For the purposes of this assignment, I’d like you to get some experience working with the primitives.
Part 1 (25 points): Unencrypted File Transfer
In Part 1, you will use network sockets to transfer a file from a client to a server. To simplify operation, the client will “read” a file from STDIN and the server will “save” the file to STDOUT. Your code for the client and server must reside in the same Python script file (uft).
Your program must differentiate between client and server mode using command line arguments which must conform to the following format:
uft [-l PORT > OUTFILE] [SERVER_IP_ADDRESS PORT < INFILE]
For example, the following is an example execution in two different terminal windows.
[server]$ ./uft -l 9999 > outfile.txt
[client]$ ./uft 127.0.0.1 9999 < infile.txt
Both programs must terminate after the file is sent. You may assume the server is started before the client.
The provided starter code includes command line argument parsing and will execute the client or server function based on the provided arguments. You may not add extra command line arguments.
Network Data Exchange: The client will generate Packet Data Units (PDUs) containing binary file data that are then transmitted to the server. The PDUs must conform to the following specifications:
Data PDU
Element Size in Bytes Encoding Description
Length 2 Raw Bytes Number of data bytes following this element
Data Length Raw Bytes File Data
So the beginning of an example data segment with 70 bytes of data could look as follows:
00 46 53 6F 6D 65 74 69 6D 65 73 20 79 6F 75 20
6E 65 65 64 20 74 6F 20 75 6E 64 65 72 73 74 61
6E 64 20 74 68 65 20 62 69 74 73 20 74 68 61 74
20 6D 61 6B 65 20 6F 72 20 62 72 65 61 6B 20 70
72 6F 74 6F 63 6F 6C 73
with the first two bytes 00 46 encoding the length of the following data (0x46 = 70). The total length of the PDU is thus 72 bytes to account for the header. Ensure the length bytes are sent in network order (big-endian).
Network Sequence: The PDUs will be transmitted as shown in the following network sequence diagram.

Important: All parts of this assignment must work for both small and big files, both text based and binary based. I recommend trying first with a simple text file and then testing with a PDF before submitting.
Tip: The entire file does not need to be sent in a single PDU. Multiple PDUs may be sent, each containing a portion of the file. The autograder will by default send 1024 bytes of data at a time, but it will accept any length up to 65535 bytes. Each PDU will contain the length of the data within that PDU, not the total number of bytes in the file.
Tip: Use sys.stdin.buffer.read() to read from STDIN and sys.stdout.buffer.write() to write to STDOUT. Wrappers for these functions are provided in the starter code.
Part 2 (25 points): Encrypted File Transfer
In Part 2, you will extend uft with symmetric encryption and integrity verification using AES running in Galios Counter Mode (AES-GCM) mode of operation. Recall that GCM avoids the need to incorporate integrity into the cryptographic protocol (e.g., Encrypt-then-MAC).
It is highly recommended you test uft against the autograder before starting this part of the assignment as this part builds off of the code you wrote in part 1.
To perform the encryption, you will use PyCryptodome. Note that PyCryptodome is a drop-in replacement for PyCrypto, which does not support GCM. Unfortunately, most systems provide PyCrypto instead of PyCryptodome, so you may need to read the installation instructions. The documentation for PyCryptodome has several useful examples, but you will likely need to read the API documentation, specifically for using GCM.
You must:
1. Use AES-256 in GCM mode
2. Compute a 32 byte key from the command line argument using PBKDF2 (Password-Based Key Derivation Function), which is available in PyCryptodome. Note that that using PBKDF2 requires a salt, which is a securely generated random value. Both the client and server need to use the same salt; therefore, your connection should start with the client sending the salt to the server. This initial exchange will also get you ready for Part 3.
3. Pad the data into 16 byte (128 bit) AES blocks using the pkcs7 style. The pad and unpad functions are available as utility functions in PyCryptodome.
4. Transmit to the server the IV (“nonce” in the GCM API), verification tag, and encrypted data.
Your code for the client and server must reside in the same Python script (eft), which must conform to the following command line options:
eft -k KEY [-l PORT > OUTFILE] [SERVER_IP_ADDRESS PORT < INFILE]
The following is an example execution.
[server]$ ./eft -k SECURITYISAWESOME -l 9999 > outfile.txt
[client]$ ./eft -k SECURITYISAWESOME 127.0.0.1 9999 < infile.txt
You may assume the server is started before the client.
The provided starter code includes command line argument parsing and will execute the client or server function based on the provided arguments. You may not add extra command line arguments.
If an integrity error occurs (e.g., the key is incorrect), the server should write the following error text to STDERR. Note that this exact error message is required to pass all automated grading checks.
Error: integrity check failed .
The following is an example execution demonstrating the integrity check output (red text denotes output to STDERR).
[client]$ ./eft -k SECURITYISAWESOME 127.0.0.1 9999 < some-file.txt
[server]$ ./eft -k SECURITYISBORING -l 9999 > some-file.txt
Error: integrity check failed .
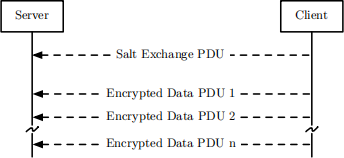
Network Data Exchange: The client will generate Packet Data Units (PDUs) containing either binary file data or the salt that are transmitted to the server. The PDUs must conform to the following specifications:
Salt Exchange PDU
Element Size in Bytes Encoding Description
Salt 16 Raw Bytes Securely generated random value used in PBKDF2
Data PDU
Element Size in Bytes Encoding Description
Length 2 Raw Bytes Number of nonce, tag, and data bytes
Nonce 16 Raw Bytes Random Initialization Vector (IV)
Tag 16 Raw Bytes Integrity Verification Tag
Data Length - 32 Raw Bytes Encrypted File Data
Network Sequence: The PDUs will be transmitted as shown in the following network sequence diagram.
Tip: PyCryptodome installs into the Crypto python module.
Tip: Each data packet should be encrypted independently.
Tip: PBKDF2 will by default produce a 16 byte key for AES-128. It accepts an optional length parameter dkLen which should be set to 32 to get a 32 byte key. Do not pass other optional arguments to PBKDF2 as this will change the generated key which will cause some autograder tests to fail.
Part 3 (25 points): Encrypted File Transfer with Diffie-Hellman Key Exchange
In Part 3, you will extend eft to calculate a key using the Diffie-Hellman key exchange protocol. Therefore, instead of getting the key from the command line, you will first perform a DH message exchange between the client and the server to establish a symmetric key. The Diffie-Hellman key exchange protocol replaces the PBKDF2 key derivation used in Part 2.
It is highly recommended you test eft against the autograder before starting this part of the assignment as this part builds off of the code you wrote in part 2.
For the key exchange, we will use a fixed g and p as follows:
g=2
p=0x00cc81ea8157352a9e9a318aac4e33ffba80fc8da3373fb44895109e4c3ff6cedcc55c02228fccbd551a50 4feb4346d2aef47053311ceaba95f6c540b967b9409e9f0502e598cfc71327c5a455e2e807bede1e0b7d23 fbea054b951ca964eaecae7ba842ba1fc6818c453bf19eb9c5c86e723e69a210d4b72561cab97b3fb3060b
Note that Python has native support for handling large numbers and you do not need to store the value p or the output of any of the exponentiation steps in a special data type.
You must use a good, cryptographic source of randomness for the DH secrets. Do not use Python’s built in random.random() function as it is not cryptographically secure. PyCryptodome has a secure random number generator. You may also use os.urandom() in Python.
The output of the diffie-hellman key exchange process should be first encoded to a hex string (without the “0x” added by, e.g., hex()) and then hashed in its utf-8 encoding using the SHA256 hashing algorithm. Take the first 32 bytes of the digest output and use it as the session key.
Tip: Deriving the session key in different ways to the autograder is a very common reason for failing tests (while the test using your client + server passes).
• E.g., a common mismatch is how the hex string is generated just because Python isn’t very consistent there:
val = 1024
hex(val) # = ' 0x400 '
val.to_bytes(2).hex() # = ' 0400 '
' %x ' % val # = ' 400 '
The autograder uses the last example (hexval = ' %x ' % val) for generating hex strings. Number to hex string converters that correctly format the value are provided in the starter code.
• The autograder uses the .digest() of the hash to derive the session key, not the .hexdigest!
• The autograder works with the SHA256 implementations from both pycryptodome and hashlib.
Your code for the client and server must reside in the same Python script (eft-dh), which must conform to the following command line options:
eft-dh [-l PORT > OUTFILE] [SERVER_IP_ADDRESS PORT < INFILE]
The following is an example execution.
[server]$ ./eft-dh -l 9999 > outfile.txt
[client]$ ./eft-dh 127.0.0.1 9999 < infile.txt
You may assume the server is started before the client.
The provided starter code includes command line argument parsing and will execute the client or server function based on the provided arguments. You may not add extra command line arguments.
Network Data Exchange: The client will generate Packet Data Units (PDUs) containing either binary file data or the public diffie-hellman key exchange value that are transmitted to the server. The server will also generate a PDU containing the public diffie-hellman key exchange value that is transmitted to the client. The PDUs must conform to the following specifications:
Diffie-Hellman Exchange PDU
Element Size in Bytes Encoding Description
Salt 384 UTF-8 String Diffie-Hellman Public Value A or B
Important: The Diffie-Hellman Public value A or B is sent as a 384 character UTF-8 encoded string. Zeros must be padded to the left if the output of A or B produces a number that is less than 384 digits in length. The number should not be sent as raw bytes. A conversion function is provided in the starter code.
Data PDU
Element Size in Bytes Encoding Description
Length 2 Raw Bytes Number of nonce, tag, and data bytes
Nonce 16 Raw Bytes Random Initialization Vector (IV)
Tag 16 Raw Bytes Integrity Verification Tag
Data Length - 32 Raw Bytes Encrypted File Data
Network Sequence: The PDUs will be transmitted as shown in the following network sequence diagram.
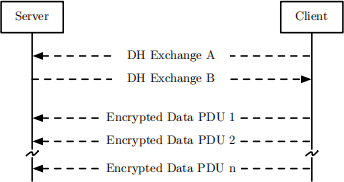
Tip: The DH Exchange packets can both be transmitted at the same time. The A packet does not have to arrive at the server before the B packet can be transmitted. The autograder implementation will transmit A or B as soon as it has been calculated.
Part 4 (25 points): On-Path Attack on DH Key Exchange
In Part 4, you will create a proxy called dh-proxy that performs an on-path attack on eft-dh and saves a copy of all traffic passing through the proxy. To simplify the assignment, we will assume the client connects directly to the proxy and that the proxy connects directly to the target server. Recall from class that an on-path attack is achieved by a) establishing a DH exchange with the client; b) establishing a DH exchange with the server; and c) decrypting data from the client and re-encrypting data to the server. Therefore, you will be able to reuse your DH key exchange code from Part 3.
It is highly recommended you test eft-dh against the autograder before starting this part of the assignment as this part builds off of the code you wrote in part 3.
The tricky part of this part is not the crypto, but rather the network programming. You need to read from the socket with the client and then write to the socket for the server. While you could use threads to handle this, select is much easier to use.
Your program must conform to the following command line options:
dh-proxy -l LISTEN_PORT SERVER_IP_ADDRESS SERVER_PORT
The following is an example execution.
[server]$ ./eft-dh -l 9998 > outfile.txt
[proxy]$ ./dh-proxy -l 9999 server.ip.address 9998 > interceptedfile.txt [client]$ ./eft-dh proxy.ip.address 9999 < some-file.txt
You may assume the server is started first, then the proxy, and finally the client.
The provided starter code includes command line argument parsing and will execute the proxy function with the provided arguments. You may not add extra command line arguments.
Network Data Exchange: The proxy will transmit and receive PDUs containing either binary file data or the public diffie-hellman key exchange value. The PDUs must be the same as those used in part 3.
Network Sequence: The PDUs will be transmitted as shown in the following network sequence diagram.
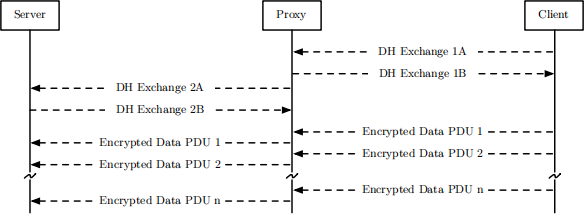
Tip: Wait for the client to establish a connection with the proxy before connecting to the server to prevent a connection timeout.
Part 5 (10 Extra Credit Points): Logjam attack on DH Key Exchange
Part 5 is strictly optional extra credit. I have not completed it, and I don’t know how easy or hard it is. However, the idea is to use the logjam attack to eavesdrop on the communication between the client and server without performing multiple DH key exchanges. Instead, you should brute force the established key via the logjam attack and write the contents of the transmitted file to STDOUT.
Your program must conform to the following command line options:
lj-proxy -l LISTEN_PORT SERVER_IP_ADDRESS SERVER_PORT
The following is an example execution.
[server]$ ./eft-dh -l 9999 > outfile.txt
[proxy]$ ./lj-proxy -l 9999 server.ip.address 9999 > interceptedfile.txt [client]$ ./eft-dh proxy.ip.address 9999 < infile.txt
You may assume the server is started first, then the proxy, and finally the client.
Note that since this may be beyond the computational ability of your personal computer, you may modify the values g and p used in eft-dh. In this case, provide an alternate eft-dh-weak file that has this change. The solution with the largest p will receive an additional 5 points.
2024-02-06