Exercise 1: Understanding TCP Congestion Control using ns-2
Hello, dear friend, you can consult us at any time if you have any questions, add WeChat: daixieit
Exercise 1: Understanding TCP Congestion Control using ns-2
We have studied the TCP congestion control algorithm in detail in the lecture (and Section 3.6 of the text). You may wish to review this before continuing with this exercise. Recall that, each TCP sender limits the rate at which it sends traffic as a function of perceived network congestion. We studied three variants of the congestion control algorithm: TCP Tahoe, TCP Reno and TCP new Reno.
We will first consider TCP Tahoe (this is the default version of TCP in ns-2). Recall that TCP Tahoe uses two mechanisms:
. A varying congestion window, which determines how many packets can be sent before the acknowledgment for the first packet arrives.
. A slow-start mechanism, which allows the congestion window to increase exponentially in the initial phase, before it stabilises when it reaches threshold value. A TCP sender re-enters the slow-start state whenever it detects congestion in the network.
The provided script, tpWindow.tcl implements a simple network that is illustrated in the figure below.
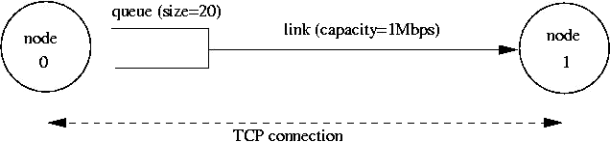
Node 0 and Node 1 are connected via a link of capacity 1 Mbps. Data traffic will only flow in the forward direction, i.e. from Node 0 to Node 1. Observe that packets from node 0 are enqueued in a buffer that can hold 20 packets. All packets are of equal size and are equal to the MSS.
The provided script accepts two command line arguments:
. the maximum value of the congestion window at start-up in number of packets (of size MSS).
. The one-way propagation delay of the link
You can run the script as follows:
|
$ns tpWindow.tcl |
NOTE: The NAM visualiser is disabled in the script. If you want to display the NAM window (graphical interface), then uncomment the fifth line of the 'finish' procedure (i.e. remove the "#"):
|
proc finish {} { global ns file1 file2 $ns flush-trace close $file1 close $file2 #exec nam out.nam & exit 0 } |
We strongly recommend that you read through the script file to understand the simulation setting. The simulation is run for 60 seconds. The MSS for TCP segments is 500 bytes. Node 0 is configured as a FTP sender which transmits a packet every 0.01 second. Node 1 is a receiver (TCP sink). It does not transmit data and only acknowledges the TCP segments received from Node 0.
The script will run the simulation and generate two trace files: (i) Window.tr, which keeps track of the size of the congestion window and (ii) WindowMon.tr , which shows several parameters of the TCP flow.
The Window.tr file has two columns:
|
time congestion_window_size |
A new entry is created in this file every 0.02 seconds of simulation time and records the size of the congestion window at that time.
The WindowMon.tr file has six columns:
|
time number_of_packets_dropped drop_rate throughput queue_size avg_tp ut |
A new entry is created in this file every second of simulation time.
The number_of_packets_dropped , drop_rate and throughputrepresent the corresponding measured values over each second. The queue_size indicates the size of the queue at each second, whereas avg_tput is the average throughput measured since the start of the simulation.
Question 1 : Run the script with the max initial window size set to 150 packets and the delay set to 100ms (be sure to type "ms" after 100). In other words, type the following:
|
$ns tpWindow.tcl 150 100ms |
To plot the size of the TCP window and the number of queued packets, we use the provided gnuplot script Window.plot as follows:
|
$gnuplot Window.plot |
What is the maximum size of the congestion window that the TCP flow reaches in this case? What does the TCP flow do when the congestion window reaches this value? Why? What happens next? Include the graph in your submission report.
Question 2: From the simulation script we used, we know that the payload of the
packet is 500 Bytes. Keep in mind that the size of the IP and TCP headers is 20 Bytes, each. Neglect any other headers. What is the average throughput of TCP in this case? (both in number of packets per second and bps)
You can plot the throughput using the provided gnuplot script WindowTPut.plot as follows:
|
$gnuplot WindowTPut.plot |
This will create a graph that plots the instantaneous and average throughput in packets/sec. Include the graph in your submission report.
Question 3 : Rerun the above script, each time with different values for the max congestion window size but the same RTT (i.e. 100ms). How does TCP respond to the variation of this parameter? Find the value of the maximum congestion window at which TCP stops oscillating (i.e., does not move up and down again) to reach a stable behaviour. What is the average throughput (in packets and bps) at this point? How does the actual average throughput compare to the link capacity (1Mbps)?
TCP Tahoe vs TCP Reno
Recall that, so far we have observed the behaviour of TCP Tahoe. Let us now observe the difference with TCP Reno. As you may recall, in TCP Reno, the sender will cut the window size to 1/2 its current size if it receives three duplicate ACKs. The default version of TCP in ns-2 is TCP Tahoe. To change to TCP Reno, modify the Window.tcl OTcl script. Look for the following line:
|
set tcp0 [new Agent/TCP] |
and replace it with:
|
set tcp0 [new Agent/TCP/Reno] |
Question 4 : Repeat the steps outlined in Questions 1 and 2 (NOT Question 3) but for TCP Reno. Compare the graphs for the two implementations and explain the differences. (Hint: compare the number of times the congestion window goes back to zero in each case). How does the average throughput differ in both implementations?
Note: Remember to include all graphs in your report.
Exercise 2: Flow Fairness with TCP
In this exercise, we will study how competing TCP flows with similar characteristics behave when they share a single bottleneck link.
The provided script, tp_fairness.tcl generates 5 source-destination pairs which all share a common network link. Each source uses a single TCP flow which transfers FTP traffic to the respective destination. The flows are created one after the other at 5-second intervals (i.e., flow i+1 starts 5 seconds after flow i for i in [1,4] ). You can invoke the script as follows
|
$ns tp_fairness.tcl |
The figure below shows the resulting topology; there are 5 sources (2,4,6,8,10), 5 destinations (3,5,7,9,11), and each source is sending a large file to a single destination. Node 2 is sending a file to Node 3, Node 4 is sending a file to Node 5, and so on.

The script produces one output file per flow; farinessMon i .tr for each i in [1,5] . Each of these files contains three columns:
time | number of packets delivered so far | throughput (packets per second)
You can plot the throughput as a function of time using the provided gnuplot script, fairness_pps.plot , as follows:
|
$gnuplot fairness_pps.plot |
NOTE: The NAM visualiser is disabled in the script. If you want to display the NAM
window (graphical interface), modify tp_fairness.tcl and uncomment the fifth line of the 'finish' procedure:
|
proc finish {} { global ns file1 file2 $ns flush-trace close $file1 close $file2 #exec nam out.nam & exit 0 } |
Run the above script and plot the throughput as a function of time graph and answer the following questions:
Question 1 : Does each flow get an equal share of the capacity of the common link (i.e., is TCP fair)? Explain which observations lead you to this conclusion.
Question 2. What happens to the throughput of the pre-existing TCP flows when a new flow is created? Explain the mechanisms of TCP which contribute to this behaviour.
Argue about whether you consider this behaviour to be fair or unfair.
Note: Remember to include all graphs in your report.
Exercise 3: TCP competing with UDP
In this exercise, we will observe how a TCP flow reacts when it has to share a bottleneck link that is also used by a UDP flow.
The provided script, tp_TCPUDP.tcl , takes a link capacity value as a command line argument. It creates a link with the given capacity and creates two flows which traverse that link, one UDP flow and one TCP flow. A traffic generator creates new data for each of these flows at a rate of 4Mbps. You can execute the simulation as follows,
|
$ns tp_TCPUDP |
After the simulation completes, you can plot the throughput using the provided gnuplot script, TCPUDP_pps.plot , as follows,
|
$gnuplot TCPUDP_pps.plot |
Question 1: How do you expect the TCP flow and the UDP flow to behave if the capacity of the link is 5 Mbps?
Now, you can use the simulation to test your hypothesis. Run the above script as follows,
|
$ns tp_TCPUDP.tcl 5Mb |
The script will open the NAM window. Play the simulation. You can speed up the
simulation by increasing the step size in the right corner. You will observe packets with two different colours depicting the UDP and TCP flow. Can you guess which colour
represents the UDP flow and the TCP flow respectively?
You may disable the NAM visualiser by commenting the "exec nam out.nam &' line in the 'finish' procedure.
Plot the throughput of the two flows using the above script (TCPUDP_pps.plot) and answer the following questions:
Question 2: Why does one flow achieve higher throughput than the other? Try to
explain what mechanisms force the two flows to stabilise to the observed throughput.
Question 3: List the advantages and the disadvantages of using UDP instead of TCP for a file transfer, when our connection has to compete with other flows for the same link.
What would happen if everybody started using UDP instead of TCP for that same reason?
Note: Remember to include all graphs in your report.
BONUS Exercise: Understanding IP Fragmentation
(Optional: If you attempt this and Include it in your report, you may get bonus marks (max of 2 marks). We will add these bonus marks to your Lab total with the condition that the total obtained marks for the labs cannot exceed 20)
We will try to find out what happens when IP fragments a datagram by increasing the
size of a datagram until fragmentation occurs. You are provided with a Wireshark trace file ip_frag that contains trace of sending pings with specific payloads to 8.8.8.8. We
have used ping with option ( – s option on Linux) to set the size of data to be carried in the ICMP echo request message. Note that the default packet size is 64 bytes in Linux (56 bytes data + 8 bytes ICMP header). Also note that Linux implementation for ping
also uses 8 bytes of ICMP time stamp option leaving 48 bytes for the user data in the
default mode. Once you have send a series of packets with the increasing data sizes, IP
will start fragmenting packets that it cannot handle. We have used the following commands to generate this trace file.
Step 1: Ping with default packet size to the target destination as 8.8.8.8
|
ping -c 10 8.8.8.8 |
Step 2: Repeat by sending a set of ICMP requests with data of 2000.
|
ping -s 2000 -c 10 8.8.8.8 |
Step 3: Repeat again with data size set as 3500
|
ping -s 3500 -c 10 8.8.8.8 |
Load this trace file in Wireshark, filter on protocol field ICMP (you may need to clear the filter to see the fragments) and answer the following questions.
Question 1: Which data size has caused fragmentation and why? Which host/router has fragmented the original datagram? How many fragments have been created when data size is specified as 2000?
Question 2: Did the reply from the destination 8.8.8.8. for 3500-byte data size also get fragmented? Why and why not?
Question 3: Give the ID, length, flag and offset values for all the fragments of the first packet sent by 192.168.1.103 with data size of 3500 bytes?
Question 4: Has fragmentation of fragments occurred when data of size 3500 bytes has been used? Why and why not?
2024-01-31