Lab 0: Introduction to LLVM Spring Semester 2024
Hello, dear friend, you can consult us at any time if you have any questions, add WeChat: daixieit
Lab 0: Introduction to LLVM
Spring Semester 2024
Due: 15 January, 8:00 a.m. Eastern Time
Objective
This lab involves running and extending LLVM, a popular compiler framework for a large class of programming languages that will be used to implement many labs in this course. You will use the LLVM framework in the provided course VM and implement an LLVM pass that will perform simple analytics on an input program. Specifically, your pass will compute the number of functions, instructions and signed division instructions in the input C program. There is an LLVM primer under Syllabus → Additional Resources on Canvas for more details on the LLVM framework.
Resources
Some past students have requested that we produce a lesson specifically on LLVM. Instead, we are offering you several resources that come from people closely connected to the LLVM project.
● Introduction to LLVM talk from 2019 LLVM Developers’ Meeting (1:01:19)
● Introduction to LLVM Program Analysis (1:21:07)
● Basic Overview of LLVM components (20:27)
Setup
The LLVM framework is pre-installed on the course VM and the skeleton code for Lab 0 can be found in Canvas. Navigate to Assignments on the left hand module, click on Lab 0, and download the llvmintro.zip file. Transfer this file to the VM, and unzip it in the VM home directory. This will create a folder in the ~ directory called llvmintro.
We will refer to this top-level directory for Lab 0 simply as llvmintro when describing file locations for the lab.
Throughout the LLVM labs, we will use CMake, a modern tool for managing the build process. If you are unfamiliar with CMake, you are strongly advised to read the CMake tutorial first (please pay attention to Step 1 and Step 2 in the tutorial link). Running cmake produces a Makefile that you might be more familiar with. If not, read the Makefile tutorial before proceeding further. Once a Makefile is generated, you need only run make to rebuild your project after editing the source files.
The following commands set up the lab:
|
$ cd ~/llvmintro $ mkdir build $ cd build $ cmake .. $ make |
Among the files generated, you should now see PrereqPass.so in the current directory. PrereqPass.so is a shared object file built from llvmintro/src/Prereqs.cpp which is the source file you will modify in this lab and submit as a deliverable.
You will implement the functionality of this lab as an LLVM pass called PrereqPass. LLVM passes are subprocesses of the LLVM framework. They usually perform transformations, optimizations, or analyses on programs. Each pass operates on an intermediate representation of the input program called the LLVM IR. So, to exercise this lab on an input C program, we must first compile the program's source code to LLVM IR:
|
$ cd ~/llvmintro/test $ clang -emit-llvm -S -fno-discard-value-names -c simple0.c |
clang is a C language compiler that uses LLVM and serves as a drop-in replacement for the gcc compiler. If you knowhow to use gcc, you should be fine with clang. Otherwise, scan the user manual to familiarize yourself with some of clang’s command-line options. Briefly, -S instructs clang to perform preprocessing and compilation steps only, -emit-llvm instructs the compiler to generate LLVM IR (which will be saved to simple0.ll), and -fno-discard-value-names preserves names of values in the generated LLVM to improve readability.
opt is a tool from LLVM that performs analyses and optimizations on LLVM IR. We will use opt to run our custom LLVM pass on the compiled C code:
|
$ opt -load ~/llvmintro/build/PrereqPass.so -Prereqs -disable-output \ ~/llvmintro/test/simple0.ll |
The option -load loads our LLVM pass library while -Prereqs instructs opt to run the pass on simple0.ll. (Libraries can and often do contain multiple LLVM passes.) Consult the documentation for opt to understand the potential ways to use the tool; it may help you build and debug your solutions.
You should see the following output from the above command:
|
Analytics of Module llvmintro/test/simple0.ll # Functions : 0 # Instructions : 0 # Signed Division Instructions : 0 |
After implementing your pass logic in Prereqs.cpp, these numbers will reflect the actual counts of various properties of the C program under analysis; for now, the output only shows the default integer values provided to you as boilerplate.
Lab Instructions
We have provided a pass skeleton for you to modify; in particular, you will need to edit the runOnModule function in the pass file (llvmintro/src/Prereqs.cpp) so that it correctly prints the number of functions, instructions and signed division instructions for an input C program compiled to LLVM IR.
LLVMIR Primer. Consider the following example of an LLVM IR instruction:
|
%1 = add i32 %2, 4 |
This instruction performs the add operation on 32-bit integers (i32). It adds the number in register 2 (%2) and the constant number 4 and places its result in register 1 (%1).
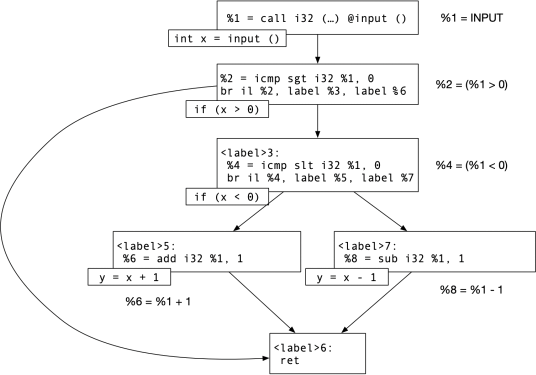
Now, consider a more complicated example. We show the LLVM IR of the code highlighted in green in the right column.
|
int x = input(); if (x > 0) {
if (x < 0) { int y = x + 1; } else { int y = x - 1; } } |
I1: %1 = call i32 (...) @input() I2: %2 = icmp sgt i32 %1, 0 I3: br i1 %2, label %3, label %6 |
In I1, variable %1 refers to the integer value from the user input. In I2, the return value of icmp (integer comparison) is stored to a temporary variable %2. Lastly, in I3, the program execution jumps to either label %3 or %6 depending on the value of %2.
The following figure shows the control-flow graph of the full LLVM IR code for our preceding example. In it, we show the LLVM IR for each basic block.
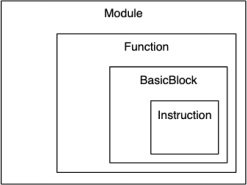
You will learn how to utilize many classes in the LLVM API throughout the labs in this course. Some of the more general ones that you will frequently use are Module, Function, BasicBlock, and Instruction. You should get in the habit of scanning some of the LLVM class documentation, as each contains many useful methods that you might find helpful in implementing some of the labs. We recommend following the LLVM coding standards for code (names of variables, types, classes, etc.); at the very least, you should consult the relevant section, but the standard serves as a good programming guideline.
Now, returning to the task at hand, think of the runOnModule function as the main entry point to your compiler pass. Inside a Module, you can find all program Functions. In LLVM, a function consists of one or more BasicBlocks that contain Instructions. The hierarchy is summarized in the figure.
Traversing over these program elements is common when working with LLVM and you should expect to get familiar with various traversal techniques.
The recommended approach is to breakdown the lab into the following tasks:
1. Find the count of the functions in the Module &M object and update the NumOfFunctions integer to match your result.
2. For each Function, count the number of instructions it contains and update the NumOfInstructions variable accordingly. This variable represents the total instruction count for all Functions in the module.
3. For each Function, count the number of signed division instructions it contains and update the NumOfSDivInstructions variable accordingly. This variable represents the total number of signed division instructions for all Functions in the module. The only class to compare an instruction's opcode against in computing this count is LLVM::SDivOperator. Do not include unsigned integer division, float division, modulus and any other operator other than LLVM::SDivOperator in this count.
Note that there are multiple ways to accomplish the above counting tasks. As long as your code compiles on the course VM and produces correct results, you may employ any function or construct provided by LLVM to achieve it.
LLVM Pass Structure. In Prereqs.h, you will notice some additional code:
|
char Prereqs::ID = 1; static RegisterPass<Prereqs> X("Prereqs", "Prereqs", false, false); |
The code hooks our Prereqs class into the LLVM framework so we can use it via the opt command. We register our Prereqs pass via RegisterPass<Prereqs>, and instruct LLVM to identify it on the command line as “Prereqs” with the arguments to X. It will be helpful to familiarize yourself with the basic code to set up a new LLVM pass.
Example Input and Output
Your pass should run on any C program that compiles to LLVM IR. As we demonstrated in the Setup section, we will compile some C programs to LLVM IR and then run your pass on them using opt:
|
$ opt -load ~/llvmintro/build/PrereqPass.so -Prereqs -disable-output \ ~/llvmintro/test/simple0.ll |
If completed correctly, you should see the analysis output for the provided simple0.c test case as follows:
|
Analytics of Module llvmintro/test/simple0.ll # Functions : 1 # Instructions : 22 # Signed Division Instructions : 1 |
You can look at the C code for simple0.c to verify that these counts match your expectations. Writing additional test cases is a good way to ensure your counting approach is robust to different programs.
Please Note: It is important that you preserve the formatting of the above result output in your submitted code by using the provided print_module_info function. Deductions may be applied to your score if the grading script is unable to parse the standard output from your pass.
Items to Submit
For this lab, we will be using Gradescope to submit and grade your assignment. For full credit, the files must be properly named and there must not be any subfolders or additional files or folders. Submit the following files through Gradescope.
● Submit your modified version of Prereqs.cpp
Do not submit anything else. Make sure all ofyour code modifications are in the files listed above as your other files will not be submitted. In particular, past students have modified header files to import additional headers, leading to a compile error in their submission.
Through Gradescope, you will have immediate feedback from the autograder as to whether the submission was structured correctly as well as verification that your code successfully runs the public tests on the grading machine. The public tests are the same tests provided to you as part of the lab, but these tests won’t (and are not intended to) catch everything. You will get your final score after the assignment due date.
Grading Rubric
The grader will run your counting pass on IR generated for four C programs:
● simple0.c: a test case provided to you with the lab. 20% of grade.
● simple1.c: a hidden test case which is of similar complexity to simple0.c. 20% of grade.
● complex0.c: a hidden test case which involves an additional function. 30% of grade.
● complex1.c: a handful of arbitrary functions and instructions. 30% of grade.
Each test case is graded on an all-or-nothing basis, meaning your counts must match the expected counts exactly to receive credit for that test.
How Do We Use It?
LLVM is a powerful compiler framework used by many industry leaders such as Apple, Adobe, Cray, Electronic Arts, Intel, NVIDIA, and Sony. Most of the labs in this class use LLVM.
Typically, you will be directly writing LLVM code. In others, you will not interact with LLVM, but the tool you will use was built on top of it. Since LLVM is one of the leading compiler
toolchains today and it is open source, with a robust set of tools for users to write their own analyses, it is the primary system we will use to explore software analysis through labs. While this lab does not on the surface seem that useful, completing it means you have successfully written an analysis pass using LLVM. This foundation will enable you to do more interesting analyses in future labs.
Tips for submitting your assignment with Gradescope
● When you go to the Canvas Assignment, you will see a blank Gradescope submission window embedded in the Canvas Page. Follow the on-screen prompt to submit your files.
● If there are multiple files in this lab, you can zip the files together and upload the single zip file to the submittal page, or you may select each file individually on the page. If you select the files individually, they must all be uploaded in the same submission.
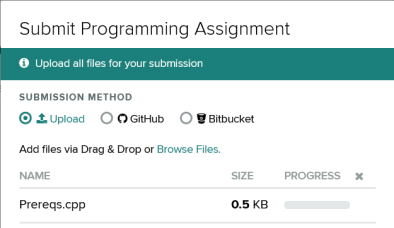
● A correct submission should look like this image (ignoring size and order):
● You may resubmit your assignment as many times as you want up to the assignment due date. The Active submission will be the final grade. By default, every time you upload a new submission, it will become the Active submission, but you can change the Active submission in your Submission History window if needed.
● If you resubmit your assignment, you must include all files as part of the new submissions.
● We provide comments as output of your submission. Use these to make sure your submission is as complete as possible. For example, if you see a compile error, you will not receive any points for that part of the assignment.
2024-01-15