TU2983: Advanced Databases
Hello, dear friend, you can consult us at any time if you have any questions, add WeChat: daixieit
TU2983: Advanced Databases
Lab Notes 2:
Crash Course in Visual Basic .NET
and
Data Access Programming Fundamentals
PART 1: Introduction
A. Lab Objectives
1. This TU2983 lab module aims to fulfil the following objectives:
i. To provide students with a quick tutorial on using the Visual Basic .NET (VB) programming language for creating Windows form applications and executable. This tutorial will familiarize students with the fundamental VB programming syntax and covers variable declaration, control statements, functions and sub-procedures, Windows form objects and object events programming.
ii. To teach students data access programming fundamentals using the OLEDB programming extensions, which will provide VB programs access to data that is stored in Microsoft Access databases.
2. Students must already be familiar with general programming concepts, as the lab modules for TU2983 from this point forward is not intended to be a full-fledged programming course. However, these lab notes were written in such away that a novice and inexperienced programmer can immediately use it as a guide for building two-tier Windows programs that can access databases, also known as "database applications".
3. The programming language used for the TU2983 lab modules is Visual Basic .NET, while database used to hold project data will be either of the following
a. Microsoft Access 2007 or above as the portable database
b. IBM DB2 Enterprise Server Edition v9.7 or above as the server database.
Students will be instructed on the exact database to use for each lab exercise and lab assignment.
4. These lab notes were written using the "Visual Studio 2010 Ultimate Edition" integrated
development environment (IDE) for the Visual Basic .NET programming language. However, the steps demonstrated in these lab notes can also be used for all versions of Visual Basic
.NET in Visual Studio IDEs starting from Visual Studio .NET 2002 and above.
B. IMPORTANT: Installing and Configuring Visual Studio 2019
1. Download the “Visual Studio 2019 Community - ZIP File” from the ‘REQUIRED SOFTWARE’ section on UKMfolio, and extract the ‘vs_community.exe’. Alternatively, you can also download Visual Studio Community directly from Microsoft at the following link and click the “Download Community 2019” button:
https://docs.microsoft.com/en-us/visualstudio/releases/2019/history
2. Run the ‘vs_community.exe’ file.
3. When youreach the “WORKLOADS” window, tick only the following box, and click ‘INSTALL’
.NET desktop development
4. When installation completes, run "Visual Studio 2019" from the the Windows Start Menu.
5. At the "Sign into Visual Studio" screen, login with your Microsoft-registered account.
6. Exit Visual Studio.
C. *** VERY IMPORTANT ***: Installing the Required Database Drivers
|
*** VERY IMPORTANT ***: You may need to install the Database Drivers to prevent the following error when trying to connect to your Microsoft Access Database: "The Microsoft.ACE.OLEDB.12.0 provider is not registered on the local machine" The error above is caused by the failure of Microsoft Office / Microsoft 365 in registering the database drivers in the Windows Registry during initial installation. Follow these steps exactly to FORCE INSTALL the required database drivers to your PC. |
1. Make sure Microsoft Access and Visual Studio are closed.
2. Download the "Microsoft Access Database Engine 2016 Redistributable" file (i.e. the database drivers) from Microsoft at the following link:
https://www.microsoft.com/en-us/download/details.aspx?id=54920
3. Click the ‘DOWNLOAD’ button.
4. At the ‘Choose the download you want’ window, tick ‘accessdatabaseengine.exe’ and click ‘Download’ (this will download the 32-bit database drivers. See the NOTE on the following page to determine if you need to install the 64-bit database drivers instead )
5. In 'Windows Explorer, create a temporary folder C:\TEMP
6. Copy the "accessdatabaseengine.exe" file to the C:\TEMP folder.
7. Open a "Command Prompt" window as an "ADMINISTRATOR" (i.e. In your 'Windows Search' bar, type 'cmd' and when the 'Command Prompt'app menu appears, click 'Run As
Administrator').
8. In the "Command Prompt" window. type the following line in full at the C:\> prompt (this will FORCE INSTALL the database drivers to your PC):
C:\TEMP\accessdatabaseengine.exe /quiet
9. Nothing will happen for a few seconds. When you receive the the C:\> prompt again, close your "Command Prompt" window and run Visual Studio.
|
NOTE: The majority of TU2983 students will only require the 32-bit database drivers (i.e. the "accessdatabaseengine.exe" file). if you need to install the 64-bit database drivers, repeat the steps above with the following changes (all other steps are the same as before): . In Step (4) above, download the "accessdatabaseengine_X64.exe" file instead.
. In Step (8) above, type the following line in full at the C:\> prompt instead: C:\TEMP\accessdatabaseengine_X64.exe /quiet |
D. Visual Basic Object Naming conventions
1. Standardized prefixes and suffixes will be appended to the names of Visual Basic objects, according to the type of object created, for two purposes:
. To ease the identification of a VB windows form object through its name alone, when referenced in VB-code.
. To prove originality of a student's work and ownership of the VB project through the student's matric number.
2. The Visual Basic object naming conventions areas follows:
i. All Visual Basic object names should be in lowercase (no capital letters) and must not
contain any'spaces', punctuations ( !? , ; : . etc.), mathematical operators ( + - * / etc.), or any other special characters. All 'spaces'must be replaced by the 'underscore' ( _ ) character.
ii. All object names must begin with a prefix to indicate the object type, and end with a suffix to indicate originality and ownership, as follows:
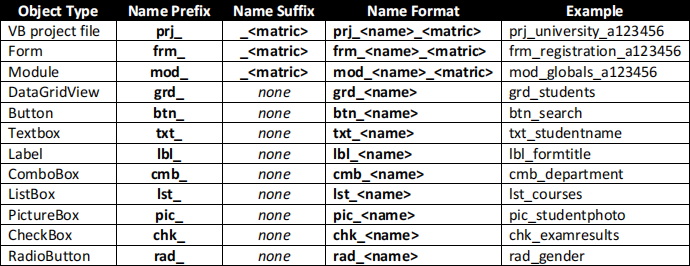
|
IMPORTANT MANDATORY RULE : All VB Project filenames, Form names, and Module names MUST end with the student's matric number as the suffix to indicate the creator of the VB object, as shown in the example above. |
E. Student Requirements for this Lab
1. All students must bring the following equipment for the lab:
. MANDATORY REQUIREMENT: One USB hard drive / thumb drive pendrive (to save your work)
2. All students must have the following requisite knowledge:
. MANDATORY REQUIREMENT: Using the Microsoft Windows operating system.
. MANDATORY REQUIREMENT: Understand the fundamentals of programming and recognize the different control statements and data structures that are generally available in all programming languages.
. MANDATORY REQUIREMENT: Writing Structured Query Language code, or SQL.
. MANDATORY REQUIREMENT: Creating a sample database in Microsoft Access (see TU2983 Lab Notes 1).
PART 2: Creating a Visual Basic .NET Project
A. Creating a new VB project
1. Open your working folder or create a new working folder.
. If you have previously completed TU2983 Lab Notes 1, we will use the previous working folder that you used for creating a Microsoft Access database,i.e.
'a123456_facultyrecords', which you have stored in your USB drive.
. If you have not, in the desktop, click 'Start' > 'Computer' > 'C:'. Create a folder or directory with the name '<matric>_<your project name>'. For this example, type 'c:\a123456_facultyrecords'.
Remember this folder location as it will be used throughout these lab notes.
2. Start Visual Studio. In the Windows desktop, click 'Start' > 'All Programs' > 'Microsoft Visual Studio 2010' > 'Microsoft Visual Studio 2010'.
3. In the Visual Studio start page, click 'New Project...'. The 'New Project window will open.
4. On the 'Installed Templates' panel to the left of the 'New Project'window , you should see 'Visual Basic' at the top. If you do not see 'Visual Basic', then click 'Other Languages' >
'Visual Basic'.
5. Click 'Visual Basic' > 'Windows' > 'Windows Forms App (.NET Framework)'.
IMPORTANT! In Visual Studio 2019, there is more than one project type called Windows Forms App
Choose the project type called “Windows Forms App (.NET Framework)”. This is the CORRECT project type that has complete OLEDB data access features:
<CORRECT
Do NOT choose the project type “Windows Forms App”. This is the WRONG project type that does not have OLEDB data access features:
<WRONG
6. In the 'Name'field, type 'prj_facultyrecords_a123456', and click 'OK'. The form design will open.
B. Renaming a Form File and Form Name
1. In the 'Solution Explorer' panel on the top-right side of the form design window, you will see the objects that have been created automatically for your project, which is your project
folder 'prj_facultyrecords_a123456' and a blank form called 'Form1.vb'
2. To rename the form file, click on 'Form1.vb' in the 'Solution Explorer'. In the 'Properties'
panel on the lower-right side of your form design window, click on the 'File Name' property, and replace the current 'Form1.vb' form name with 'frm_splashscreen_a123456.vb'.
3. Click anywhere outside of the 'Properties' panel, and the form name in your 'Solution Explorer' panel will automatically change to 'frm_splashscreen_a123456.vb'.
4. On the 'frm_splashscreen_a123456.vb [Design]'tab in the main window, click on the form object. You will see that the 'Properties' panel will switch to the properties for this form. Scroll down the properties list to the (Name) property (located under 'Design') and you will see that the form's name has been automatically changed to 'frm_splashscreen_a123456'.
C. Saving your VB project
1. To save your VB project and all its objects and programming source code, on the main menu click 'File' > 'Save All'. Alternatively you can click on the 'Save all' button (multiple diskettes) on your tool bar.
2. The 'Save Project'window will open. Leave the 'Name' and 'Solution Name'field as it is.
3. For the 'Location' field, click on the 'Browse' button, select your working folder from the
folder list (e.g. c:\a123456_facultyrecords), and click 'Select Folder'. Click 'Save' in the 'Save Project'window.
D. Running and Stopping your VB program
1. To run your program, click on the 'Start Debugging' button (green arrow) or 'Play' button on your toolbar. A blank Windows form, titled 'Form1' will appear.
2. Alternatively, on your main menu, you can click 'Debug' > 'Start Debugging' to run your
program. You can also just press the 'F5' key on your keyboard to run your program.
3. To stop your program, click the 'X' button on your form window. You will be returned to the form design view.
4. Alternatively, on your main menu, you can click 'Debug' > 'Stop Debugging' to stop your program. You can also click the 'Stop Debugging' button (blue square) or 'Stop' button on your toolbar to stop your program.
5. You must make sure to stop your program completely before you can edit your form design, or edit your VB source code again. If the title bar of your Visual Studio IDE says '(Running)' then you have not stopped your program completely.
E. Adding Form Objects
1. The left-side of your form design window is the 'Toolbox'panel, which contains a list of form objects that you can place onto your forms, either as display objects, input objects, or
control objects.
2. From the toolbox, click-and-drag the 'Label' object, and release-click it in your
'frm_splashscreen_a123456' form. Labels are generally used to display static text that cannot be edited directly by the user during runtime.
3. From the toolbox, click-and-drag the 'TextBox'object, and release-click it in your
'frm_splashscreen_a123456' form. TextBoxes are used as input field for alphanumeric data entered by the user during runtime.
4. From the toolbox, click-and-drag the 'Button' object, and release-click click it in your
'frm_splashscreen_a123456' form. Buttons are used as control objects that can be used to execute user functions or control form transitions.
F. Editing the Properties of Form Objects
1. In the 'frm_splashscreen_a123456.vb [Design]'tab, click once on the label you have just added, 'Label1'.
. In the 'Properties' panel, scroll to the '(Name)' property and rename it to 'lbl_name'.
. In the 'Properties' panel, scroll to the 'Text'property and type in 'Please enter your name below:'.
2. In the 'frm_splashscreen_a123456.vb [Design]'tab, click once on the TextBox you have just added, 'TextBox1'.
. In the 'Properties' panel, scroll to the '(Name)' property and rename it to 'txt_name'.
. In the 'Properties' panel, scroll to the 'Text'property and type in 'Anonymous'.
3. In the 'frm_splashscreen_a123456.vb [Design]'tab, click once on the Button you have just added, 'Button1'.
. In the 'Properties' panel, scroll to the '(Name)' property and rename it to 'btn_start'.
. In the 'Properties' panel, scroll to the 'Text'property and type in 'START'.
4. In the 'frm_splashscreen_a123456.vb [Design]'tab, click once on the Form itself, 'frm_splashscreen_a123456'.
. In the 'Properties' panel, scroll to the 'Text'property and type in 'UKM Faculty Records'.
. In the 'Properties' panel, scroll to the 'BackColor' property and click the drop-arrow next to the property. In the drop-list, click on the 'Web' tab, and click the 'Yellow' color.
5. Run your program to view the results. Afterwards, stop your program to return to the form design window.
6. Move and arrange your form objects to make some space above the 'lbl_name' label.
7. Add another label above 'lbl_name', and click once on the label you have just added.
. In the 'Properties' panel, scroll to the '(Name)' property and rename it to 'lbl_title'.
. In the 'Properties' panel, scroll to the 'Text'property and type in 'UKM Faculty Records'.
. In the 'Properties' panel, scroll to the 'Font' property, and click on the ellipses (...) button. In the 'Font'window, change the 'Font'to 'Times New Roman', change the 'Font Style' to 'Bold', and change the 'Font size' to '24'. Click 'OK'.
. In the 'Properties' panel, scroll to the 'ForeColor' property and click the drop-arrow next to the property. In the drop-list, click on the 'Web' tab, and click the 'Blue' color.
8. Run your program again to view the results, then stop your program completely.
|
TIP: It is a good idea to try changing the properties of any form object to see its effects on the form. Some object properties require a specific format, or valid range of values. To view the description of each property and what it does, click on the property and press the 'F1' key on your keyboard. This will open the 'Help File' which describes the property and also the valid range of values. |
|
TIP: The Visual Studio 'Help File' requires an Internet connection to connect to the main MSDN TechNet Knowledge Base. Accessing the 'Help File' is faster if it has been installed locally in your computer. The option for installing the Help File will appear at the end of the standard installation of Visual Studio. |
2023-12-28
Crash Course in Visual Basic .NET and Data Access Programming Fundamentals