COMPUTER PROGRAMMING - Coursework 2
Hello, dear friend, you can consult us at any time if you have any questions, add WeChat: daixieit
DEPARTMENT OF MECHANICAL, MATERIALS & MANUFACTURING ENGINEERING
A LEVEL 1 MODULE, AUTUMN SEMESTER
COMPUTER PROGRAMMING - Coursework 2
Introduction:
This coursework is designed to help you revise your basic MATLAB knowledge that you have gained in lectures 4-9. For each question you should write a script that contains the answers. Save your scripts to disk with some sensible name for example, the file containing the code for question one could be called Q1.m. Once you have finished all the questions (or as many as you can manage), zip all your scripts up into a single zip file and upload this to moodle. Name the zip file using the following format Firstname_surname_studentid.zip. So for example my zip file would be called:
yong_ren_01234567.zip
In each .m file you generate, put on the first line your name and e-mail address – the markers will use this e-mail address to give you feedback. For questions which require you to write English sentences just include these as comments using the '%' character in a script file. Try to include comments in the script files describing what the program is doing – you will get marks for this.
Finally, please remember this is individual work and not group work. Work handed in must be entirely your own and not copied from anyone else. By all means discuss the coursework with your friends BUT then go away and write the programs yourself.
Question 1 (10% of total mark) : This question will help you reinforce your basic computer knowledge. Answer, by writing comments in a script file Q1.m:
a) Name the five fundamental components of a computer which were covered in the lecture.
b) In no more than 10 words describe what each component does.
c) Why does it take more time to get information from a hard disk than from the computers main memory.
d) Give three examples of an embedded computer that you use in your daily life.
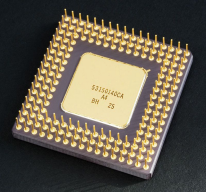
Figure 1: An Intel processor chip seen from below. The gold pins are the electrical contacts used for getting information in and out of the chip.
Question 2 (10% of total mark) : All computers store and transmit text as American Standard Code for Information Interchange (ASCII) code. When you start writing programs to interface to robots in your mechatronics courses you will use ASCII code a lot to send commands to these robots. This question helps you practice using ASCII code in MATLAB, make a new script called Q2.m and answer the following questions:
a) Write a short program which asks the user to enter their name.
b) Make the program convert the text the user entered to ASCII numbers.
c) Using your program convert the sentence 'Computers store all data as numbers' to ASCII code. Save the resulting list of numbers in Q2.m as a comment.
Question 3 (10% of total mark) :
This question lets you practice using the sprintf and disp commands. Very often when dealing with embedded computers you won't have much screen space to display information. It is therefore important to be able to carefully control text output.
Using one disp command and one sprintf command make MATLAB print out the poem on the right.
Oh! I have slipped the surly bonds of earth,
And danced the skies on laughter-silvered wings; Sunward I've climbed, and joined the tumbling mirth
Of sun-split clouds, --and done a hundred things
You have not dreamed of-- Wheeled and soared and swung
High in the sunlit silence. Hov'ring there
I've chased the shouting wind along, and flung My eager craft through footless halls of air... Up, up the long, delirious, burning blue
I've topped the wind-swept heights with easy grace
Where never lark or even eagle flew --
And, while with silent lifting mind I've trod The high untrespassed sanctity of space.
John Gillespie Magee, Jr
The poem should be formatted exactly the same way as I have formatted it, including:
*Spaces between lines
*The author's name should be right aligned using tabs.
*All special characters should be printed.
Store your answer in Q3.m.
Question 4 (10% of total mark) : This question lets you practice matrix operations in MATLAB. Write a script to do the following and save it as Q4.m:
a) Generate the following matrices:
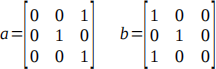
b) Add matrix a to matrix b and store the result in 'B'.
c) Subtract matrix a from matrix b, and store the result in 'C'
d) Perform a matrix multiplication of a by b.
e) Add four to each element of matrix a, and store the result in matrix e.
f) Generate a random matrix 10x10 between the values of -10 and 10 called Z use surf to plot this matrix.
g) Calculate the determinant of matrix Z.
Question 5 (20% of total mark) : This question is about basic image processing, it will help you practice loops and 2D arrays. We are going to use MATLAB to load in an image, then we are going to write an algorithm to adjust the exposure. The algorithm we are going to write is used in digital cameras and photo processing software. From moodle download the zip file CW2.zip, in this file you will find the jpg file museum_london.jpg, which is a picture of the natural history museum in London. Extract this image to your home directory, then write a script to do the following:
a) Load the image file using the imread command into an array 'a'. The imread command works just like the load command, and will produce a 2D array of numbers. Each element in the array represents the brightness of one pixel in the image. The lower the number the darker the pixel, the higher the number the brighter the pixel.
b) Display the image using the command imshow(a), the image you see should look like figure 2
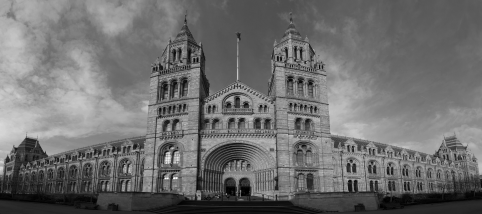
Figure 2: The natural history museum in London.
c) Make two copies of the array 2D 'a', into variables 'L' (for light) and 'D' (for dark).
d) The first thing to do when working with a new array is to find and store its size. Calculate the size of the array 'a', using the size command and store the x and y size in two variables x_len and y_len.
e) We now need to start writing our code to process the image. The first step is to write two nested for loops which will iterate over each pixel in the image. To do this write one for loop that counts using x from 1 to the x_len. Now define a second for loop inside the first for loop which counts from 1 to y_len using y. You have just made a nested for loop. There are more examples of how to do nested loops in lecture 5. Now, by using the sprinf and disp commands within the nested for loop, make the script display the following text for each pixel:
The brightness of pixel at ?,?? is ???.
where ? represents the x position, ?? represents the y position and ??? represents the pixel brightness.
f) Now comment out the command printing each brightness value to the screen (but don't delete them – otherwise you won't get the marks). We are now going to make the image darker (less exposed). Within the nested for loops, multiply each value stored at each position in array 'a' by 0.3 and store the result in the same location in array 'D'. Now at the end of your script use imshow to display the darker version of the image. If you issue the figure command before imshow, matlab will display each figure in a new window. Compare the original and less exposed images.
g) Now we are going to increase the exposure of the image by making it lighter. Within the nested for loops, multiply each value stored, at each position in the array 'a' by 1.5 and store the result in the same location in array 'L'. Display the result in a new figure.
h) Often it is important to know how long a piece of code takes to run. MATLAB has two built in functions to help you find out how long code takes to run. These are tic and toc functions. They work a bit like a stop watch, the tic command starts a stop watch and toc stops the stop watch. When toc is called the time elapsed is also printed out. Try putting tic at the beginning of your program and toc at the end of your program. How long does it take your program to run? Write the result as a comment in your program.
i) Now comment out the nested for loop with the '%' character so that it no longer runs (but don't delete it – otherwise you won't get the marks), and replace its functionality with matrix multiplication commands. How long does your program now take to run – why is this?
Question 6 (20% of total mark) : This question is designed to help you practice writing simple functions.
a) Write a script to prompt the user for the height, width and breadth of a box. The computer should then use the disp command and the sprintf command to write the text:
Your box has dimensions width=??, height=??, length=??
Where ?? are replaced with the information the user entered.
b) Define a function called box_area which accepts three variables and returns the area of the box.
c) Define another function called box_volume, which accepts three variables and returns the volume of the box.
d) Use these functions to print the text:
The box has the area of xxx and volume of xxx.
e) Edit the script to ask the user for the units used in the measurements, then adjust the text to read
The box has the area of xxx units_for_area and volume of xxx units_for_volume.
Where units_for_area and units_for_volume are replaced by the correct units. Hint: You have to use %s*%s*%s, and %s*%s in the sprintf command to print the correct units.
f) Edit the script so that if the user enters the dimensions height=5, width=30, length=30 the program prints to the screen 'It's a pizza box!'
Question 7 (20% of total mark): This example will
help you practice for loops, while loops and if
statements. In this question we are going to use
MATLAB to simulate randomly moving gas particles in
a box. To simplify the problem we are only going to
simulate a 2D gas in a 2D space. Please note: This
question is quite tricky and I don't expect everyone to
finish it, I have put it in because it's quite fun and will
challenge the people who find MATLAB easy. Try to
do as much as you can.

Figure 3: Gas particles in a box.
Generating a 2D box
a) Define(nerati)na(g) a2D(2)Darra(bo)y(x) called 'a' of size 8x8 onlyFigure 3: Gas particles in a box.
containing zeros, this array represents an empty 2D box containing no gas particles. We are going to represent gas particles within the box by using the number 1. Set the point at 3,3 to be equal to one, this represents one gas particle at position 3,3.
b) Using the imagesc make your script display the 2D matrix 'a'. This command works just like surf but only produces flat 2D images.
c) Just as you did in question 5 find out the size of the matrix 'a', and store its x and y size in the variable 'x_len' and 'y_len'.
d) Again, just as you did in question 5, write two nested for loops which iterate through all the x and y coordinates to the array 'a'. Use sprintf and disp to output the following text for each point in the 2D array:
'At the value x=??, y=?? the value of a=?? '
Where ?? are replaced by the current x value, y value and corresponding value of a(y,x)
e) Place the disp command and the sprintf within an if statement, so that the text is only printed when value at a(y,x) is equal to 1. Change the line of text to read:
'A gas particle exists at x=??, y=??'
where, ?? is replaced by the actual x and y coordinate of the gas particle.
Moving the gas particle
f) Gas particles will randomly move within any space due to thermal energy. In order to simulate this movement, we need to write some code to randomly move the gas particle in our 2D matrix. Change your if statement you wrote above, so that if your code finds a gas particle, it will choose a random number between 0 and 4, store this number in the variable r. Depending upon the number chosen we are going to move our gas particle up (r==0), down (r==1), right (r==2) or
left (r==3). We therefore need the rand command to produce only whole numbers, we can do this by using the floor command to round 'r' down to the nearest whole number. Use the floor command to make sure only whole numbers are randomly generated.
g) Write an if-elseif-elseif statement which will print the following text using the disp command, depending upon the value of r generated:
|
Value of r |
Text to print |
|
0 |
Moving particle up |
|
1 |
Moving particle down |
|
2 |
Moving particle right |
|
3 |
Moving particle left |
h) The above if-elseif-elseif tells us which direction we would like to move the particle, but does not actually move the particle in the 2D array. In this next section we will write the code to actually move the particle. Firstly, above the if- elseif statement but still in the for loops, save the current value of x and y to two variables called x_new, and y_new. Now comment out the disp commands within the if-elseif-elseif statement and replace them with the following commands:
0: y_new=y_new - 1
1: y_new=y_new+1
2: x_new=x_new+1
3: x_new=x_new-1
This will generate a new random coordinate for the gas particle only one pixel away from where it currently resides.
Hint: In the next few subsections, the script will start to produce a lot of output to the screen, printing to the screen is very slow, to speed up your code use the ; command at the end of lines.
i) The final job is to move the particle to the new coordinate we have generated. Place these commands:
a(y,x)=0
a(y_new,x_new)=1
within the for loops but after the if-elseif-elseif statements to move the gas particle by one step. Make sure the imagesc command comes after both for loops, and run the program to see what happens to your particle.
j) In order to make your particle continually move you need to place the two nested for loops in a while loop. Make a while loop that runs 1000 times. The code may run so fast that your 2D plot of the matrix will not update, if this happens place the command pause(0.5) after the imagesc command. Your particle should now randomly move in the box until it reaches the edge. Why does the program crash when the gas particle reaches the edge of the box? Write the reason for the crash at the top of the script.
k) To keep the particle within the box use four nested if statements to check if the values of y_new,x_new are within the array. Rerun the code and see what happens to the particle. Congratulations you have simulated a gas particle in a box! Now, add four more particles to your box and let the simulation run. And run the code, what is what is wrong with the simulation (place the answer at the top of the script)?
l) To stop the gas particles destroying themselves when they meet, wrap the code that moves the gas particle:
a(y_new,x_new)=1
a(y,x)=0
in an if statement, which will only execute if a(y_new,x_new)==0.
m) Increase the size of your box to 100 by 100, using two for loops generate a square of 20x20 gas particles in the center of the box. Let the simulation run and watch the gas particles spread out in the box.
n) We are now going to simulate a liquid evaporating from a surface. Comment out the for loops you wrote in part 'n' – but don't delete them or you will loose the marks. Using two for loops generate a layer of gas particles at the bottom of your box 20 units deep, which spans the entire box. Let the simulation run and watch the particles evaporate.
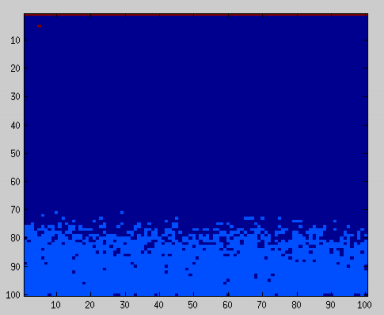
Figure 4: Simulating evaperation. Your code should
produce something that looks like this.
Removing gas particles from the simulation (tricky)
o) Set the value at 4,4 in your matrix to 5. Edit your code so that if your particle moves on to a data point with a value of 5, the gas particle is deleted. This could represent a hole in your box though which gas escapes.
p) The problem with this simulation is that once the particles reach the top of our box they become trapped. In reality the particles would continue moving away from the surface forever. To prevent the particles becoming trapped in the box, use a single for loop to set the top edge of the box to the value of 5. When a particle reaches the top of the box it will now be deleted – thus simulating particles escaping from the top of the box.
q) Now include the effect of gravity in the simulation, by making it more probable that the particle will choose to move towards the bottom of the box than in any other direction.
2023-12-18