DSC 20 Project: Classes, Inheritance and Exceptions.
Hello, dear friend, you can consult us at any time if you have any questions, add WeChat: daixieit
DSC 20 Project: Classes, Inheritance and Exceptions.
Total Points: 100 (10% of the Course Grade)
Submission due (SD time):
● Checkpoint: Friday, December 1st, 11:59pm
● Final submission: Friday, December 8th, 11:59pm
Starter Files
Download project.zip
Contents:
● project.py
● image_viewer.py A file for viewing your images
● img/ A folder of images
● knn_data/ A folder of sample images for the KNN
Checkpoint Submission
Earn 5 points extra credit by completing Part 1 and Part 2 by the deadline above.
Final Submission
Submit the project.py file to gradescope.
● Only this file will be checke
● You do not need to submit any other files
Partners
You can work with one other person on this project. If working with a partner, make sure to add them after you submit. If you resubmit, please re-add your partner - Gradescope will not automatically relink your latest submission to your partner. You should submit only one copy per team.
Important: The lateness policy for the project is the same as all homeworks. However, both partners must have an available slip day before you submit late.
Requirements
1. You cannot use any libraries in project.py
2. The project will not be graded on style
a. You do not need to submit your doctests but it is highly recommended to test your code with custom doctests (we will have our own tests, not just provided ones).
b. You can add docstrings, but they will not be graded.
3. Raise exceptions when required by the question
a. Exception requirements will be in bold blue
b. If there are no exception requirements, you can assume valid inputs
c. Do not use asserts
Project Overview:
In this project, we will make a basic image processing app.
● Part 1 covers how images are stored in code.
● Part 2 introduces some image processing methods in a Processor Template.
● Part 3 uses inheritance to simulate a monetized app.
● Part 4 uses inheritance to simulate a premium app with new methods.
● Part 5 implements a KNN classifier to predict the labels of images.
In the digital world, images are defined as 3-dimensional matrices: height (row), width (column), and channel (color). Each (row, col) entry is called a pixel. Height and width dimensions are intuitive: they define the size of the image. The channel dimension defines the color of an image.
The most commonly used color model is RGB. In this model, every color can be defined as a mixture of three primary color channels: Red, Green and Blue. Thus, the color of a pixel is digitally defined as a triplet (R, G, B). Each element in this triplet is an integer (called intensity) with value between 0 and 255 (both inclusive), where 0 represents no R/G/B is present and 255 means R/G/B is fully present. Thus, (0, 0, 0) represents black since no R/G/B are present, and (255, 255, 255) represents white. To better understand how the RGB color model works, you can play around the RGB value with this online color wheel.
In our project, we will use a 3-dimensional list of integers to structure the pixels. This picture shows how a pixels list is structured.

The first dimension is the row, starting from the top. The second dimension is the column, starting from the left. The third dimension is the color channel. In other words, len(pixels[row][col]) = 3, and each of the items in the pixels[row][col] list represents an intensity (0 - 255, both inclusive) of each color. Therefore, to index a specific intensity value at row i, column j, and channel c of the pixels list, you use pixels[i][j][c].
Note that the width of an image is the length of the column dimension (number of columns), and the height of an image is the length of the row dimension (number of rows). Since in Python we conventionally consider (row, column) as the order of dimensions for 2-dimensional lists, make sure to distinguish these notions clearly.
Install Pillow and NumPy
The project uses two packages: NumPy (np) and Pillow (PIL). These are two of the most common packages to use for image processing. Although we prevent you from using these packages in your own implementation, you can still use them for testing. If you have not installed these packages before, run the following command in your terminal :
Mac/Linux: python3 -m pip install numpy Pillow
Windows: py -m pip install numpy Pillow
If you have trouble installing the packages, try updating pip first:
Mac/Linux: python3 -m pip install --upgrade pip
Windows: py -m pip install --upgrade pip
Please note: You are not allowed to use numpy or PIL/Pillow methods in your code.
Testing
We have provided basic doctests that cover simple cases to check if your code works. Note that you will want to create more tests to check edge cases.
The doctests use small square images between 6px and 16px in size. They also use the included expected output images in the img/exp/ directory to compare your results against.
The doctests include some exceptions, deep copy, and cost value checks. Recall the difference between deep and shallow copies.
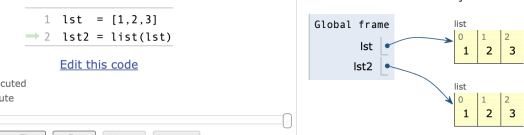
Shallow Copy: is a concept that refers to creating a new object that shares the underlying elements with the original object. In other words, a shallow copy creates a new object but references the same nested objects or elements as the original.

Deep copy: is a concept that refers to creating a complete and independent copy of an object, including all of its nested objects or elements.
Since this project is about processing images, it makes more sense for you to visually check the output. Therefore, your main way of debugging will be to look at the images generated.
Mac/Linux: python3 -m doctest project.py
Windows: py -m doctest project.py
Using image_viewer.py
We have included a python file that allows you to view your images to check for errors.
To run the file, use the following commands
Mac/Linux: python3 -m doctest project.py
"img/out/the_file_to_view.png"
Windows: py -m doctest project.py "img/out/the_file_to_view.png"
If you get an error like "ModuleNotFound Error: No module named 'tkinter'", then
run the command python3 -m pip install tk. If this doesn’t work, you can come to office hours and we can help install it for you (involves reinstalling python).
The script takes in a file path that points to an image, and displays it for you to view

You can zoom with your scroll wheel and pan around with your mouse. When you hover over a pixel, it will display the current color value at the bottom.

You can use this to check where your code is creating the wrong output values. You can also use it to manually compare your output against the expected output.
Video Guide:
This is a setup video for this project: Link
We recommend that you watch this video multiple times throughout the project to better understand all of its components.
Understanding Quiz:
There is an optional quiz on canvas to check your understanding of the basic ideas behind this project, it is not required but we recommend taking it to make sure you understand the writeup before creating your code: link.
Efficiency and Runtime for Autograder
Because we are dealing with massive lists of lists, your code will need to be efficient.
Your code must run for less than 10 minutes to pass the autograder. Each test in the autograder is limited to 30 seconds. The solution takes around 70 seconds to run the runner file (this time is beatable).
Part 1: RGB Image
In this part, you will implement the RGBImage class
__init__ (self, pixels)
A constructor for an RGBImage instance
The argument pixels is a 3D list, where pixels[i][j][c] indicates the intensity value at position (i, j) in channel c. You simply need to assign this list to self.pixels.
You also need to set the values of self.num_rows and self.num_cols accordingly.
Exceptions:
If the argument pixels is not a 3-dimensional list, raise a TypeError(). The conditions you need to check for are the following:
● pixels is a list, and has at least one element
● All elements (rows) in pixels are also lists, and have at least one element
● All rows are the same length
● All elements (pixels) in each row are also lists
● All pixels are a list of length 3
Then, if any pixel has an intensity value other than an integer from 0-255, raise a ValueError()
size (self)
A getter method that returns the size of the image, where size is defined as a tuple of (number of rows, number of columns).
get_pixels (self)
A getter method that returns a DEEP COPY of the pixels matrix. This matrix of pixels is exactly the same pixels passed to the constructor.
Note:
It is very important to create a deep copy, as otherwise the ImageProcessing methods will break.
Recall that we can create a deep copy of a 1D-list with a list comprehension ([elem for elem in x]) or with (list(x)). However, this will not work on pixels since it is a 3D-list. The outer list would be reconstructed, but the inner lists are the same object in memory for the original and the copy.
copy (self)
A method that returns a COPY of the RGBImage instance. You should create a new RGBImage instance using a deep copy of the pixels matrix (you can utilize the get_pixels function) and return this new instance.
get_pixel (self, row, col)
A getter method that returns the color of the pixel at position (row, col). The color should be returned as a 3-element tuple: (red intensity, green intensity, blue intensity) at that position.
Note that the rows and columns are 0-indexed, so get_pixel(0, 0) is valid.
Exceptions:
If row and col are not integers, raise a TypeError()
If row and col are not valid indices in the pixels matrix, raise a ValueError(). Negative indexing is considered an invalid index, so a ValueError() should be raised in that case.
set_pixel (self, row, col, new_color)
A setter method that updates the color of the pixel at position (row, col) to the new_color. The argument new_color is a 3-element tuple (red intensity, green intensity, blue intensity).
We want this function to have the ability to modify one color channel, while leaving the rest unchanged. Therefore, if the given color channel is any negative number, then you should not modify that channel, but you should still modify the other channels. Consider this example:
img = [
[[255, 128, 64], [ 32, 16, 8]],
[[ 1, 2, 4], [ 8, 16, 32]]
]
new_color = (-1, 0, 0)
new_row = 0
new_col = 0
img.set_pixel(new_row, new_col, new_color)
Modified image matrix:
img = [
[[255, 0, 0], [ 32, 16, 8]],
[[ 1, 2, 4], [ 8, 16, 32]]
]
You can see that the R value of the 0,0 pixel was not changed, while the G and B values were
both set to 0.
Exceptions:
If row and col are not integers, raise a TypeError()
If row and col are not valid indices in the pixels matrix, raise a ValueError()
If new_color is not all of the following, raise a TypeError()
● a tuple
● of length 3
● with all integers
If new_color has an intensity value greater than 255, raise a ValueError(). Note that you should allow negative values, per the example above.
2023-11-30