SWEN20003 Object Oriented Software Development
Hello, dear friend, you can consult us at any time if you have any questions, add WeChat: daixieit
School of Computing and Information Systems
SWEN20003 Object Oriented Software Development
ShadowFlap
Project 2, 2021
Please read the complete specification before starting on the project, because there are important instructions through to the end!
Overview
In this project, you will create a graphical game in the Java programming language, continuing from your work in Project 1. We will provide a full working solution for Project 1; you are welcome to use all or part of it, provided you add a comment explaining where you found the code at the top of each file that uses the sample code.
This is an individual project. You may discuss it with other students, but all of the implemen-tation must be your own work. By submitting the project you declare that you understand the University’s policy on academic integrity and aware of consequences of any infringement.
There are two parts to this project, with different submission dates.
The first task, Project 2A, requires that you produce a class design demonstrating how you plan to implement the game. This should be submitted in the form of a UML diagram showing all the classes you plan to implement, the relationships (e.g. inheritance and associations) between them, and their attributes, as well as their primary public methods. (Constructors, getters, and setters need not be explicitly included.) If you so choose, you may show the relationships separately to the class members in the interests of neatness, but you must use correct UML notation. Please submit as PDF only.
The second task, Project 2B, is to complete the implementation of the game as described in the rest of this specification. You are not required to strictly follow your class design from Project 2A; if you see design improvements, which you did not identify when you did your initial class diagram, choose the better design for the code.
Bagel
The Basic Academic Game Engine Library (Bagel) is a game engine that you will use to develop your game. You can find the documentation for Bagel here.
Graphics Concepts Revision
Coordinates
Every coordinate on the screen is described by an (x, y) pair. (0, 0) represents the top-left of the screen, and coordinates increase towards the bottom-right. Each of these coordinates is called a pixel. The Bagel Point class encapsulates this, and additionally allows floating-point positions to be represented.
Frames
The program’s logic is updated 60 times per second, each time the screen is cleared to a blank state, and all of the graphics are drawn again. Each of these steps is called a frame. Every time a frame is to be rendered, the update() method in ShadowFlap is called. It is in this method that you are expected to update the state of the game.
Velocity
Moving objects have a velocity that can be represented by a vector (vx, vy). A vector is composed of magnitude and a direction. Often, the magnitude is the step size that the object takes. In this case, we scale the vector to have magnitude 1 (called a unit vector) and simply use its direction component, which was described in detail in Workshop 4. Calculating the new position can be done via vector addition of the position and velocity; Bagel contains the Vector2 class to facilitate this. You are not required to use this class; it is merely provided for convenience. You can refer to Workshop 4 solution for an implementation of ’moving’ objects. However, the implementation in Workshop 4 solution does not consider acceleration.
Collision
It is sometimes useful to be able to tell when two images are overlapping. This is called collision detection and can get quite complex. For this game, you can assume images are rectangles. Bagel contains the Rectangle class to help you.
Game Elements
Below is an outline the different game elements you will need to implement. ShadowFlap has 2 different levels in this project. Each level comes with different images for each game element, as well as differing game logic. The following are game elements that are common to both levels (despite using different images).
Background
The background should be rendered on the screen and completely fill up your window throughout the game. The image that acts as the background is supplied to you in the skeleton package. There is no need to scale or rotate the image in anyway. Remember that the default window size should be 1024 * 768 pixels. You can find the background image for each level in their respective subfolders within res.
Bird
In addition to the basic functionalities implemented in Project 1 (spawning, flying, falling, wing-flap, collision with pipes), the Bird also has a life bar in this project and the ability to pick up/shoot weapons at pipes in Level 1. The implementation details of Life Bar and Weapons are described in later sections of this document. The functionalities implemented in Project 1 are attached below for your convenience. When the player first presses SPACE to start the game, the bird should start by flying.
Wing-Flapping
To imitate the flapping motion, birdWingUp.png should be rendered once every 10 frames. In all other frames where the bird is active, birdWingDown.png should be rendered. The bird images to be used in Level 0 and Level 1 are to be found in their respective subfolders in res.
Spawning
When the player hits the space-bar for the first time to start the game, the bird should initially spawn at (200, 350). The bird’s x coordinate should remain constant throughout the game. The image to be used in spawning is birdWingDown.png.
Falling
After the game has started, the bird (albeit very briefly) has an initial speed of 0 pixel per frame before gravity comes into play. When not flying (see the following section for flying behaviour), the bird’s falling speed is accelerated by gravity at of 0.4 pixel per frame-squared (not 9.8 like on Earth!). However, the bird cannot fall faster than 10 pixels per frame. Remember that every time a frame is rendered, the update() method in the main ShadowFlap class is called.
Flying
After the game has started, the player can press the space bar for the bird to fly. Whenever the space bar is pressed, the bird should start flying upwards by 6 pixels per frame. Then, gravity should pull it down in the same behaviour as described in the Falling section above.
Pipes
In this game, a set of pipes consists of a top pipe (which stems from top of the window and points downwards) and a bottom pipe (which stems from the bottom of the window and points upwards). You are provided with an image of a top pipe in both levels, which you must rotate to become a bottom pipe when appropriate. The top pipe image you are provided with is long enough to span the entire window height, but remember that you can draw images at negative coordinates.
The logic for spawning pipes in Level 0 and Level 1 is different, and will be described in the Level 0 and Level 1 sections later in this document. However, in both levels, sets of pipes should be spawned continuously every 100 frames from the right border of the window, until one of the following scenarios is encountered.
● Level 0: Level-Up after score reaches 10 points.
● Level 1: Win after score reaches 30 points.
● Both Levels: Game-Over after life bar depletes.
Once spawned, the set of pipes should start moving from their initial position to the left border of the screen when the player presses the space bar to start the game, at a speed of 3 pixels per frame. If there is no collision with the bird, the pair of pipes should leave the window from the left border. The player is able to adjust the speed at which the pipes move towards the left border of the window by mechanisms described in the Timescale Controls section below.
There are multiple types of pipes for Level 1 with different strengths. They are specified in the Level 1 section later in this document.
Timescale Controls
The movement rate of pipes in this project specification assume a timescale of 1. In the complete ShadowFlap game, we might want to speed things up to increase the difficulty of the game.
When the ‘L’ key is pressed, the timescale should increase by 1 (if possible). When the K key is pressed, the timescale should decrease by 1 (if possible). The timescale should not go below 1 or above 5. Each change in timescale makes the movement rate of pipes increase or decrease by 50%. The effect of a change in the timescale should be reflected immediately within the game.
Life Bar
Life Bar composes of full-hearts and empty-hearts, where a full-heart represents 1 life and an empty-heart represents a used life. Note that a heart should never disappear. Life Bar should update in real time throughout the game.
Life Bar should be rendered from the left. That is, the first heart (leftmost heart) should be rendered with its top-left coordinate at (100, 15). From this heart onwards, every heart should be spaced apart with 50 pixels in between them.
The bird has 3 lives in Level 0 and 6 lives in Level 1. The left-over lives from Level 0 does not carry over to Level 1. The bird loses a life when it collides with a pipe or goes out-of-bound (described below).
Out-of-Bound
If the bird’s centre y-coordinate exceeds the window’s top border or the bottom border, it is considered out-of-bound. Once an out-of-bound is detected, a life is lost and the bird should be re-spawned at its original position of (200, 350).
Game Over Screen
The Game-Over screen should be rendered when the game is lost. The game is lost when the Life Bar is depleted. The Game-Over screen is the same as what you have implemented in Project 1, that is, a message of GAME OVER should be rendered at the centre of the window. Additionally, the score should be rendered at 75 pixels below the GAME OVER message, in the format of FINAL SCORE: k. The only difference between the Game-Over screen of Level 0 and Level 1 is the background.
Score Counter
While the bird is active, a score counter should be rendered in the top left corner of the screen, in the format of SCORE: k, with k being the correct score at any moment of the game. The bottom left of the score counter message should be located at (100, 100).
The logic for score-counting is different in Level 0 and Level 1, this differing behaviour is described below in each level’s respective section.
Level 0
Start Screen
A Start screen for Level 0 should be rendered when the game is first run, and it should be rendered until the player presses SPACE to start the game. An instruction message that reads PRESS SPACE TO START should be rendered at the centre of your window, on top of the Level 0 background and in the font provided.
Scoring Logic
When the bird’s centre x-coordinate crosses the right-hand-side x-coordinate of a pipe set, 1 point is earned.
Pipe Spawning
There are 3 ”types” of pipe sets in Level 0. They will be referred to as ’High-Gap’, ’Mid-Gap’ and ’Low-Gap’ for convenience here, but you do not need to name them accordingly in your implementation. The gap between top and bottom pipe is still 168 pixels for all 3 ”types” of pipe sets. However:
● High-Gap: The gap should start at position (100) on the y-axis of the Window.
● Mid-Gap: The gap should start at position (300) on the y-axis of the Window.
● Low-Gap: The gap should start at position (500) on the y-axis of the Window.
In Level 0, every pipe set you spawn should be randomly chosen from the 3 types listed above.
Level-Up Screen
When the level-up score threshold of 10 has been reached, a Level-Up screen should be rendered for 20 frames before Level 1 is loaded. The Level-Up screen should have the same background as Level 0, with the message ”LEVEL-UP!” rendered at the centre of the window. Nothing else (bird, pipes, scores, life bar etc.) should be rendered.
Level 1
Start Screen
After the Level-Up screen in Level 0 has been rendered for 20 frames, a Start screen for Level 1 should be rendered. An instruction message that reads PRESS SPACE TO START should be rendered at the centre of your window, on top of the Level 1 background and in the font provided. Additionally, a message that reads "PRESS ’S’ TO SHOOT" should be rendered 68 pixels below the instruction message. Note that nothing else should be in the window at this time. This Start screen is rendered until the player presses SPACE to start Level 1.
Weapons
The bird in Level 1 can use rocks and bombs as weapons to destroy pipes and earn points. You can find their respective images in the level-1 subfolder under res.
Weapons should be spawned from the right border of the screen at a random y-coordinate between 100 and 500. The type of weapon (rock or bomb) spawned at anytime should also be random. Weapons should be spawned at an interval that does not overlap with the spawning of pipe sets. That is, you can decide how frequently the weapons are spawned as long as there is no overlapping behaviour: there should never be a weapon on a pipe since they are non-retrievable by the bird. Of course, the weapons should never overlap with each other or be out-of-bound either. However, since flames shoot from the steel pipes randomly, it is okay for a weapon to overlap with a flame.
When the bird touches a weapon, the weapon is picked up and attached to the beak of the bird. That is, wherever the bird goes, the weapon should be rendered at its beak (you can take the right-hand border of the bird’s rectangle for convenience). The bird can only hold one weapon at anytime and cannot store weapons.
If a weapon is picked up by a bird, the player can press ’S’ to shoot. Each type of weapon has a shooting range and the type of pipes it can destroy:
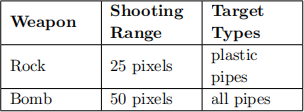
If the weapon does not collide with a pipe within the shooting range, it should disappear after reaching the shooting range. The point at which the player presses ’S’ is its firing point. After being shot, the weapon travels at the speed of 5 pixels per frame, in a straight line, to reach its shooting range and detect if it hit any pipes.
Once collided with a pipe, the weapon and pipe set (if the weapon collides with a top pipe, the corresponding bottom pipe should also disappear, and vice versa) should both disappear. The score counter increments by 1 in this case.
If a weapon is never picked up by a bird, it should travel from its spawning point to the left border of the window at the speed of 3 pixels per frame (same speed as pipes) and disappear once it leaves the window.
Scoring Logic
When the bird’s centre x-coordinate crosses the right-hand-side x-coordinate of a pipe set, 1 point is earned.
Additionally, whenever a pipe is destroyed by a weapon, 1 point is earned.
Pipes
There are 2 different types of pipes in Level 1: plastic pipes and steel pipes. You can find the respective images of each in the level-1 subfolder under res. The pipes have different strengths against attacks from the weapons, and other differing features as follows:
● Plastic Pipes: Destroyed after 1 hit from any weapon.
● Steel Pipes: Destroyed after 1 hit from bomb only. The steel pipe set also shoots flames from both its top and bottom pipes simultaneously every 20 frames while it is on-screen. You can find the image of flame in the level-1 subfolder under res. When the pipes are shooting flames, a collision between the bird and the flames has the same result as a collision between the bird and the pipe body itself.
Pipe Spawning
The gap between top and bottom pipe is still 168 pixels for plastic pipe sets in Level 1. For steel pipe sets, the gap is shortened whenever the flames appear as described in the previous section, but the gap is still 168 pixels when there is no flame. The gap of 168 pixels can start at any y-coordinate between the range of 100 to 500.
For every pipe set spawned in Level 1, a new random number between 100 and 500 should be generated. This will be the start of the 168-pixel gap between top and bottom pipe of this pipe set.
Win Screen
When the win score threshold of 30 has been reached, a Win screen should be rendered. This marks the end of your program and should remain static until the player quits the game by pressing ESCAPE to close the window. The Win screen should have the same background as Level 1, with the message ”CONGRATULATIONS!” rendered at the centre of the window. Nothing else (bird, pipes, scores, life bar etc.) should be rendered.
Your Code
You must submit a class called ShadowFlap that contains a main method that runs the game as prescribed above. You may choose to create as many additional classes as you see fit, keeping in mind the principles of object oriented design discussed so far in the subject. You will be assessed based on your code running correctly, as well as the effective use of Java concepts. As always in software engineering, appropriate comments and variables/method/class names are important.
Implementation Checklist
To get you started, here is a checklist of the game features (in addition to the features in Project 1):
● Spawn pipes continuously, according to the mechanism described in for each level described in Game Elements section, until game over or level up (winning in the case of Level 1).
● Render life bar at the given location on the screen and update life bar in live time throughout the game.
● Implement timescale adjustment mechanism as described in the Game Elements section.
● Level 0 Specific: Implement level up behaviour when the 10-point threshold has have been met.
● Level 1 Specific: Implement different types of pipes and different types of weapons.
● Level 1 Specific: Spawn weapons at random y-coordinates from the right border of the window, ensuring that weapons do not overlap with pipes.
● Level 1 Specific: Detect collision between weapons and pipes and implement consequences of this collision as described in the Game Elements section.
● Level 1 Specific: Implement winning screen when the 30-point threshold has been met.
Supplied Package and Getting Started
You will be given a package called project-2-skeleton.zip that contains the following: (1) Skeleton code for the ShadowFlap class to help you get started, stored in the src folder. (2) All graphics and fonts that you need to build the game, stored in the res folder. (3). The pom.xml file required for Maven. You should use this template exactly how you used project-1-skeleton.zip, that is:
1. Unzip it.
2. Move the content of the unzipped folder to the local copy of your [username]-project-2] repository.
3. Push to Gitlab.
4. Check that your push to Gitlab was successful and to the correct place.
5. Launch the template from IntelliJ and begin coding.
6. Commit and push your code regularly.
Submission and Marking
Project 2A
Please submit a .pdf file of your UML diagram for Project 2A via. the Project 2A tab in the Assignments section of the LMS.
Project 2B
Technical requirements
● The program must be written in the Java programming language.
● The program must not depend upon any libraries other than the Java standard library and the Bagel library (as well as Bagel’s dependencies).
● The program must compile fully without errors.
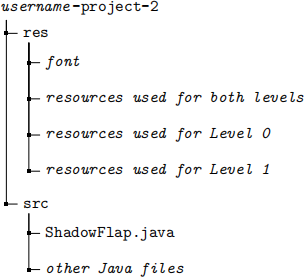
Submission will take place through GitLab. You are to submit to your <username>-project-2 repository. An example repository will be posted on LMS under Project 2 to show an ideal repos-itory structure. At the bare minimum you are expected to follow the structure below. You can create more files/directories in your repository if you want.
On 15/10/2021 at 9:00pm, your latest commit will automatically be harvested from GitLab.
Commits
You are free to push to your repository post-deadline, but only the latest commit on or before 15/10/2021 8:59pm will be marked. You must make at least 5 commits (excluding the Initial Submission commit) throughout the development of the project, and they must have meaningful messages (commit messages must match the code in the commit). If commits are anomalous (e.g. commit message does not match the code, commits with a large amount of code within two commits which are not far apart in time) you risk penalization.
Examples of good, meaningful commit messages:
● implemented gravity logic
● fix bird flying behaviour
● refactored code for cleaner design
Examples of bad, unhelpful commit messages:
● fesjakhbdjl
● i’m hungry
● fixed thingzZZZ
Good Coding Style
Good coding style is a contentious issue; however, we will be marking your code based on the following criteria:
● You should be taking care to ensure proper use of visibility modifiers. Unless you have a very good reason for it, all instance variables should be private.
● Any constant should be defined as a final variable. Don’t use magic numbers!
● Think about whether your code is written to be easily extensible via appropriate use of classes.
● Make sure each class makes sense as a cohesive whole. A class should have a single well-defined purpose, and should contain all the data it needs to fulfil this purpose.
Extensions and late submissions
If you need an extension for the project, please email Betty at [email protected] ex-plaining your situation with some supporting documentation (medical certificate, academic adjust-ment plan etc.). If an extension has been granted, you may submit via LMS (for Project 2A) and Gitlab (for Project 2B) as usual; please do however email Betty once you have submitted your project with an extension.
The project is due at 8:59pm sharp on Wednesday 29/09/2021 (Project 2A) and on Friday 15/10/2021 (Project 2B). Any submissions received past this time (from 9:00pm onwards) will be considered late unless an extension has been granted. There will be no exceptions. There is a penalty of 1 mark for a late project, plus an additional 1 mark per 24 hours. If you submit late, you must email Betty so that we can ensure your late submission is marked correctly.
Marks
Project 2 is worth 22 marks out of the total 100 for the subject.
● Project 2A – 8 marks
– Correct UML notation for methods (2 marks)
– Correct UML notation for attributes (2 marks)
– Correct UML notation for relationships (2 marks)
– Good breakdown into classes (1 marks)
– Appropriate use of inheritance, interfaces and the abstract keyword (1 mark)
● Project 2B Feature Implementation – 11 marks
– Correct implementation of pipes for Level 0 (2 marks)
– Correct implementation of pipes for Level 1 (2 marks)
– Correct implementation of life bar (2 marks)
– Correct implementation of weapons (2 marks)
– Correct implementation of timescale adjustment (1 mark)
– Correct implementation of scoring system (1 mark)
– Correct implementation of level-up, winning and losing logic (1 mark)
● Coding Style – 3 marks
– Delegation: breaking the code down into appropriate classes (0.5 marks)
– Use of methods: avoiding repeated code and overly complex methods (0.5 marks)
– Cohesion: classes are complete units that contain all their data (0.5 marks)
– Coupling: interactions between classes are not overly complex (0.5 marks)
– General code style: visibility modifiers, magic numbers, commenting etc. (0.5 marks)
– Use of documentation (javadocs) (0.5 marks)
Customisation
Optional: We want to encourage creativity with this project. We have tried to outline every aspect of the game design here, but if you wish, you may customise any part of the game, including the graphics, types of game elements (bird, pipes, rocks etc.). You can also add entirely new features.
Extensions submitted this way may use any libraries you like, not just Bagel and the Java standard library.
However, to be eligible for full marks, you must implement all of the features in the above imple-mentation checklist. Please submit the version without your customisation to [username]-project-2 repository, and save your customised version locally or push it to a new branch on your Project 2 repository.
We will hold a competition for the best game extension or modification, judged by the teaching team. The top 3 winners will have their games shown at the final lecture, and there will be a prize for our favourite. Past modifications have included drastically increasing the scope of the game, incorporating memes and creative game design, adding polish to the game, and some even introducing networked gameplay.
If you would like to enter the competition, please email the head tutor, Betty Lin at [email protected] with your username, a short description of the modifications you came up with, and your game (either a link to the other branch of your repository or a .zip file if you saved it locally). You can email Betty with your completed customised game anytime before Week 12. Note that customisation does not add bonus marks to your project, this is completely for fun. We can’t wait to see what you come up with!
2021-09-28