CS325 2023/24: Assessed Coursework
Hello, dear friend, you can consult us at any time if you have any questions, add WeChat: daixieit
CS325 2023/24: Assessed Coursework
A Compiler for MiniC
The CS325 module covers both theoretical and practical aspects of designing and building a compiler. The underlying aim of this coursework is to examine a language specification and write a compiler from scratch using compiler development technologies currently prevalent in industry and research.
Goal of the project
You will develop a compiler for a subset of the C programming language, which we will call MiniC. If you are not familiar with C, it is recommended that you do so, including experimenting with the use of a C compiler such as gcc or clang. However, as our target language is a subset of C, not all aspects of the C language is required to be understood in its entirety. MiniC does not include arrays, structs, unions, files, pointers, sets, switch statements, do statements, for loops, or many of the low level operators. The only data types permitted are bool, int and float. The MiniC language tokens are given in Section 1.1 and the grammar is provided in BNF in Section 1.2. The semantics of MiniC will be that of C (C99) and in case of any ambiguities when implementing your compiler, this will be a good default unless otherwise specified.
Your compiler must be written in C++. You may not have encountered C++ previously as part of your undergrad-uate curriculum at Warwick. However the objective of this project is to not get distracted (or worry) about being (or not being) proficient in the language, before writing your compiler, but to learn C++ (or those features of C++) as you go along writing your compiler. You will however find that you are able to draw on your knowledge and experience of procedural and object oriented programming which you learned in your first year with Java and subsequently improved on, in your second year. These will be very much applicable regardless of the language used. Such a scenario will very closely mirror what you will encounter either in industry or research, after graduating from Warwick, when you may very likely be asked to make use of a language that you have not used before or indeed use a completely new language. As C++ is one of the most widely used languages in industry for developing compilers, we think that using it for your own compiler construction will provide valuable skills for your future. To build your compiler written in C++ we will make use of clang++ a modern C++ compiler supporting C++ 14 standard (C++14) and beyond. clang++ is installed at /modules/cs325/llvm-17.0.1/bin/clang++ in the DCS machines (including the DCS machines you can remotely access as detailed in: https://warwick.ac.uk/fac/sci/dcs/intranet/user guide/remote-login/.
Your compiler will make use of tools provided by the LLVM compiler framework (http://llvm.org/) for generating an LLVM intermediate representation (IR) of the code parsed by your compiler. LLVM is a compiler infrastructure currently used in production by a wide variety of commercial and open source projects as well as being widely used in academic research. The specific version of LLVM you will be using is 17.0.1. It is installed in the DCS undergraduate laboratory workstations at /modules/cs325/llvm-17.0.1/. The code, commands and options to be used for building and generating LLVM IR will be discussed in Section 2. Finally in Section 2.2 we will generate an executable binary from the LLVM IR and test the results of the code compiled using your compiler on an X86 target machine. You can install LLVM and Clang on your own machine by following the instructions given here, but do make sure you install LLVM version 17.0.1 and Clang (available here).
This coursework will follow techniques discussed in the LLVM tutorial for building a compiler - https://llvm. org/docs/tutorial/. This tutorial develops a compiler for a much smaller language called Kaleidoscope. Throughout the coursework, references will be made to this tutorial as guidance on how to achieve specific tasks. We will also go through parts of this tutorial during laboratory sessions. It is also strongly recommended that you follow good software engineering practices. Particularly the use of version control will be highly beneficial. If you have not already used version control before, take a look at git, a highly versatile distributed version control system for your work. Tutorials to get you set up with a repository and working with git can be found here. There is also resources for students available in github.edu including creating private git repositories here.
1 Part 1 - Parser and AST
Download the coursework files from the module website. Look in the file named mccomp.cpp. This file contains an implementation of a lexer for MiniC, together with the relevant LLVM header files required for developing your compiler. Part 1 of this coursework will entail creating a parser from a language specification and producing an Abstract Syntax Tree (AST) of the code parsed.
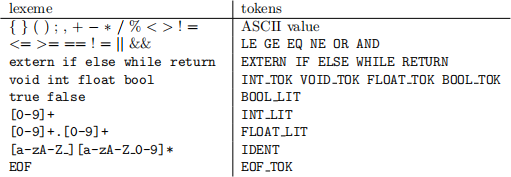
Table 1: Lexemes and tokens
1.1 Task 1 - Build and Run the Lexer
As discussed in the lectures, a lexer transforms the stream of characters into a stream of tokens. The tokens that your compiler needs to recognize, together with their regular expression definitions are given in Table 1. The first row lists all of the single character lexemes – their ASCII value can be used to encode their token value. In this row we have left and right brackets, left and right parenthesis, semicolon, comma, plus, minus, multiplication, division, modular, less than, grater than, not and assignment symbols. The second row lists the two character lexemes and their corresponding tokens. Following this are keywords for control structures, primitive types, and boolean literals. Regular expressions are used to describe lexemes for integer literals, floating point literals, and identifiers. The “end of file” is encoded with a token EOF TOK. Comments should be treated as white space. Only single line comments starting with // are allowed.
mccomp.cpp provides one way of implementing a lexer for generating the tokens from Table 1. You can compile mccomp.cpp using clang++. Before doing so, on DCS workstations, you will need to, load the relevant modules for gcc version 12.2.0, add clang++ to your PATH and set up your environment by adding the following to your .bashrc file:
module load GCC/12.2.0
export PATH=/modules/cs325/llvm-17.0.1/bin:$PATH
export LD_LIBRARY_PATH=/modules/cs325/llvm-17.0.1/lib:$LD_LIBRARY_PATH
Now, compile mccomp.cpp and run the lexer. Use the Makefile provided to compile/build the lexer by typing make, then execute:
# compile/build lexer
make
# lex some MiniC code -- e.g. use tests in tests/*
./mccomp tests/addition/addition.c
The Makefile that uses GNU make will be helpful to build the rest of the compiler, if its source is spread across multiple source files.
When the lexer is executed on some example MiniC code (see the tests/ directory in the downloaded coursework files for examples), it will currently tokenize the MiniC source code and print out the resulting tokens to standard output. For additional guidance on how the lexer was created see the final full code listing in Chapter 2 of the LLVM tutorial. You will see that an appropriate integer value to represent each token has been used and an enum is used to store the tokens and their corresponding integer value. The code also include a rudimentary token buffer making use of a C++ queue data structure. The token buffer enables to look ahead an arbitrary number of tokens. This will come in handy when you create the parser in the next section, particularly if you need more than 1 look ahead for parsing the grammar. You are allowed to change the Lexer implementation, as you see fit, to support the development of the rest of the compiler.
1.2 Task 2 - Parser
The next task will be to create a recursive descent parser for the MiniC language. As discussed in lectures, a recursive descent parser is a top-down parser that parse the code by recursively calling procedures that implements each production of the grammar. The parsing process corresponds to creating a tree (called the syntax tree) according to the grammar productions. The Grammar for MiniC is given in Figure 1. The operators follow the usual C precedence rules. More specifically take note of the order of precedence for operators indicated in the grammar.
1.2.1 Grammar Transformations
Transform the grammar in Figure 1 to an equivalent LL(k) form that can be parsed using top-down parsing. This will include eliminating left recursion. Additionally you will need to examine whether your grammar is enforcing the appropriate operator precedence. Once you have transformed your grammar, compute the FIRST sets for each non-terminal. These will then enable you to create a predictive top-down parser as discussed in the lectures. As part of this, you may also have to compute the FOLLOW sets of some non-terminals. If there are any further conflicts you could also try the technique of left factoring to resolve these.
1.2.2 Recursive Descent Parser
Making use of the FIRST and FOLLOW sets and the transformed grammar, create a predictive, recursive descent parser for MiniC. The functionality of the parser should be such that (1) if the code being parsed is lexically and syntactically valid (i.e. conforming to the language specification) then it will report success and print out the AST of the code (see below) or (2) if it encounters a lexical or syntax error it will provide feedback to the user to help diagnose the error. For the purposes of this coursework, reporting the first error encountered is sufficient.
Figure 1: Grammar in BNF
program ::= extern_list decl_list
| decl_list
extern_list ::= extern_list extern
| extern
extern ::= "extern" type_spec IDENT "(" params ")" ";"
decl_list ::= decl_list decl
| decl
decl ::= var_decl
| fun_decl
var_decl ::= var_type IDENT ";"
type_spec ::= "void"
| var_type
var_type ::= "int" | "float" | "bool"
fun_decl ::= type_spec IDENT "(" params ")" block
params ::= param_list
| "void" | epsilon
param_list ::= param_list "," param
| param
param ::= var_type IDENT
block ::= "{" local_decls stmt_list "}"
local_decls ::= local_decls local_decl
| epsilon
local_decl ::= var_type IDENT ";"
stmt_list ::= stmt_list stmt
| epsilon
stmt ::= expr_stmt
| block
| if_stmt
| while_stmt
| return_stmt
expr_stmt ::= expr ";"
| ";"
while_stmt ::= "while" "(" expr ")" stmt
if_stmt ::= "if" "(" expr ")" block else_stmt
else_stmt ::= "else" block
| epsilon
return_stmt ::= "return" ";"
| "return" expr ";"
# operators in order of increasing precedence
expr ::= IDENT "=" expr
| rval
rval ::= rval "||" rval
| rval "&&" rval
| rval "==" rval | rval "!=" rval
| rval "<=" rval | rval "<" rval | rval ">=" rval | rval ">" rval
| rval "+" rval | rval "-" rval
| rval "*" rval | rval "/" rval | rval "%" rval
| "-" rval | "!" rval
| "(" expr ")"
| IDENT | IDENT "(" args ")"
| INT_LIT | FLOAT_LIT | BOOL_LIT
args ::= arg_list
| epsilon
arg_list ::= arg_list "," expr
| expr
1.2.3 AST Nodes
While the parser checks if the code being parsed conforms to the syntax of the language, one of the actions resulting from a parse is the creation of an Abstract Syntax Tree(AST). Include in your parser the ability to create AST nodes as it progresses through a parse. Consider what AST nodes you will need to create and declare one class for each AST node. Every time you are to create such a node you can then instantiate this class. For example, you can use the following to declare an AST node class for for Integer literals:
/// ASTnode - Base class for all AST nodes.
class ASTnode {
public:
virtual ~ASTnode() {}
virtual Value *codegen() = 0;
virtual std::string to_string() const {return "";};
};
/// IntASTnode - Class for integer literals like 1, 2, 10,
class IntASTnode : public ASTnode {
int Val; TOKEN Tok;
public: IntASTnode(TOKEN tok, int val) :Tok(tok), Val(val) { }
};
Note how the IntASTnode extends a base class called ASTnode. The virtual methods in ASTnode are methods to be overridden later when displaying and AST node in Section 1.3 and generating code in Section 2. You can now create an IntASTnode node using :
std::make_unique
For further examples, take a look at Chapter 2 of the LLVM tutorial. It details the creation of a recursive descent parser for Kaleidoscope, together with creating an AST, which you can adapt for the MiniC language in this coursework.
1.2.4 Building and Running
Build and run your parser using the Makefile. You may have to modify Makefile to add any new source files to it. Test the resulting parser on the example code in the tests directory.
1.3 Task 3 - Display AST
The final task of this first part of the project will be to display the AST after a successful parse. One way to achieve this objective is to add a method called to string() to each of the classes that represent an AST node. Indeed, you can override the to string() in the ASTnode base class from the example in Section 1.2.3:
/// IntASTnode - Class for integer literals like 1, 2, 10,
class IntASTnode : public ASTnode {
int Val;
TOKEN Tok;
std::string Name;
public:
IntASTnode(TOKEN tok, int val) : Val(val), Tok(tok) { }
virtual std::string to_string() const override {
// return a sting representation of this AST node
...
}
};
Note the use of the key word override in C++ that is required in a derived class to override the method in the base class. The to string() method when called will print a string representation of the node and then will call the to string() method of each of its children. This will result in a pre-order traversal of the tree. After a successful parse, calling the to string() method of the root of the AST should result in printing the whole AST. There is already a operator<< in mccomp.cpp that will help you with this task:
llvm::raw_ostream& operator<<(llvm::raw_ostream& os, const ASTnode& ast) {
os << ast.to_string();
return os;
}
When you have written to string() methods for each AST node the complete AST can be printed with:
llvm::outs() << RootASTnode << "\n";
It will significantly help readability if you incorporate indenting to indicate the level of the tree nodes. For a good example, take a look at the AST created by clang using the following command on any C program:
clang -cc1 -ast-dump your_file.c
Clearly as you can see, MiniC is quite a limited programming language, yet despite its limitations it can be used to program some useful applications. Your compiler should be able to parse the example programs in the tests/ directory, checking that these conform to the language specification and create the correct AST for each. Correctly parsing and creating an AST for these tests and displaying the AST in a well formatted / readable manner will form part of the marks awarded for the coursework (see Section 5).
2 Part 2 - Types, Scope and Code Generation
The second part of the coursework will involve generating code using the AST you created. It will also be more challenging as several aspects of writing a compiler needs to be handled carefully to produce working target code. As such this part of the coursework will give you a chance to showcase your compiler writing skills !
2.1 Task 1 - LLVM IR Code generation
Similar to how you output a textual description of an AST node as above in Part 1 - Task 3, it is possible to add a method called codegen() to each AST node class that when called, emit some intermediate representation (IR) for that AST node, along with emitting the IR for all its child AST nodes on which it depends on. An example codegen() method for the AST node for Integer literals could be :
/// IntASTnode - Class for integer literals like 1, 2, 10,
class IntASTnode : public ASTnode {
int Val; TOKEN Tok;
public:
IntASTnode(TOKEN tok, int val) :Tok(tok), Val(val) { }
virtual std::string to_string() const override { ... }
virtual Value *codegen() override { /* generate code */ ... }
};
Again, in this example the base class method codegen() is overridden. The codegen() method returns an LLVM Value object. “Value” is the class used to represent a “Static Single Assignment (SSA) register” or “SSA value” in LLVM (as discussed in the lectures). Go through Chapter 3 of the LLVM tutorial, which provides details of how LLVM IR can be generated from the AST nodes. You will again see that emitting IR for each AST node will require traversing the tree rooted in that node, emitting IR for its children as required. Extend your parser to generate LLVM IR for the AST created after a successful parse. To support this task, it will be very helpful to go through and understand Chapters 3, 5 and 7 in the LLVM tutorial. These chapters contain examples on how to generate the required IR for various programing constructs in our language.
[Note : the code presented inline in the tutorial may have subtle errors due to being written for earlier versions of LLVM, but the full listing at the end of each section presents a correct version.]
❼ Chapter 3 : Generating LLVM IR for literals, variables, expressions, binary expressions, function calls, function declarations (including function signature and body).
❼ Chapter 5 : Generating LLVM IR for control flow. You will need to adapt the LLVM functions used to generate code for for loops to generate code for while loops as required for MiniC.
❼ Chapter 7 : Generating LLVM IR for local variable declarations and the assignment operator. Particularly, note how memory accesses are created with the use of alloca instructions.
In addition to the above chapters, you may also find the following hints useful for generating LLVM IR:
❼ The IRBuilder class consists of many methods that you will find useful for generating code for program-ing constructs such as comparisons (e.g CreateFCmpUEQ, CreateFCmpUNE, CreateFCmpULE , etc.), loading (CreateLoad), storing (CreateStore) and returning values (CreateRet).
❼ For generating code for binary operators (such as +, −, ∗, /, etc.) you may prefer to use CreateBinOp in the IRBuilder class. In the same class, methods CreateFNeg and CreateNeg will be useful for unary negation.
❼ ConstantInt is the shared class of boolean and integer constants. Use its get() methods to obtain Integer or Boolean constants. A Boolean is represented as a 1 bit integer. ConstantFP is used for floating-point constants.
❼ You may find that generating Phi nodes in if/then/else statements (Chapter 5) is not required for MiniC as you will be using allocas (Chapter 7) to load and store changes to variables in memory.
❼ Use the LLVM GlobalVariable class for creating global variables.
❼ The methods used for generating the if/then/else blocks in Chapter 5 of the LLVM tutorial provides a good example of how code can be generated for an AST node representing a block of statements (as required for the non-terminal block in our grammar in Figure 1). Particularly note how basic blocks are created using the Create method of the BasicBlock class and how the code insertion points are set using methods SetInsertPoint and GetInsertBlock of the IRBuilder class.
❼ When generating IR for while loops, create a basic block for the loop header, loop body and loop end using the Create method of the BasicBlock class. Within the loop header, generate the code for the condition. Then use a conditional branch created using the CreateCondBr method of IRBuilder class to branch to the start of loop body or fall through to end of loop body depending on the condition. After generating code for the loop body, create an unconditional branch using CreateBr back to the loop header where the loop condition will be tested again.
❼ Function declarations as detailed in Chapter 3 require you to generate the function signature (called the proto-type) first and then the function body. Note how for the function signature, the return type should be set using the get method of the FunctionType class. The function is created using create method of the Function class. Also note how the function arguments are set for the signature.
Further details of classes including their methods can be found by searching through the LLVM API documentation (Google usually returns the required documentation page). You may find it helpful to ignore the class diagrams in these documentation and simply concentrate on the API.
2.1.1 Types, Scope and Symbol Tables
You will soon realize that to generate valid LLVM IR you need to check types of variables and check if variables and functions are in scope. Implement checking type and scope of variables and functions when generating code. Output appropriate errors when these semantic checks are violated. As stated earlier, assume C language rules for these checks (except for the exceptions noted in Section 2.1.2). You may find the getType() method in an LLVM Value object useful for type checking. You can then use this Type to work out if the value is a float or an int (and what type of int, hint: it is recommended you use signed integers all the way through the coursework as there is no “unsigned” keyword in MiniC.). Recall that Value objects are returned by each of the codegen() methods you write for your AST nodes. Alternatively, you may wish to implement your own type checking system by augmenting the AST node classes with type information and use these to implement semantic checks.
For checking scope, follow the techniques demonstrated in the LLVM tutorial were a rudimentary symbol table(s) are used to check scope of your functions and variables:
static std::map
static std::map
2.1.2 Special MiniC Semantic Rules
To simplify the implementation of semantic analysis, a number of C99 semantic rules have been simplified and should be handled in the following manner:
❼ In C99 it is valid to have a global variable defined multiple times in the same file. For MiniC you should only allow a global variable to be defined once. However, re-declaration of a global variable within a local scope should be allowed.
❼ In C99 int foo() means that the function can be called with 0 or more arguments. For MiniC we will use the C++ convention where foo() can only be called without any arguments.
❼ Allow only widening conversions when returning an incorrect type (i.e. a type different to that of the declared type in the function definition) at the end of a function. So for example if an int function returns float this is a semantic error, but if a float function returns an int promote the int to a float and return without flagging and error.
❼ In C99, it is also allowed to call a function with differing argument types. e.g: int func(int a){return a;}int x = func(1.0);. For your compiler, again flag narrowing conversions as errors and allow widening conversions.
❼ Implementing the C/C++ convention of lazy evaluation (boolean short circuit code generation) for && and || operators correctly, will be awarded extra marks.
2.1.3 The LLVM Interpreter and Static Compiler
The main() function in mccomp.cpp is set up to output the generated IR to a file called output.ll. You can make use of the LLVM Interpreter lli or the LLVM static compiler llc to check if the IR generated through your compiler is valid. You may find it useful to refer to the LLVM IR instruction reference when debugging your IR. Additionally, you may find it useful to see the LLVM IR generated by the clang compiler itself for a MiniC program, and attempt to get your compiler to produce that IR. However do note that clang may generate extra bits of code that you will not need to generate for this assignment.
# use llvm Interpreter
lli output.ll
# use llvm static compiler - will result in an assembly file called output.s
llc output.ll
# use the clang compiler to generate LLVM IR for a MiniC programe called foo.c
clang -cc1 foo.c -emit-llvm
2.2 Task 2 - Putting It All Together
The final task will make use of the IR generated from your compiler to build a binary executable and test it on an X86 machine. As we require basic I/O capabilities to inspect the results from the compiled code, we will make use of a small driver application. Each example in tests/ also consist of a driver code driver.cpp that you can compile together with the LLVM IR generated by your compiler to obtain an executable. For example to compile and build the executable for addition.c and execute it:
# compile addition.c using your compiler
./mccomp tests/addition.c
# use output.ll to build and execute
clang++ driver.cpp output.ll -o add
./add
As you can see from the above command, clang++ can directly make use of LLVM IR to build an executable. Test the code generated from your compiler on all the tests by making use of the tests.sh script. If you have carefully built your compiler, checking the IR generated from it, for each codegen() method, then this script should finish without any errors ending with an “ALL TESTS PASSED” output. Marks will be awarded based on the number of test cases that produce correct results (see Section 5). As these tests may not exercise all the functionality of your compiler, it is strongly advised that you test it on other examples that conform to the language specification. Testing on examples that do not conform to the specification will also be important, enabling you to see if your compiler is able to report errors.
2.3 Task 3 - Report
Write a report that details the design and implementation of your compiler. Include in this report (1) the final grammar used for building the parser, (2) FIRST and FOLLOW sets created for developing the predictive parser, (3) design decisions for implementing the parser, (4) how semantic checks were handled when generating code, (5) other sources you consulted and (6) any known limitations of your solution. Comprehensive coverage of all the aspects of the design and implementation of your compiler should be detailed here to obtain full marks. Apart from the final grammar listing and FIRST and FOLLOW sets, your report should be no longer than 2 pages.
3 Deliverables
The coursework is released on the 2nd of October 2023. The deadline for submitting the solution files and report via Tabula is Monday 20th November 2023 at 12 noon (Week 8). The time you submit to Tabula will be taken as the official time of submission. Marking will be done anonymously, so please do not put your name in your program files or your report, instead include your University card number. Your submission should be a single zip file containing the following:
1. All the C++ source files for your compiler. The file that contains the main method should be called mccomp.cpp. Make sure that LLVM IR is generated into a file called output.ll. Additionally you should include the modified Makefile that builds your compiler with GNU make. Your compiler will then be tested by calling the tests/test.sh script, which contains a sequence of commands such as to following to test the code:
# build compiler
make mccomp
# compile some MiniC code using your compiler
mccomp some_code.c
# create an executable
clang++ driver.cpp output.ll -o executable
# execute
./executable
There will be extra tests used to evaluate your compiler that is not included in the tests/test.sh script provided to you. As such you should thoroughly test your compiler before submission.
2. The report, as a pdf (named report.pdf).
Make sure your code is working on the DCS undergraduate laboratory workstations (or the DCS machines you can access remotely) using the specific LLVM version noted in this coursework. Also make sure that you are submitting the version of your code that you intended to submit. If your code fails to compile and/or run on the above systems/software, I will not be able to award marks to the sections of the marking scheme that tests its functionality and other subsequent sections that depends on these non-functioning parts of your code. A good rule is to check that at least the supplied tests pass (using the script tests.sh) before you submit your code. Also note that the parser must be a recursive descent parser. It should not be a stack based LL parser, nor any other type of parser. Zero marks will be awarded if the parser is not a recursive descent parser. You could develop a back-tracking parser, but you will lose the marks awarded for developing a predictive parser.
4 Plagiarism
By now you will know the Department policy on allowable collaboration and reliance on outside sources. You may well find bits of code that are relevant to the coursework, if you do, make sure you acknowledge it and be aware that your submission will be marked taking this source into consideration. You may discuss the basic structure of your solution with colleagues, but the final code that is submitted must be your own.
Using generative AI tools, GAITs (e.g. Chat-GPT, Google Bard, GitHub Copilot) is permitted under the condition that you acknowledge its use (in the report) specifying what was generated and where (in code comments and/or report). Any prompts used to generate code/text and the resulting code/text must be submitted with the solution. You must adhere to the new departmental guidelines introduced this term on the use of GAITs (see the updated student handbook). When assessing the coursework you may be required to attend an in-person viva to demonstrate ownership of content you claim as your own. Additionally, be warned that current generative AI frameworks tend to produce considerable bugs in the source code. You will need a good understanding of compiler theory and your design/implementation to resolve these.
5 Assessment criteria
This coursework is worth 40% of the marks for CS325. It will be marked out of 100, and the marks will be allocated to the following aspects:
6 Epilogue
In this coursework we have gone through several key aspects of designing a compiler, starting from a language spec-ification, through to lexing, parsing, some basic semantic analysis tasks and IR code generation. We have also made use of LLVM, a very powerful compiler development framework, extensively used in industry and academia for a wide range of production compilers.
The coursework, of course, only demonstrates one way of designing various aspects of a compiler. In fact, much of the tasks only scratched the surface of the complexities involved in designing a production compiler. Here, we have
Part 1
Converting Grammar to LL(k) form (including precedence) and computing FIRST/FOLLOW sets 5
The parser is a working recursive descent predictive LL(k) parser 5
Correct and well formatted ASTs generated for test cases 5
Correct errors reported for test cases with syntax errors 10
Part 2
Correct errors reported for test cases with semantic errors (type and scope) 10
Correct results from executing the code generated for test cases including extra tests 30
Overall
Quality of error reporting 15
Programming style, clarity of comments in code 5
Report
Quality of report - details of design and implementation 15
used top-down parsing to create an AST and have then traversed it for generating code. You could have also generated code during the top-down parsing process, as we discussed in lectures.
Furthermore, the MiniC language is limited in its capabilities. More powerful features such as arrays, structs, switch statements, memory management, classes etc., could be added, but these will complicate the grammar and may require more powerful parsing techniques than LL(k) to parse. However, generating code using LLVM through bottom-up parsers (such as LR parsers) would work equally well, where the same LLVM code generation routines can be used as actions for the reductions in the bottom up parser. Generating code for more powerful features are commented on in the final chapter (Chapter 10) of the LLVM tutorial. Hopefully, you will now have some skills to try this on your own !
We have also not attempted to optimize the generated IR, nor tried to optimize the target code, given time limitations. However, some details on this are discussed in Chapter 4 of the LLVM tutorial. You could also inspect transformations done to your LLVM IR by running it through the LLVM optimizer, opt (see the man pages of opt for details). Again, it is recommended that you have a look at these techniques, as they give significant insights into the module material and would ultimately improve your skills as a compiler writer.
Acknowledgments
This assessed work has its origins in previous coursework set for the CS325 - Compiler Design module by Sara Kalvala, where the development of a recursive descent parser using Python was attempted for Lua and COOL languages during various academic years. The current coursework extended these ideas with the aim of developing an end-to-end compiler, together with utilizing a real-world compiler infrastructure.
The MiniC grammar was adapted from Compiler Design: Theory, Tools, and Examples - (C/C++ edition), by S.D. Bergmann and the grammar for the Mini-C project by J. van Boxtel. The use of LLVM was inspired by discussions with Carlo Bertolli, one of the HPSC research group’s collaborators at IBM TJ Watson labs (now at AMD) and David Truby, who read for a PhD in the same group at Warwick (now at ARM). Various fixes, amendments and improvements to the coursework was done by Toby Flynn and Finnbar Keating, both former CS325 students, currently reading for PhDs at Warwick.
2023-11-06