COMP 311: Lab 4
Hello, dear friend, you can consult us at any time if you have any questions, add WeChat: daixieit
COMP 311: Lab 4
It's time to practice SAP by writing some SAP programs! This will help bridge the gap between the first half of COMP 311 and the second half, which involves MIPS assembly and MIPS architecture.
In this lab, you will write five SAP programs that build upon each other. You'll become more comfortable with writing assembly-like code, which will be useful as we transition into writing MIPS programs.
SAPsim
To simulate and debug your SAP programs for this lab, use SAPsim.
To install, run pip install SAPsim . If you get pip not found , use pip3 instead. Python 3.9+ is required.
Then click the link above, and read the Usage section of SAPsim's brief README (~2 min) to see how to use it.
Lastly, here are two commented example SAP programs. We recommend downloading and running both programs in SAPsim's debug (step) mode to get more familiar with SAP programming and SAPsim.
Overview
SAPsim
Pre-lab knowledge
General SAP knowledge
SAP and RAM
SAP instructions and data
Autograding
Example
Program 1: Flags
Inputs
Outputs
Examples
Save two instructions
FlagC and FlagZ
Program 2: 16-bit
Inputs
Output(s)
Examples
Note
Program 3: Replicate
Input
Output
Grading note
Program 4: Overflow
Input
Output
Examples
Program 5: Even/odd
Input
Output
Examples
Edge case
Grading note
Challenge
Submit your assignment
Pre-lab knowledge

SAP Instruction Set
If needed, the lecture slides explain each instruction in greater detail.
General SAP knowledge
SAP and RAM
We'll use pseudocode syntax from the SAP Instruction Set to go through some simple examples.
Mem(address) returns a byte. Mem(address) = byte sets the value of RAM at address to byte .
LDA , ADD , and SUB get a byte from an address in RAM ( Mem(arg) is a get operation).
STA sets the byte at an address in RAM ( Mem(arg) = A is a put operation).
Lastly, PC represents an address in RAM. Mem(PC) returns the byte representing the next instruction to be executed.
Instructions and data values are both bytes. Specifically, an instruction is a 4-bit opcode (represented as a mnemonic for readability) and 4-bit operand, and a data value is an 8-bit number. They're both composed of a first hexit and a second hexit. Instructions and data look the same to SAPsim, and the difference is how the bit pattern is interpreted.
SAP instructions and data
However, we'll now distinguish instructions and data.
The column names in the CSV files are Address,First Hexit,Second Hexit .
For instructions, the first hexit is a textual mnemonic. The second hexit is the arg. Data values are written as a first hexit and second hexit. For example,
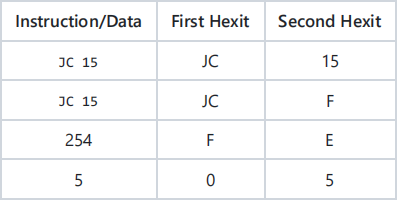
SAPsim representations of instructions/data
The first and second rows show two ways of representing JC 15 . In the third row, the decimal value 254 is represented as 0xFE . In the fourth row, the First Hexit 0 may not be omitted.
Per convention, we use the lower-numbered addresses to store instructions and the higher-numbered addresses to store data. We can also use Register A to store data.
Autograding
SAP is much too simple to have sophisticated I/O. To provide data inputs to your program, we RESERVE certain addresses for our (and your) use. For you to expose output, you will store data in Register A and/or a specific predetermined memory address and then halt your program so that the autograder knows when to check it.
Before executing your program, the autograder overwrites your program with data at RESERVED address(es). Your program must work with arbitrary data values to produce correct return values.
Lastly, if any Exception occurs during autograding, the rest of the tests for that file will not be run. The stack trace in Gradescope will show the name of the Exception and information about it.
Example
We provide a concrete example of the process by explaining Program 1's template. The flags.csv template happens to be more restrictive than the rest. In addition to RESERVED addresses, it also has DO NOT MODIFY addresses and a RETURN VALUE address. Some comments are paraphrased.

flags.csv
The arbitrary inputs X and Y will be provided to your program at addresses 13 and 14 immediately before execution.
To debug your program, you may modify data at RESERVED addresses yourself. However, any modifications to RESERVED addresses will be overwritten during autograding.
Given the arbitrary (0 to 255) inputs X and Y , your task is to fill out rows 2 - 12 to produce correct RETURN VALUEs at address 15 and in Register A, based on program specifications.
Do not modify addresses 0 or 1. For this template, the two instructions there have to be what's in the template. If you modify them, they'll be overwritten during autograding anyway.
Now that you understand the process, it's time to start coding!
Program 1: Flags
In flags.csv , return the ALU flags set by the ADD or SUB instruction.
Use FlagC and FlagZ computed by the ADD or SUB at address 1 to store FlagC at address 15. Also, load FlagZ into register A. Then halt.
Inputs
X (0 to 255) RESERVED at address 13
Y (0 to 255) RESERVED at address 14
Outputs
FlagC (0 or 1) resulting from X+Y or X-Y stored at address 15
FlagZ (0 or 1) resulting from X+Y or X-Y loaded into register A
Examples
Suppose address 1 contains SUB 14. Also, X = 5 and Y = 5 at addresses 13 and 14, respectively.
FlagC = 1 and FlagZ = 1.
So, we store the value 1 at address 15. We also load the value 1 into register A.
After completing both operations, halt.
Suppose address 1 contains ADD 14. Also, X = 1 and Y = 255 at addresses 13 and 14, respectively.
FlagC = 1 and FlagZ = 1.
So, we store the value 1 at address 15. We also load the value 1 into register A.
After completing both operations, halt.
Suppose address 1 contains ADD 14. Also, X = 9 and Y = 254 at addresses 13 and 14, respectively.
FlagC = 1 and FlagZ = 0.
So, we store the value 1 at address 15. We also load the value 0 into register A.
After completing both operations, halt.
Save two instructions
You can save two instructions by hardcoding the address 15 RETURN VALUE to 0 (or 1) so that when FlagC is 0, you don't have to set it to 0.
FlagC and FlagZ
For Program 1, you don't have to understand how the flags are set, just that they are set, but you will have to understand for the other programs.
Self-check (an understanding of FlagC and FlagZ is required for the next exercises): Compute the flag values for the above 3 examples.
This doesn't take a lot of effort (i.e., can be done mentally) if you understand the rules for flag-setting. You should already be familiar with these rules since the ALU you implemented follows all the same rules, just for 4-bit instead of 8-bit.
Specifically, in the previous lab, , and FlagZ = S3 + S2 + S1 + S0 = NOR(Sum bits).
With these rules, it's easy to determine flags by hand after addition. Though the above equations also hold for subtraction since both operations use the same circuit, it's more tedious to apply them since you would have to apply 2's complement.
Fortunately, for subtraction, there are two shortcuts for determining flags by hand for which you do not actually have to perform the subtraction operation. Here's a table for quickly evaluating flags in a SAP program:

How to quickly evaluate flags in SAP program
The ADD rules are from the Boolean equations mentioned earlier. The SUB rules are the two simplest rules from the unsigned comparison table :
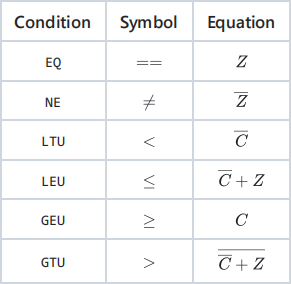
Unsigned comparison table
Note: SUB means A = A - Mem(arg) . There are two values of A : the original value and the updated value. Use the original value of A when checking the SUB conditions. See Example 1.
Program 2: 16-bit
In 16bit.csv , given two 16-bit numbers X and Y , compute the 16-bit result X+Y .
The task is to perform 16-bit addition despite the limitation of having 8-bit registers and 8-bit data values. We can implement a simple algorithm to do so. In the template, notice that we represent both X and Y as a high byte (8-bit) and low byte (8-bit). For example, if Y is 0xBEEF , then its high byte is 0xBE and its low byte is 0xEF . We add the two low bytes and then the two high bytes. Two examples are shown below, under examples.
Inputs
X (0 to 65535), represented as a high byte RESERVED at address 12 and a low byte RESERVED at address 13
Y (0 to 65535), represented as a high byte RESERVED at address 14 and a low byte RESERVED at address 15
Output(s)
X+Y (0 to 65535), represented as a high byte RETURN VALUE at address 14 and a low byte RETURN VALUE at address 15
Examples
Note: The two-column addition examples below render correctly on GitHub but may not render well in other Markdown viewers (e.g., VSCode).
Suppose X is 0x000F and Y is 0xF1CE .
1. First, we add the low bytes 0x0F and 0xCE .

2. We store DD at address 15.
3. There is not a carry-out, so we proceed to normal addition of the high bytes 0x00 and 0xF1 .

4. We store 0xF1 at address 14. We now have 0x000F + 0xF1CE = 0xF1DD .
5. Halt.
Suppose X is 0xDEAD and Y is 0xBEEF , as shown in the template.
1. First, we add the low bytes 0xAD and 0xEF .

2. We store 0x9C at address 15.
3. There is a carry-out, so we carry the 1 in our next addition of the high bytes 0xDE and 0xBE .

4. We store 0x9D at address 14. We now have 0xDEAD + 0xBEEF = 0x9D9C (there is overflow, so the MSB carry-out is discarded).
5. Halt.
Note
Addresses 14 and 15 are both RESERVED and RETURN VALUE addresses. However, this is not a problem. As shown in the above examples, when you store the low byte of X+Y to address 15, you no longer need the low byte of Y that was originally provided there.
Program 3: Replicate
In replicate.csv , replicate the following pseudocode.
uint8_t X = input() // RESERVED data value (0 to 255) at address 15
if (X < 127)
return 1;
else if (X == 127)
return 2;
else
return 3;
Input
X (0 to 255) RESERVED at address 15
Output
The return value of the above pseudocode in Register A
Grading note
For this program, if you load 3 into Register A then halt, you'll pass 128/256 tests.
Therefore, 128 or fewer tests passed will be given 0%. 256 tests passed will be given 100%. Any number in between will be given a score scaled between 0% and 100%. Specifically, the score for this part is given by max(t - 128, 0) / 128 , where t is the number of tests passed.
Program 4: Overflow
In overflow.csv , implement overflow detection.
You are given input X (1 to 255), and your program must continually add that number to itself until there is overflow. When overflow occurs, load the number of successfully completed addition operations (i.e., without overflow) into Register A, then halt.
Input
X (1 to 255) RESERVED at address 15
Output
Y , the number of successfully completed addition operations before overflow occurs, in Register A
Y is the unique integer such that XY ≤ 255 and X(Y + 1) > 255
Examples
Suppose X = 84 = 0x54 .
0 + 84 = 84
84 + 84 = 168
168 + 84 = 252
252 + 84 = 80 (overflow)
We successfully completed 3 addition operations without overflow, so we load the value 3 into Register A, then halt.
Suppose X = 51 = 0x33 .
0 + 51 = 51
51 + 51 = 102
102 + 51 = 153
153 + 51 = 204
204 + 51 = 255
255 + 51 = 50 (overflow)
We successfully completed 5 addition operations without overflow, so we load the value 5 into Register A, then halt.
Program 5: Even/odd
In evenodd.csv , determine whether input X is even or odd. That is, implement a mod 2 operation.
If even, load the value 0 into Register A, then halt. If odd, load the value 1 into Register A, then halt.
Input
X (0 to 255) RESERVED at address 15
Output
Y such that Y = X mod 2 in Register A
Examples
Suppose X = 4.
4 is even, so we load the value 0 into Register A, then halt.
Suppose X = 5.
5 is odd, so we load the value 1 into Register A, then halt.
Edge case
If your program passes 255/256 tests (fails 0.4%), check for an edge case.
Grading note
The grading note from Program 2 applies here as well.
Challenge
The solution file for this program uses the fewest addresses! Can you match 7? This count includes RESERVED address 15.
Congratulations, you have successfully created five SAP programs and are ready to take on MIPS assembly soon! SAP programming can be considered more difficult than MIPS programming since it is more restrictive. After getting this far, you should be in great shape for the rest of the course!
Submit your assignment
Assignments are submitted through Gradescope.
You should already be enrolled in the COMP 311 course on Gradescope. If you are not, please check the course website and syllabus for self-enrollment instructions. If you're unable to self-enroll, please contact your cohort leader(s) and we'll manually add you.
To submit your assignment, please follow the basic steps provided below. If you're unable to perform any of the steps, please reach out to your cohort and cohort leader as soon as possible. That is, give yourself time to resolve any technical issues using GitHub, GitHub
Desktop, and Gradescope well before the assignment due date.
1. Submit modifications using the commit GitHub Desktop instructions.
2. Update remote (origin) repository using the push GitHub Desktop instructions.
3. Go to the COMP 311 course in Gradescope and click on the assignment called Lab 4.
4. Click on the option to Submit Assignment and choose GitHub as the submission method. You may be prompted to sign in to your GitHub account to grant access to Gradescope. When this occurs, grant access to the Comp311 organization.
5. You should see a list of your public repositories. Select the one named lab-04-yourname and submit it.
6. Your assignment should be autograded within a few seconds and you will receive feedback.
7. If you receive all the points, then you have completed this lab assignment! Otherwise, you are free to keep pushing commits to your GitHub repository and submit for regrading up until the deadline of the lab.
2023-10-31