CSCI142: Computer Science 2
Hello, dear friend, you can consult us at any time if you have any questions, add WeChat: daixieit
CSCI142: Computer Science 2
Lab 3 - Derp Your Interpreter
Introduction
An interpreter is a program that executes instructions written in a programming language. For example, the Java Virtual Machine (JVM) is an interpreter that executes compiled Java bytecode. This assignment involves writing an interpreter for a very simple language called Derp.
The Derp interpreter accepts prefix mathematical expressions (the mathematical operation is written at the beginning rather than in the middle). Derp converts a prefix expression represented as a string into a tree structure called a parse tree. Only the operators +, -, *, / and % are allowed in the Derp language. The only supported operand is integer literals (e.g., 8). The tree is binary where the operators are interior nodes and the operands are leaves. When given a prefix expression, Derp will:
1. construct the parse tree
2. evaluate the result
3. display the infix form of the expression (referred to as emitting)
Design
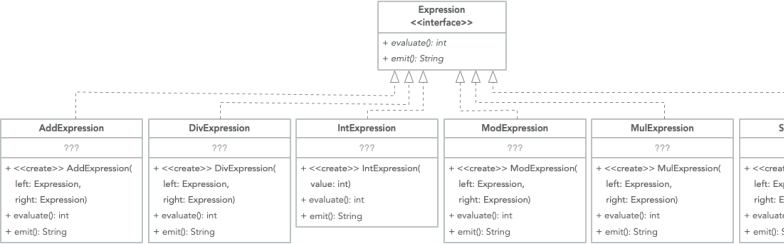
The full design of the expressions that you began with in problem solving is shown here. The public methods are shown to you, but the private state is not. You will need to design and develop this own on your own. A general rule of thumb is to look at the constructor and minimally consider its arguments in terms of state the class will need.
Implementation
In-Lab Activity: Getting Started
This is the first lab where you will be required to use GitHub.
Create your GitHub Account
1. First you need to create your GitHub account and set it up with IntelliJ on your machine. Go through the setup instructions here. This needs to be done only once.
The remaining instructions need to be done for every new assignment you receive. You should make a new IntelliJ project each time - do not try to reuse the same project!
Accept GitHub Classroom Assignment
Next you will get the GitHub classroom link from your instructor/SLI and accept it. Please note, this link is specific to your section. You should not share this link with anyone else.
2. Open the classroom link in a browser. You may be required to log back into to your GitHub account. If you are asked for GitHub to authorize the assignment you should do so. Once the assignment is accepted it will take you to your repository home for this assignment on GitHub.
Checking Out a New GitHub Assignment in IntelliJ
You will now check out the assignment from the GitHub repository that was created so that you may work with it in IntelliJ.
3. Create a place on your personal computer to store this assignment.
4. Launch IntelliJ. In the splash screen, select Get from Version Control.
5. In the left, select GitHub (that lists your username), and in the right for URL select the new repository you created from the assignment link. Then for Directory select the location for this lab assignment.
6. Click the Clone button and select a location on your machine to store your repository/code locally. When asked to check out your code you should select Yes.
Initial Project Structure
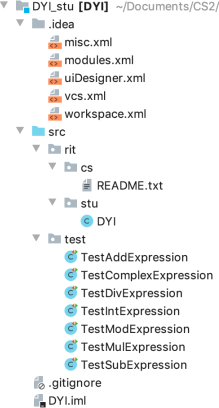
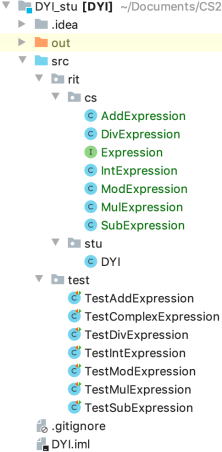
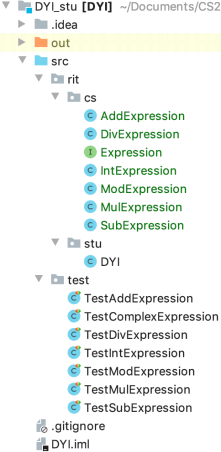
Once your project is loaded you should see the following initial structure of the assignment when you select Project in the left and bug down on the directories under src.
Implementing Expression Interface
The first thing you will notice is there are a series of test programs in the test package that are underlined in red when you select them. This is because you first need to implement the expression classes in rit.cs.
7. First, you can delete the README.txt file. It is there as a reminder.
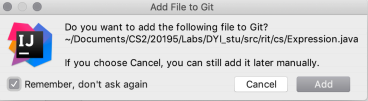
8. Next, write the Expression interface that you developed in problem solving and see in the design above. You can do this by right clicking on the rit.cs folder and selecting New...Java Class and changing the pulldown menu from Class to Interface. A dialog will come up asking if you want to have all future files automatically added to Git control. It is safe to allow this and to check the checkbox in the dialog to remember your decision.
Stubbing the Expression Classes
The goal here is to make it so all the test programs compile and run - but all tests fail. This step makes sure your code conforms to the usage in the testers. Create all the concrete expression classes so that they satisfy the following:
● Each class should implement the Expression interface.
● There should be a constructor for each of these classes. Look at the test programs to see the difference between IntExpression and the others. Leave the body of the constructor empty for now.
● Provide an implementation for the evaluate method, but simply have the method return the value 0.
● Provide an implementation for the emit method, but simply have the method return the value null.
9. Begin with the IntExpression class. When stubbed it should look like the following.
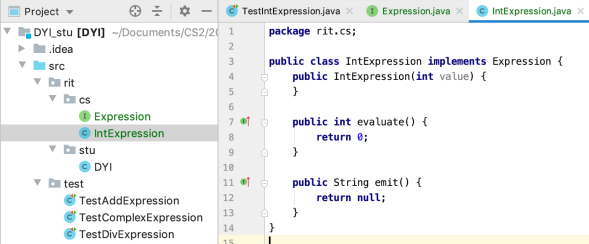
10. Continue by creating and stubbing the remaining classes. When finished your project structure should look like the following.
Verifying Tests
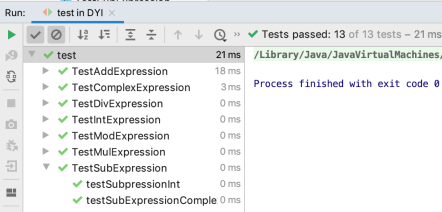
This is the final step in the implementation portion of the in-lab. You will make sure all of the tests pass. For each expression class you will be adding the private state to support the methods, and then implementing the methods to work with said state.
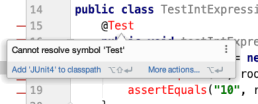
11. The test program use a library called Junit. This is contained within IntelliJ, but you may need to configure it first. Go to the TestIntExpression class in test package. If the source code comes up with undefined things from JUnit (in red), you should hover over the Test annotation that precedes the testIntExpression method. A popup should come up with blue text to Add Junit 4 to classpath. Select that and a dialog should come up to download it - click the OK button. At this point there should be no errors that show up in the test code. If you are having problems please seek help before continuing.

12. Each test class is designed to test an individual class that you have to implement, except for TestComplexExpression which tests all of them. You can run all the tests at once by right clicking on the test package, or you can run each test case individually by right clicking on it. Initially, you should see that all the tests fail.
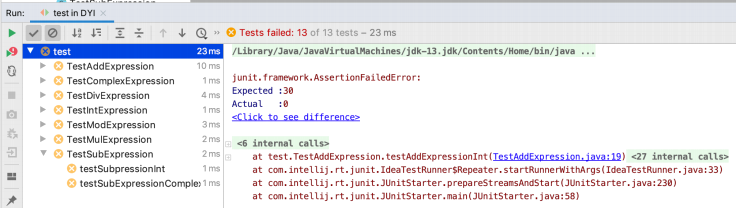
13. When a test fails it shows you what it Expected, and the Actual which is what your program produced. These two things must match exactly in order to pass the test. If strings are being compared they must match character by character exactly. Your goal now is to finish implementing all the expression classes so the test cases all pass.
Commiting and Pushing to GitHub
If you do not finish the expression class implementation and testing portion of the in-lab before the end of lab, it is okay. You should leave a little time at the end to make sure that you commit and push the work you did. You can then return back to this activity at a later point without fear of losing any work.
Notice the colors of the source files in your project. The existing files that you did not change are black. The new ones that you just made in the cs package are green. This means these are files that are new to Git. They have not been committed as changes to the repository on your machine. And they also have not been pushed out to GitHub. As you develop and progress through your assignments, you should pause to commit your changes and push them out so the revisions are saved both locally on your machine and on GitHub. If you do not do this you could lose your work if your hard drive becomes corrupted. Also, failure to make a reasonable number of commits to show your progress will cause you to lose points on the lab.
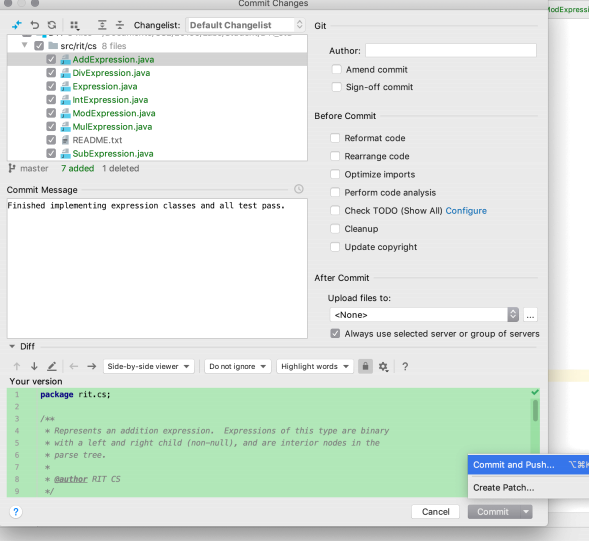
13. In IntelliJ, right click on your root project directory folder and select Git...Commit Directory.... A new dialog window will come up. Here is where you can compose your commit message and then commit and push it. In the checkboxes in the right it is okay to unselect the boxes for Perform code analysis and Check TODO. In the commit message area you should put a meaningful commit message detailing the work you just did.
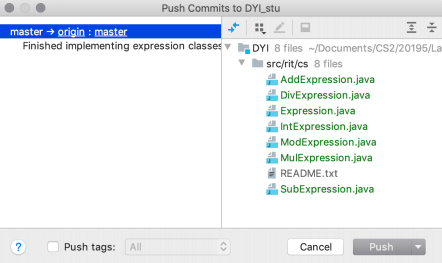
14. Next, select the pull down for the Commit button in the lower right and select Commit and Push. In the next window you should Push the changes out to GitHub.
15. Now when you look at your project you should see that the commit was made, and the file colors will turn to black. This means they are under Git control and have not been modified since the last commit/push. Later on when you modify existing files they will change to the color blue. This indicates again you need to commit and push them.
16. Every assignment has points for doing a reasonable number of commits. This is verified by your SLI by looking at your Git log in your repository on GitHub. Make sure you do this regularly as you develop your assignment.
At this point you have made great progress on this assignment. You know that the nodes in the expression tree that you will eventually build function correctly when called upon. You can now work on the actual implementation of the DYI program in the stu package. Refer to the next section for details on this part.
DYI Implementation
The main program is the class DYI in the rit.stu package. It is responsible for reading a prefix expression from standard input, generating the corresponding parse tree, and then emiting and evaluating the tree.
Sample Run
Here is a sample run using several prefix expressions:
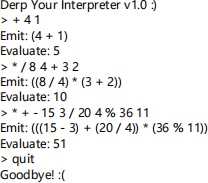
First, a welcome message is displayed (one time only). The user is then prompted with ">" and the program waits for the user to enter the expression. Once entered, the program builds the parse tree. It then emits the inorder string of the expression and displays the evaluation of it. This process is repeated until the user enters "quit" - this causes the program to display a closing message and then the program gracefully terminates.
For purposes of this lab you may assume all input is correct and represents a valid parse tree.
Main Program: rit.stu.DYI
You are expected to write the main program from scratch. To receive full design points you should follow all of these suggestions:
● Your main program should be fully object oriented (no static methods except for the main). This means the main method should be tiny (only a few lines). It should create a DYI instance and then pass control to a method of that instance that handles the processing loop .
● The main loop is responsible for reading in prefix expressions from the user until they wish to quit. It is responsible for building a list of tokens for the prefix expression. It should then pass control to a helper function that builds the current parse tree. It should then use the root of the tree to emit and evaluate the results.
● The helper function for building and returning the parse tree is what you developed in problem solving for the last question. It takes the current list of tokens as an argument and returns the appropriate Expression node for the token at the front of the list. It is a recursive function that removes the front token from the list, and based on the string, it builds and returns the appropriate concrete Expression node by recursively calling parse to complete the work. This recursive process proceeds until an integer is encountered (a leaf node in the tree) - the base case. In problem solving you worked on integers and addition, and now you will add support for the remaining operators.
Submission
In-Lab
Once you have completed implementing all the expression classes (and interface) in the rit.cs package, you should zip up your entire src folder, name it lab3-inlab.zip, and submit it to the dropbox on MyCourses by the due date.
Lab
You should zip all of the Java source files in the src directory into a file named lab3.zip and submit it to the dropbox on MyCourses by the due date.
Grading
The grade breakdown for this lab is as follows:
● Problem Solving: 15%
● In-Lab Activity: 10%
● Design: 15%
● Functionality: 50%,
● Code Style & Documentation: 10%
2021-09-17
Lab 3 - Derp Your Interpreter