CS 120 (Fall 21): Introduction to Computer Programming II
Hello, dear friend, you can consult us at any time if you have any questions, add WeChat: daixieit
CS 120 (Fall 21): Introduction to Computer Programming II
Short/Long Project #3
1 Overview
In this pair of projects, you will be practicing with graphics.
We will be using Ben Dicken’s graphics.py that most have you have used in 110, but I have provided an updated version which has some new features. Please download my new version - since we may be using some of the more advanced features later this semester.
2 Short Problem: Static Picture
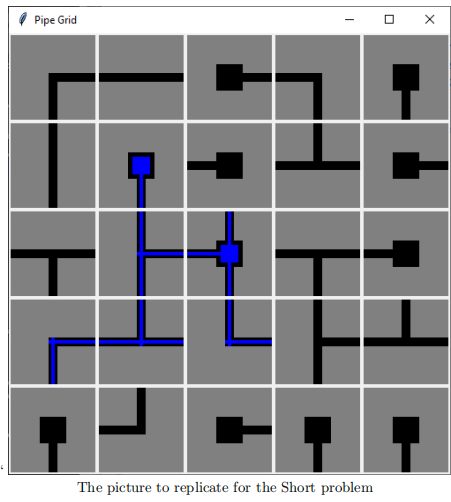
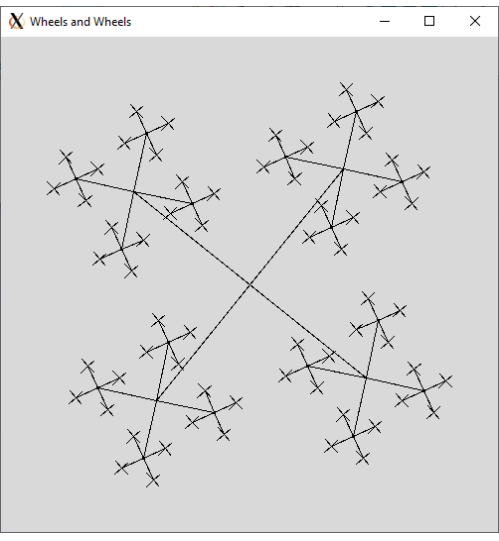
In the Short problem, you will be creating two short programs. Both will be based off of the picture on the previous page.
2.1 Program 1: pipes static_A.py
Write a program, pipes_static_A, which replicates the example picture. While you don’t have to replicate it exactly, you should get pretty close. Your window should be roughly 500x500 pixels in size; don’t make it extremely large, or your TA may not be able to view your window.
This program must organize the code into one or more functions; do not simply fill up main() with hundreds of graphical operations. I would suggest one of two strategies:
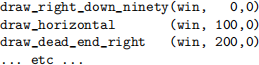
● Tile Functions (easy, but less adaptable long-term)
In this style, you declare a function for each different type of tile - but you pass (x, y) parameters that give the location where the function should draw:
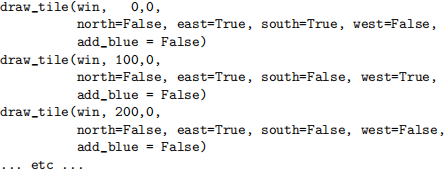
● Parameterized (cool, but harder)
In this style, you declare a function which takes a few parameters, which allow you to draw any tile. While this function will be harder than the ones I suggested above, you’ll only have to write it once.
2.2 Program 2: pipes_static_B.py
Write this program second, after you’ve written the first. It will be worth fewer points. However, if you’ve organized the first program into functions like I’ve requied, this program should be pretty easy to write.
This program takes the previous program, and introduces randomness. Each time that you run this program, you will display only one picture; however, each time that you run this program, this picture should be different because it was generated randomly.
At all times, your window must be (roughly) 500x500 pixels in size (the same as the previous program), and you must draw a 5x5 grid of pipes. However, in this one, you randomly choose which pipes to draw in each location.
Note that duplicates are allowed; it’s OK if your code sometimes draws the same time in multiple locations.
If you used my first suggestion and wrote a different function for each type of tile, then your random number generator should simply decide which function to call, for each tile. (Do you understand now why I said that your functions should have (x, y) parameters that tell you where to draw?)
If you used my second suggestion, you have the option (if you wish) to generate entirely new tiles - simply by using randomness to choose the value for every one of the parameters.
3 Long: Animated Graphics
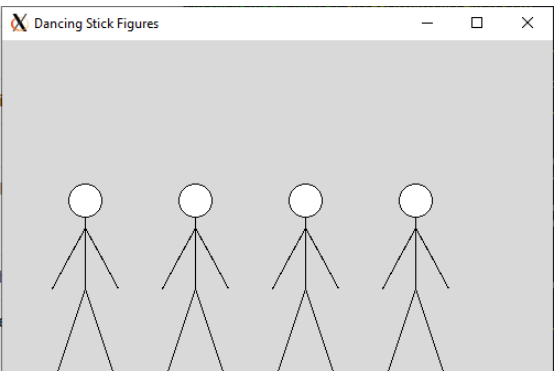
In the Long project, you will either (roughly) replicate one of the example animations that I’ve provide, or else come up with something of comparable complexity. Name this program whatever you want.
Feel free to be creative! Your TA will be grading you on your engagement with the project - that means that you have to write a little bit of non-trivial code. And of course, if your code doesn’t work - if it can’t even draw to the screen, or it isn’t animated - then you will lose most or all of the points for this project.
On the previous page, and below, I’ve placed snapshots of my two example animations. Watch the video that I post to see them move!
NOTE: Please restrict your window to no larger than 800x800, so that we can be sure that the window will fit on your TA’s screen.
4 How to Turn in the Graphics Programs
Your graphics programs must be complete programs (not just a function). When the TA runs your program, you should create a graphics window and draw the animation.
Your program must make use of the graphics library that we’ve provided to draw the basic graphic elements. Do not add any new features to the graphics.py, since your TA will be using the standard one. However, if you have some good ideas, feel free to share them with me - I might include them in a future version!
If you want to also include a README file (either a text file or PDF), explaining how to run the program (or any cool features), you may - but you aren’t required to.
5 Appendix: random
To use random numbers in Python, you must import the random library:

Then, in your code, you can call functions in the library to ask for random data. The most common one we use in this class is random.randint(a,b) which returns a random integer in a range. Note that the upper bound is inclusive, which is the reverse of many other Python ranges.

6 Appendix: graphics.py
Ben Dicken has created a file, graphics.py, which many of you have used in the past: it gives a slightly-nicer wrapper around a classic Python library, known as tkinter. Ben’s library encapsulates tkinter in an object, and provides some methods that you can use to draw a scene.
If you’ve used graphics.py before, please download a new copy from me. I’ve added a few features.
6.1 (x, y) Coordinates
As is common in computer graphics, the (0,0) point of the screen is the upper left corner; positive x is going right, and positive y is going down.
6.2 Creating a Window
To create a window, import graphics, and then call the following function:

This is a constructor for an object; save the reference into a variable, becaause all of the calls below are methods on this object.
6.3 win.ellipse(x,y, w,h, fill)
Used to draw circles and ellipses. (x,y) is the center of the figure. (w,h) is the width and height of the figure; to draw a circle, give the same value for both width and height. Since this is the total width and height, it is the diameter of the circle, not the radius.
The fill color is a string; it can be a standard color, such as "black", "red", "green", etc. , or it can be an html hex color, like "#ff00ff".
6.4 win.rectangle(x,y, w,h, fill)
Used to draw rectangles and squares. (x,y) is the upper-left corner (NOT the center). (w,h) is the width and height.
The fill color works the same way as ellipse().
6.5 win.line(x1,y1, x2,y2, fill, width=3)
Draws a line between two points. The fill color works the same as ellipse().
The width is an optional parmeters. If you don’t provide it, then it will default to 3. If you provide it, then you can change the width of the line you are drawing.
6.6 win.triangle(x1,y1, x2,y2, x3,y3, fill)
Draws a filled triangle, connecting the three points. The fill color works the same way as ellipse().
6.7 win.clear()
Clears the window. Destroys all drawings that you’ve made so far. (This should be the first thing you do before drawing another frame of the animation!)
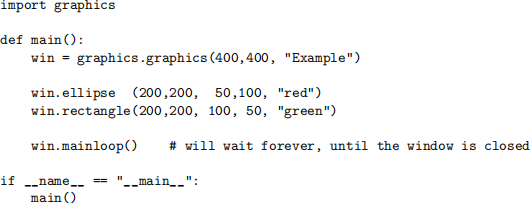
6.8 EXAMPLE - Short Project
This program draws a picture exactly once, and then waits forever. The main() for the two programs in your Short Project will look like this.
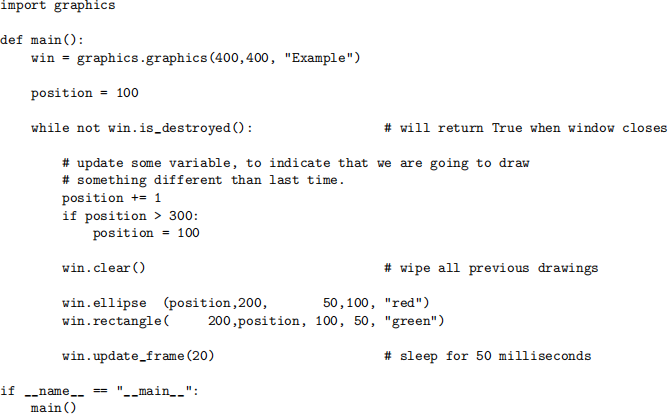
6.9 EXAMPLE - Long Problem
This program draws a picture, waits a fraction of a second, and then clears it and draws another one. Use a main() function like this for your Long Project.
2021-09-12
Short/Long Project #3