Assembly Project – CSCB58 Summer 2023
Hello, dear friend, you can consult us at any time if you have any questions, add WeChat: daixieit
Assembly Project - CSCB58 Summer 2023
A Platform Game
Overview
In this project, you will build aplatformgameusing MIPS assembly. Platformers area classic genre of games: you control a character that moves around a map (“level”) by running left or right, jumping on “platforms” or falling, or climbing up and down ladders, and soon. The goal of the player might be avoiding obstacles, getting to a specific point on the screen using precise jumps, picking things up, shooting enemies,not falling off the bottom of the screen, and more. Some have othergimmicks too.
You have some level of freedom in building the game, and we encourage you to be creative in how it looks and feels. We setup the basic requirements, but it is your game! You can see several classic examples of such games for inspiration below (click links for videos). You do not need to achieve this level of polish and sophistication! In particular, we recommend making a “single-screen” platformer, where the screen does not scroll, but perhaps moves to the next screen once the player has finished the current level.

Since we don't have access to physical computers with MIPS processors, you will develop and test your implementation in a simulated environment within MARS. We will use a simulated bitmap display and a simulated keyboard input.
The project has two marking stages. In the checkpoint demo, you will demonstrate the basic features to your TA during your final interviewslot at the last week of the term. For the final version, you will choose additional features to implement from a list of potential additions that change how the game looks and behaves. You will then submit the completed assembly program (basic features and additional features) with a video link and TAs will later grade it. Note that projects are individual.
Important Info and Due Dates
• Check the Piazza FAQ post frequently for FAQs and updates.
• Checkpoint: Due during your usual TA interviewslot on Week 12 (Jul. 31 – Aug 4).
• Final submission: Due Monday, August 6, 2023, 11:59pm (on Quercus).
(life happens; we will accept late submissions without penalty if they arrive by end of Aug 9)
Version
• Jul. 10, 2022: initial public version.
The Game
Basic Gameplay
The basic format of the game is simple: the player controls a character moves around horizontally (perhaps it is running left and right) and has away to move up and down (such as jumping, dropping down, climbing on ladders, etc.). There are platforms on the screen that the player can reach. There are also other objects: perhaps enemies or spikes that the player must be careful to avoid and may end the game if touched by the player. Or perhaps pick-ups rather than enemies that the player must to collect to finish the game.
Game Controls
The player uses the keyboard to control the character. While the ![]() a
a ![]() key is pressed, the character will move left if it is not at the left edge of the screen. Similarly, the
key is pressed, the character will move left if it is not at the left edge of the screen. Similarly, the ![]()
![]() d
d ![]()
![]() key makes the ch
key makes the ch![]() aracter move right. For vertical movement, it can depend on your choice. A simple choice is to have the
aracter move right. For vertical movement, it can depend on your choice. A simple choice is to have the ![]() w
w ![]() key to have the character jump, after which gravity pulls it dow
key to have the character jump, after which gravity pulls it dow ![]() n. Alternatively, perhaps you want to have ladders or stairs, in which case it is appropriate to use
n. Alternatively, perhaps you want to have ladders or stairs, in which case it is appropriate to use ![]() w
w ![]() and
and ![]() s
s ![]() to move up and down. See “Technical Background” below to see how to read the status of keys.
to move up and down. See “Technical Background” below to see how to read the status of keys.
Note: MARS does not support multiple keys well. If you prefer to allow 8 directions in your game, you can use the keyboard setup shown on the right →

Additionally, holding a key can work but is not great, and depends on the keyboard repeat delay and repeat rate set in the user’s operating system.
Basic Demo
Clickherefor a video demonstration of a basic version of what you are supposed to implement (it also showshow to setup the MARS simulator for the project). This demo shows the features we expect for the checkpoint (explained below); for the final submission, you will implement additional features.
Note that the demo explanation says an incorrect minimum framebuffer size, so make sure to use the requirements in this handout as the main source of truth for this project.
Note it is OK if your game looks and behaves somewhat differently from our demo, as long as the features are there! For example, Ryan has chosen to develop a game in the style of infinite platformer where platforms keep scrolling from right to left. You don’t have to do that. You may also decide to
develop a game where players are notable to “fallout of the screen” (the water in the video) – this is not mandatory, but a choice. See Milestones 1, 2 and 3 for what you’d need to do.
Additional Features
The above only describes the basic gameplay. To get full marks, you will need to implement additional features from a list. There are many possible additions to the gameplay, and it depends on what kind of game you have (puzzle platformers, for example, often have no enemies). Here area few examples:
• Additional screens once the player finishes a level.
• Moving enemies.
• Adding the ability to shoot enemies or jump on their heads to get rid of them.
• Platforms that move around, making it the timing to jump on them difficult.
• Picking up powerups that “repair” your health, freeze enemies, change enemy size and speed, and soon.
• Gimmicks such as time manipulation, turning the character into a bird that can fly for a short time, double jumping (jumpin midair),etc.
See the list of additional features at the end.
Creativity and Limits
While you are not required to do so, we encourage you to be creative within the framework of the game and features we have required. Many of the features are defined generally on purpose, to allow you some freedom. Moreover, you have a lot of control in how the game looks and feels. You don’t have to emulate our demo!
As you consider your creativity, be aware of the limits of what we are working with. The MARS simulator is not very fast. This implies there are only so many MIPS instructions you can execute in one second, which limits the complexity of your game and graphics. You maybe able to come up with interesting tricks to make things run faster, but we are not marking you based on this!
Technical Background
You will create this game using the MIPS assembly language taught in class and the MARS. However, there area few concepts that we will need to cover in more depth here to prepare you for the project: displaying pixels, taking keyboard input and system calls (syscall).
Displaying Pixels Using a Framebuffer
To display things on the screen, we will use a framebuffer: an area in memory shown as a 2D array of “units”,where each “unit” is a small box of pixels of a single colour. Figure 1on the right shows a framebuffer of width 10 and height 8 units.
Units arestored as an array in memory: every 4- byte word in that array is mapped to a single on- screen “unit”. This is known as a framebuffer, because the buffer (the region of memory) controls what is shown on the display. The address of this frame buffer array is the base address of the display. The unit at the top-left corner of the bitmap is located at the base address, followed by the rest of the top row in the subsequent locations in memory. This is followed by the units of the second row, the third row and so on (referred to as row major order).

To set the colour of a single unit, you will write a 4-byte colour value to the corresponding location in memory. Each 4-byte value has the following structure: 0x00RRGGBB , where 00 are just zeros, RR is an 8-bit colour value for the red component, GG are the 8-bits for the green components, and BB are the 8-bits for the blue component. For example, 0x00000000 is black, 0x00ff0000 is bright red, 0x0000ff00 is green, and 0x00ffff00 is yellow. To paint a specific spot on the display with a specific colour, you need to calculate the correct colour code and store it at the right memory address (perhaps using the sw instruction).
The MARS Bitmap Display
MARS allows us to map a framebuffer in memory to pixels on the screen using the Bitmap Display tool, which you launch by selecting it in the
MARS menu: Tools → Bitmap Display. The Bitmap Display window is shown inFigure 2.
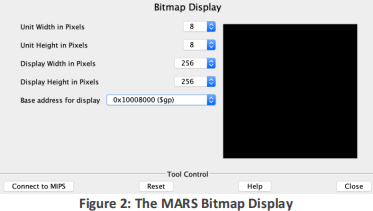
To use the Bitmap Display, you need to:
• Specify the actual on-screen width and height of each unit. The screenshot is configured to show each framebuffer unit as 8x8 block on your screen.
• Set the dimensions of the overall display: in the example above the framebuffer is of size 32x32 units, since we configured the bitmap display to have width and height of 256 pixels, and units of 8x8 pixels. Make sure the sizes match your assembly code.
• Tell MARS the base address for the framebuffer in hexadecimal. In screenshot above, this is memory location 0x10008000 in the screenshot. This means that the unit in the top-left corner is at address 0x10008000, the first unit in the second row is at address 0x10008080 and the unit in the bottom right corner is at address 0x10008ffc .
• Remember to click “Connect to MIPS” so that the tool connects to the simulated CPU.
Tip: We recommend using 0x10008000 as the base address for your framebuffer, but only if your framebuffer has 8192 cells or fewer, which is enough for 128x64 or 64x128 (if you want a larger framebuffer, ask us on Piazza; you’ll have to add avariable at the beginning of the .data section). When using the Bitmap Display, make sure to change the “base location of display” field. If you set it to the default value (static data) provided by the Bitmap Display dialog, this will refer to the " .data" section of memory and may cause the display data you write to overlap with instructions that define your program, leading to unexpected bugs.
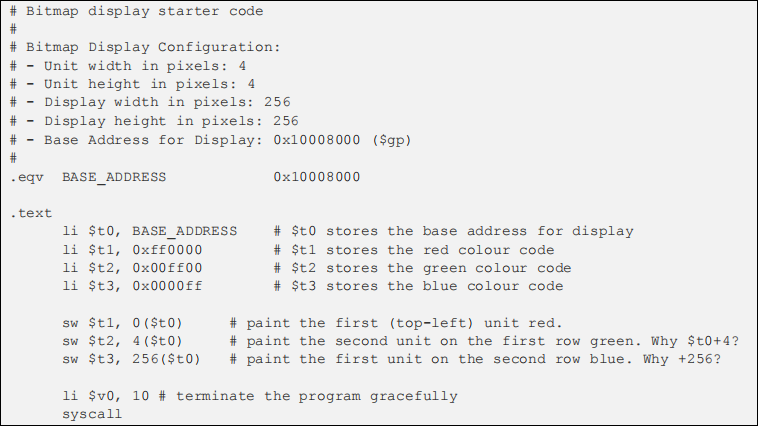
Bitmap Display Starter Code
To get you started, the code below provides a short demo, painting three units at different locations with different colours. Understand this demo and make it work in MARS.
The assembly directive .eqv defines a numeric constant which you can use instead of writing the number manually (similar to #define in C, but much more primitive) You can use it to define common useful constants such as fixed addresses, colours, number of enemies, etc.
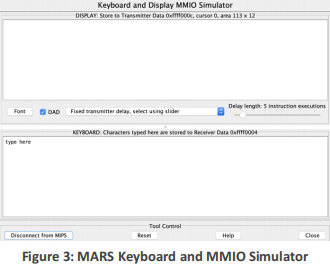
Keyboard
This project will use the MARS Keyboard and
MMIO Simulator to take in these keyboard inputs (Tools ![]() Keyboard and MMIO Simulator). To use it when playing, make sure to click inside the lower window titled “KEYBOARD”. As with the bitmap display, remember to “Connect to MIPS” .
Keyboard and MMIO Simulator). To use it when playing, make sure to click inside the lower window titled “KEYBOARD”. As with the bitmap display, remember to “Connect to MIPS” .
Note we cannot use system calls to read the keyboard input, because syscalls will block your program from executing (they are also slower).
Note the MARS simulator does not support pressing multiple keys at the sametime, which you may need to think about when implementing jumps to left and right.
Fetching Keyboard Input
MARS uses memory-mapped I/O (MMIO) for keyboard. If a key has been pressed (called a keystroke event), the processor will tell you by setting a word in memory (at address 0xffff0000) to a value of 1. To check for a new key press, you first need to check the contents of that memory location:

If that memory location has a value of 1, theASCII valueof the key that was pressed will be found in the next word in memory. The code below is checking to see if the lowercase 'a' was just pressed:

Useful Syscalls
In addition to writing the bitmap display through memory, the syscall instruction will be needed to perform special built-in operations, namely invoking the random number generator and the sleep function.
To invoke the random number generator, you can use service 41 to produce a random integer with no range limit, or service 42 to produce a random integer within a given range.
To do this, put the value 41 or 42 into register $v0, then put the ID of the random number generator you want to use into $a0 (since we’re only using one random number generator, just use the value 0 here). If you selected service 42, you also have to enter the maximum value for this random integer into $a1. Once the syscall instruction is complete, the pseudo-random number will be in $a0.

The othersyscall service you will want to use is the sleep operation, which suspends the program for a given number of milliseconds. To invoke this service, the value 32 is placed in $v0 and the number of milliseconds to wait is placed in $a0:

More details about these and othersyscall functions can be foundhere.
Your Code
Getting Started
This project must be completed individually, but you are encouraged to work with others when exploring approaches to your game. Keep in mind that you will be called upon to explain your implementation to your TAs when you demo your final game.
You will create an assembly program named game.asm. You'll design your program from scratch, but you must begin your file with the preamble starter code we include below.
1. Open a new file in MARS, call it game.asm and copy the preamble (listed below) into it. 2. Setup display: Tools > Bitmap display (thedemoshowshow to do this)
○ Set parameters like unit width and height (werecommend 8) and base address for display (we recommend 0x10008000).
○ Click “Connect to MIPS” once these are set.
3. Setup keyboard: Tools > Keyboard and Display MMIO Simulator (seedemo)
○ Click “Connect to MIPS”
...and then, to run and test your program:
4. Run > Assemble (see the memory addresses and values, check for bugs)
5. Run > Go (to start the run)
6. Input the character a or d orw or s in Keyboard area (bottom white box) in Keyboard and Display MMIO Simulator window.
Code Structure
Your code should store the location of the player character and other entities (and any other information you need) in memory or registers. We particularly recommend arrays for storing things like enemies. Make sure to determine what values you need to store and label the locations in memory where you’ll be storing them (in the .data section)
At the beginning of your program, clear the screen and initialize the state of the game. You will then switch to a central processing loop of the game (the “main loop”). Everyone’s main loop looks a little different, but in general your loop will eventually need to do most if not all of the following operations (not necessarily in this order!):
• Check for keyboard input.
• Figure out if the player character is standing on a platform.
• Update player location, enemies, platforms, power ups, etc.
• Check for various collisions (e.g., between player and enemies).
• Update other game state and end of game.
• Erase objects from the old position on the screen.
• Redraw objects in the new position on the screen.
At the end of each iteration, your main loop should sleep for a short time and go back to step 1.
Sleep and Display Refresh Rate
For animations, we generally need to update the display between 20 to 60 times per second (we recommend sleeping for 40ms, at least initially, which is a 25Hz update rate). When developing your game, you may find it occasionally useful to set it to a very high number to help debugging. We recommend using a constant (.eqv) to make it easy to change the wait time.
Make sure to choose your display size and frame rate pragmatically. The simulated MIPS processor isn't very fast. If you have too many pixels on the display and too high a frame rate, the processor will have trouble keeping up with the computation. If you want to have a large display and fancy graphics in your game, you might consider optimizing your way of repainting the screen so that it does incremental updates instead of redrawing the whole screen; however, that maybe quite a challenge! Moreover, sleep time can affect the speed and difficulty of your game.
Tip: Your display may flicker (blink on and off) because it takes sometime between erasing an object and redrawing it at the new position. There are all kinds of ways to prevent this, but some of them require special hardware. You can prevent flicker by carefully erasing and/or redrawing only the parts to the frame buffer that have changed but this requires some effort. We are not marking you based on the smoothness of the display, as long as the game is reasonably playable, so don’t worry about it.
See Marking below.
General Tips for Success
1. Prototype and build in stages. Start withdrawing a square on the screen. Then animate it moving move across the screen by adjusting its position every frame and redrawing in a loop. Then add keyboard controls for the position, and perhaps simple rules about not moving across the edges or through platforms. Then add gravity, and soon.
2. Choose storage wisely. Most of your variable will be stored in memory (.data), because you only have a few registers, and they are not going to be enough for allocating all the different variables that you'll need for keeping track of the state of the game. Use the ".data" section (static data) of your code to declare as many variables as you need. In particular, arrays are very useful. Nevertheless, it might make sense to devote a few registers to very common variables or values that you need! Calling conventions can help you there.
3. Create reusable functions for code that you reuse frequently. Instead of copy-pasting, write a function. Design the interface of your function (input arguments and return values) so that the function can be reused in a simple way.
4. …but pay attention to performance. Calling functions comes at a cost. Use functions when you need to (using the same code many times), but not when you don’t. Think about calling conventions that make sense for you and are efficient. For example, you may be able to avoid using the stack entirely!
5. Flicker and clearing the screen. It is usually best to avoid erasing and redrawing the entire screen every frame. It is a slow process and will cause lots of flickering. It is better to just erase the part you need to erase. The more time that passes between erase and redraw, the more flickering you will have.
6. Create meaningful labels. Meaningful labels for variables, functions and branch targets will make your code much easier to debug.
7. Write comments. Without proper comments, assembly programs tend to become incomprehensible spaghetti alarmingly quickly, even for the author of the program. It would be in your best interest to keep track of registers, variables, and stack pointers (if you use it) relevant to different components of your game.
8. Start small and build upwards. Don’t try to implement your whole game at once. Assembly programs are notoriously hard to debug, so add each feature one at a time and test them. Always save the previous working version before adding the next feature. Use source control (Git, SVN, etc.).
9. Debug. Debug your code cleverly. For example, you may find it useful to change the sleep time between frames to 1000ms so you can see things advance slowly, or even to wait for a key. It makes sense to sometimes add code just for debugging, and then remove it later.
10. State of player and enemies. The player can behave differently in different situations such as when jumping, falling, standing on platform, etc. Enemies might be moving left until the reach the end of the platform, and then move right. How can you implement such behaviour? You already know one way – it’s called a state machine. Store the state somewhere and jump to difference handling code based on the state.
11. Play your game. Take sometime to make conscious decisions about movement speed, gravity, enemy movement, difficulty, sleep time, etc.
12. Have fun with programming. Try to do new things and make the game yours! Writing a game purely in assembly language is an accomplishment you should be proud of.
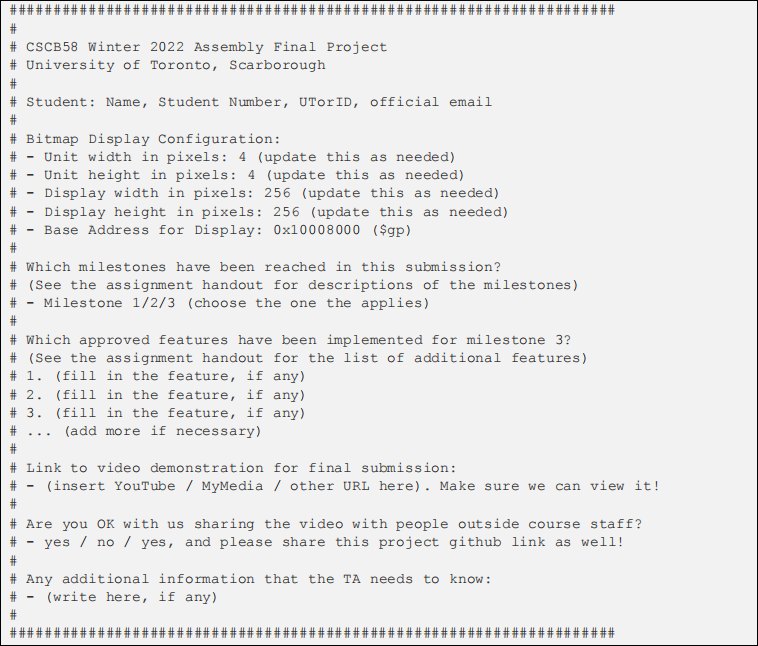
Required Preamble
The code you submit (game.asm) must include at the beginning of the file the lines shown below, in the same format. This preamble includes information on the submitter, the configuration of the bitmap display, and the features that are implemented, and a link to your video demonstration (more on this later). This is necessary information for the TA to be able to mark your submission.
Features, Milestones, and Marking
Projects are individual. This assignment is worth 17 points. 8 will be evaluated during the checkpoint demoon the last week of classes depending on your progress, and the other 9 will be for the functionality of your final submission. To better give you a sense of progress, the project is broken down into 3 milestones as follows. For milestones 1 and 2 you need to implement all features; for milestone 3 you choose a set of features to implement.
1. Milestone 1: basic graphics [3 marks]
A. Draw the level (platforms, ladders if you have them, etc.). Your game’s display resolution (framebuffer size) should beat least 64 units high and 64 units wide. Make sure to include at least 3 platforms the player would be able to stand on (that could for example mean 2 floating platforms plus a floor).
B. Draw the player character: it needs to beat least 3 framebuffer units big (more is allowed).
C. Draw at least 2 additional objects that are not platforms other than the player and the level itself (more is allowed!). These can be enemies, pickups,a mixture of both, or anything similar that makes sense. Each object needs to beat least 3 framebuffer units big (more is allowed).
2. Milestone 2: basic controls [5 marks]
A. Player can move the player character left/right around the platform using the movement keys. Make sure the player cannot move past the edges of the screen! Optional exception: you may choose to allow the player to momentarily be above the top of the screen during a jump. You will need to account for this when drawing the player character (it should be clipped by the top of the screen, meaning drawn partially).
B. Platform collision and gravity: the player can stand on a platform but will fall down if moving off a platform. If the player falls down on another platform, they will not go through; you need to detect and handle “collision” between player and platforms. You also need to handle the case where a player falls off the edge of the screen (unless you add a “floor”). This can be handles as an “endgame” condition (see Milestone 3).
C. Vertical movement: the player can navigate to (then move around on) at least 3 different platforms (including the one they are standing on initially). This can be done by jumping up to platforms and dropping down from them. You may choose instead alternative mechanisms such as going up and down ladders for navigation, and that’sok (see Donkey Kong example). Again, make sure the player is actually able to get to at least 3 platforms.
D. Collision with objects: the game must detect when a moving object touches the player (or viceversa). There are several ways to do this, and you don’t have to be 100% accurate as long as they are very close. You also need to handle collisions appropriately and give some feedback to the player. For example, if it’san enemy you could change the player character color to indicate the collision, and also reduce the player’s health or end the game. If it’sa pick-up, you could make it vanish ![]() and perhaps increase the score. E. Allow restarting the game at any point by pressing the p
and perhaps increase the score. E. Allow restarting the game at any point by pressing the p ![]() key on the keyboard.
key on the keyboard.
ð In your checkpoint session, you need to demonstrate to your TA a working implementation of the first two milestones; see Basic Demo above for what that might look like. In addition, you will need to have at least started on the other milestones.
3. Milestone 3: additional features and polish
Choose and implement enough features from the list below, each is worth some marks. Your preamble and video should list specifically what features you implemented, and you need to demonstrate them in the video. To get full marks on this milestone, you will need to implement features with a total of at least 9 marks (assuming you got all the marks for milestones 1 and 2). Note you cannot “make up” for missing features of previous milestones. In other words, you can only make at most 9 marks from milestone 3.
A. Health/score [2 marks]: track and show the player’s health and/or score onscreen during the game. You must show the score on the screen during play and on the game- over screen for this to count. You can do this in many ways: a numeric score,a bar, or hearts that disappearwhen the player gets hurt. Score can be based on pick-ups, jumping on top of enemies, or any idea you may have.
B. Fail condition [1 mark]: the player should be able to fail the game, and you then show an appropriategame overscreen. Failure could becaused by the player health dropping to zero, falling off the edge of the screen, or failing to meet a time limit – up to you. Don’t make the game too hard!
C. Win condition [1 mark]: the player can win the game and there is a“you won!” screen when the goal is achieved. For example, collecting all the floating coins, or getting a specific pick-up. It’s OK to make the game easy if you want, but try not making it so easy that you can’t demonstrate important features.
D. Moving objects [2 mark]: have the enemies/pickups move around the level. This entails continually redrawing the relevant parts of the screen with the appropriate assets. For example, perhaps enemies patrol left and right across on the platform they are on, or object pickups hovering gently up and down, orannoying, flying batstrying to hit the player.
E. Moving platforms [2 marks]: some of the platforms might be moving around, making it more challenging for the player to reach them.
F. Disappearing platforms [1 mark]: some of the platforms disappear and reappear over time. Note this is considered similar to moving platform, so if you implement both features you will only get 2 marks. A variation of this is bubble platforms: when the player touches the bubble, the bubble pops and player gets a boost up. The bubble will reappear after sometime
2023-07-27
A Platform Game