Project
Hello, dear friend, you can consult us at any time if you have any questions, add WeChat: daixieit
Phase 0
Introduction
If you have not done so already, please be sure to carefully read:
· overview
· description of the project structure
Phase 0 of the term project is a preparation phase. While all tasks below are due by the Phase 0 deadline, your submissions will only be graded with Phase 1.
Note that this first phase of the project does not require any programming. Instead, we want to encourage you to put as much thinking into your project idea as possible before you write the first line of code -- in practice, we are often tempted to immediately start writing code and this turns out to be a mistake.
Academic Honesty
Your project must be your own work. Phase 1 will include a more detailed, primarily code-oriented academic conduct policy, but the best start is to choose your own, personal topic in this phase. All content for your project must be content that you have written yourself since the start of this term.
Main Tasks
Start by cloning the repository project_xxx from GitHub where xxx is your CS ID. Then please be sure to read all the way to the end of this page before you do any work on your project!
Task 1
Your first task is decide what you'd like to create for your term project. We recommend that you give this some thought as you'll be working on the project that you select for the rest of the term. This may seem daunting but we'll be giving you guidelines along the way and your TA will be there to offer guidance. There are some broad criteria which you must adhere to in the design of your personal project:
· all code will be written in Java
· you will design a Java desktop application (no Android applications, for example)
· ultimately, your application will have a graphical user interface but you will start by designing a console based application (in phase 1)
· you will need to be able to save and restore the entire state of your application (so that the user could save, close the program, reopen the program, load, and continue from where they left off)
· to make the previous two points work, your application must have a model of the underlying data that is separate from the user interface; ideally, you could even save from your console-based application and then load into your graphical one or vice versa!
· your model must include a non-trivial class (let's call it X) that you design to represent some important item in the data of your application and a different non-trivial class (we'll call it Y) that you design that collects an arbitrary number of these items; many projects will have lots of classes that could fulfill these requirements
If you are stuck for ideas for your project, please try to discuss ideas with your TA first. If time goes by and you are still stuck, consider some examples:
· A pet tracking application for a shelter in a disaster location. It lets you enter information about pets brought to the shelter. Possible features include different species or breeds of pets; listing all pets confirmed to be available for adoption; showing a roster of pet pictures or icons. (X could be a pet, a species, a breed, etc. Y could be a list of pets or species, a breed classification category (like "Toy Dogs"), a client's preference list over pets, etc.)
· A system for recording games in your board gaming group. Enter results for each game, get statistics on how frequently games are played or win rates, group games by number of players involved. Possible features include a chart visualizing the history of your gaming group that makes it easy to see who played and won in each game. (X could be a board game, a play of a board game, a move in a game, a player, etc. Y could be someone's collection of games or wishlist they want to buy, a person's record of games they've played, a game made up of its moves, a gaming group of players, etc.)
The above should serve as examples that you could use as a last resort. But try to come up with your own idea for a term project, so that you have something unique to talk about at a future job interview. As this is a personal project, once the course is over, you'll be able to publish it on GitHub.com, so that others can view your work. For that reason, we strongly encourage you to think carefully about the design of your code - remember it's written for people to read (that includes a future employer!), as well as to be run on a computer.
Task 2
Use the Project view in IntelliJ to browse your project and note that it has a file named README.md. Your first task is to write one or two paragraphs at the start of this file that describe the project that you propose to design this term. Your proposal should provide answers to the following questions:
· What will the application do?
· Who will use it?
· Why is this project of interest to you?
The .md extension on the file name tells us that this is a markdown file. We're not expecting you to become markdown experts but you should at least learn how to:
· add a title and subtitle
· apply bold or italic fonts
· insert a bulleted list
You must make use of at least two of these three elements in your proposal. Note that the README file that we provide to you includes examples of each of these elements. A guide to these and other elements of basic markdown syntax can be found at https://www.markdownguide.org/basic-syntax/ - be sure to focus on the markdown elements and the corresponding rendered output but ignore the HTML. The use of markdown is prevalent and it is therefore well worth learning at least the basics. The course web page, for example, is almost exclusively written in markdown. Markdown is also used to format the feedback you receive from AutoTest. IntelliJ has a markdown renderer built in, so you will be able to preview your README page.
Note that the README page is displayed by default on your repository's homepage on GitHub - this is the first thing someone will see when they look at your repository, so it's worth putting some effort into making it look good.
When you are done, commit and push your code to GitHub. Remember to use a commit comment that accurately describes the changes that you have made in the current commit.
Task 3
During each phase of the term project, you will write user stories that describe how someone can use your application to produce a specific outcome. You will then design the code necessary to make that user story a reality in your application. Here are some examples of user stories:
For example, in the context of a pet tracking application:
· As a user, I want to be able to add a pet to my shelter
· As a user, I want to be able to view the list of pets in my shelter
· As a user, I want to be able to mark a pet as avaialable for adoption
· As a user, I want to be able to remove a pet from my shelter
· As a user, I want to be able to see the number of pets in my shelter and the number of pets that have been adopted
For example, in the context of a board gaming group application:
· As a user, I want to be able to add a game to my gaming group
· As a user, I want to be able to view the list of games in my gaming group
· As a user, I want to be able to mark a game as played in my gaming group
· As a user, I want to be able to remove a game from my gaming group
· As a user, I want to be able to see statistics on how frequently games are played, including how frequently games are being played
For example, in the context of a to-do application:
· As a user, I want to be able to add a task to my to-do list
· As a user, I want to be able to view the list of tasks on my to-do list
· As a user, I want to be able to mark a task as complete on my to-do list
· As a user, I want to be able to delete a task from my to-do-list
· As a user, I want to be able to see the number of incomplete and number of completed tasks on my to-do list
In the context of a recipe manager application:
· As a user, I want to be able to add a recipe to my collection
· As a user, I want to be able to view a list of the titles of the recipes in my collection
· As a user, I want to be able to select a recipe in my collection and view the recipe in detail
· As a user, I want to be able to select a recipe in my collection and rate it on a scale of one to five stars
In the context of a fantasy sports team application:
· As a user, I want to be able to create a new team and add it to a list of teams
· As a user, I want to be able to select a team and add a new player to the team
· As a user, I want to be able to select a team and view a list of the players on that team
· As a user, I want to be able to select a player on a team and add a new statistic for that player, for example, the number of goals scored in a game
· As a user, I want to be able to select a team and list all the players on that team
Note that in each of these sample applications, there is at least one user story that involves the user adding an X to a Y (e.g. adding an item to a to-do list), where X and Y are classes that you will have to design yourself. The user must be able to do this an arbitrary number of times. By arbitrary, we mean that it will not be sufficient to always add a fixed number of Xs to a Y. In the context of a to-do list application, for example, X will be Task (a class which represents a single to-do item) and Y will be ToDoList (a class that stores multiple Task objects). In the context of a game, X might be Treasure and Y could be Cache (a class that stores multiple Treasure objects). You must include at least one such user story in this phase of the application along with three others of your choosing.
Add a "User Stories" subtitle at the end of your README.md document and list your user stories. When you are done, commit and push your code to GitHub.
Phase 1
Introduction
If you have not done so already, please be sure to carefully read:
· overview
· description of the project structure
Phase 1 (including Phase 0) of the term project is worth 30% of your overall project grade.
Academic Honesty
All the code that you submit at each phase of the term project must be
· code that you have written yourself since the start of this term (you must not make use of any code that you have written in the past)
· code found in or based on any of the projects that we present to you in lecture during the term, provided you insert a comment into your code to attribute the source
Please ensure that you do not provide other students with access to your code. By doing so, you risk enabling academic misconduct for which you will be held accountable. Typically, the same grade penalty is applied to the student who enabled access to their code, as to the student who used the code.
Note that if you have attempted the course in the past, the first bullet point above still applies - you must not make use of any code written for your term project when you last took the course.
Beware:
· A number of students have violated this policy in the past and have paid the price. If you find the project challenging, ask for help from a course instructor or from one of the TAs assigned to the course this term. Do not be tempted to copy code from someone else and do not, under any circumstances, allow another student access to your code in any way. We have a tool that identifies unusual similarities in code - it works really well!
· You must not hire a tutor to help you write or debug the code for your term project. All the code that you submit must be your own work.
General Requirements
You should commit and push your code to GitHub after completion of each task, if not more frequently. By pushing your code to GitHub you are effectively making a backup of your work which you'll be able to retrieve if anything happens to the code on your laptop.
All code must be appropriately documented:
· each class should have a class-level comment (that appears just before the class declaration) to describe the information that the class represents
· every method must be documented with requires, modifies and effects clauses, as appropriate (note that simple setter and getter methods, and test methods, do not have to be documented)
Your code must adhere to our style guidelines. Note that for the term project, the maximum method length has been increased from 20 to 25 lines.
That said, there may be some cases where it does not make sense to decompose a method whose length is greater than 25 lines. In such cases, you may include an @SuppressWarnings("methodlength") annotation on the line immediately preceding the method header. This instructs checkstyle not to apply the method length restriction to that particular method. You should always check with your TA before using this annotation, as any mis-use will result in a grade penalty. Note that AutoTest will list all the places in your code where the annotation is used.
Note: full marks for code coverage can be achieved only if there is at least one branch (i.e. if/else) or loop in the code included in the model package. In general, your term project should have sufficient complexity that you will naturally include at least one branch in the code that models your domain of interest.
It is expected that you will work on this project incrementally and will frequently push changes to GitHub. As you will be using GitHub more extensively, it's recommended that you take time to work through our GitHub tutorial.
Task 1
Make your user stories a reality!
Before you get started on this task, carefully review the Teller application that we'll be studying in more detail later in the term. Notice that the Account class represents an account in our banking domain and is found in the model package, with the corresponding test class in the tests folder. The TellerApp class provides the console based user interface and is found in the ui package. The application demonstrates the division between code that comprises the model and code that comprises the user interface. You need to maintain this same separation in the code that you write. Also notice that the Main class has no fields and that the Main.main method contains a single statement that creates an instance of the TellerApp class. Your Main class and main method should be similar, comprising no more than a few lines of code. Please keep in mind that the Teller application does not contain all the features necessary to obtain full marks on this phase of the term project - it serves only to illustrate how you can separate code that models your domain from code that implements the user interface.
Start by doing a domain analysis for your application. What information is changing and what is constant? Identify the different types of data that you will need to represent the information in your domain. So, for example, the to-do application will need a Task class to represent a single task and a ToDoList class to represent the tasks that have been added to the to-do list. You should then consider the methods that each of these classes must have if you are to be able to provide the functionality described in your user stories. So, if the user must be able to add a task to their to-do list, the ToDoList class will need an addTask method. The classes that you identify at this stage in your design must be added to your model package with the corresponding tests in the test folder.
The classes MyModel and MyModelTest were provided with the starter code. Either delete these classes or rename them to something more appropriate for your particular application.
Note there must be no System.out.println statements in the code that models your domain (code that is in the model package) and no code that reads user input from the keyboard. These statements are used to present/gather information to/from the user and are therefore part of the user interface which you'll write in the next task.
When you are done, commit and push your code to GitHub.
Task 2
The next step is to add the user interface. At this stage you must design a console application. Do not attempt to design a graphical user interface. All the code for your user interface must go in the ui package. As user interface code is more difficult to test, in general, note that you are not required to design tests for your ui code on this term project. However, you must ensure that all your methods are appropriately documented.
When your application is run, a user must be able to perform each of the actions specified in your user stories. In other words, you are expected to have a working console-based application by the end of Phase 1.
When you are done, commit and push your code to GitHub.
The Lanterna Library
If you are designing a game for your term project, you might want to consider making use of the Lanterna library. It will allow you to present a basic visualization of your game. A tutorial can be found here. However, please note that use of this library is not required for Phase 1.
Be aware that in Phase 3, you will still need to switch to a GUI interface. So, you may instead want to wait until then to make something fancy so you only need to create one graphical appearance for your game.
Grading
When you are ready, commit and push your code to GitHub. Request feedback from AutoTest by making the following comment on your commit:
@210-bot #project
As you are all working on individual projects, AutoTest will obviously not give feedback on the correctness of your code. However, it will check that your code adheres to the CPSC 210 coding style and will measure the degree to which your tests cover your code. The code coverage score that you receive from AutoTest will be used, in part, to determine your overall grade for this phase of the term project as follows:
· 20 pts - (code coverage score * 20) - so 100% code coverage yields a score of 20, whereas 0% code coverage yields a score of 0
· 10 pts - clear and correct documentation has been provided
· 70 pts - realization of four user stories relevant to the proposed application (roughly equally weighted); to obtain any of these marks at least one of the user stories that has been realized must be of the form "add multiple Xs to a Y" as described in the Phase 0 description.
Note:
· any attempt to "fake" the code coverage score (e.g. calling a method but not using appropriate assertEquals, assertTrue and/or assertFalse statements to verify the expected behaviour) will result in an automatic zero for code coverage
· you must get at least 50% on this phase of the term project. If you don't achieve that grade, you will have to continue to work on this phase of the term project and request a regrade at your next lab for a maximum score of 50% on this phase of the term project
· we recommend you check the "General Requirements" section above to make sure that they have been met
During your demo for this phase of the term project, you will be asked to:
· checkout a copy of the code that you pushed to GitHub prior to the deadline
· show your TA the code coverage score received from AutoTest
· run your tests and demonstrate that they all pass - if any of your tests fails, your code coverage score will be reduced
· run your code to demonstrate that your user stories have been realized
Phase 2
Introduction
As you go through each phase of the term project, it's important to keep in mind the information presented in the following sections:
o overview
o description of the project structure
Phase 2 of the term project is worth 20% of your overall project grade.
Academic Honesty
You are reminded that all the code that you submit at each phase of the term project must be
o code that you have written yourself since the start of this term (you must not make use of any code that you have written in the past)
o code found in or based on any of the projects that we present to you in lecture during the term, provided you insert a comment into your code to attribute the source
Please ensure that you do not provide other students with access to your code. By doing so, you risk enabling academic misconduct for which you will be held accountable. Typically, the same grade penalty is applied to the student who enabled access to their code, as to the student who used the code.
If you find the project challenging, ask for help from a course instructor or from one of the TAs assigned to the course this term. Do not be tempted to copy code from someone else and do not, under any circumstances, allow another student access to your code in any way.
General Requirements
You should commit and push your code to GitHub after completion of each task, if not more frequently. By pushing your code to GitHub you are effectively making a backup of your work which you'll be able to retrieve if anything happens to the code on your laptop.
All code must be appropriately documented:
o each class should have a class-level comment (that appears just before the class declaration) to describe the information that the class represents
o every method must be documented with requires, modifies and effects clauses, as appropriate (note that simple setter and getter methods, and test methods, do not have to be documented)
You code must pass the checkstyle test on AutoTest, otherwise a grade of zero will be assigned.
All of your tests must pass, otherwise a penalty will be applied to your code coverage score.
Main Tasks
In Phase 2 and, indeed, all future phases of the term project, you will be working with the same repository that was provided to you for Phase 1.
Task 1
You should have already pushed your Phase 1 code to GitHub and requested a grade from AutoTest. If you missed the Phase 1 deadline and are still working on it, please complete Phase 1 before attempting Phase 2. It makes no sense to continue with this phase of the term project unless Phase 1 is complete. Having completed Phase 1, please push your work to GitHub and request a grade from AutoTest so that we have a record of the work that you completed during Phase 1.
Task 2
You are probably familiar with the File -> Open and File -> Save options that are common in desktop applications that we interact with on a daily basis (e.g. word processors and spreadsheets). The process of saving data to a file from where it can be reloaded at a later time is known as data persistence. If we do not save our data (e.g. essay or spreadsheet calculations) to a file before terminating the program, we lose it (unless the application auto-saves it for us).
In this phase of the term project, you will add data persistence to your application.
For example, in the context of a to-do application, you might add the following user stories:
· As a user, I want to be able to save my to-do list to file (if I so choose)
· As a user, I want to be able to be able to load my to-do list from file (if I so choose)
Alternatively, your user stories might be:
· As a user, when I select the quit option from the application menu, I want to be reminded to save my to-do list to file and have the option to do so or not.
· As a user, when I start the application, I want to be given the option to load my to-do list from file.
Start by adding two user stories to your README.md file
· one that expresses the user having the option to save the entire state of the application (e.g. the to-do list, recipe list or state of all pieces in a board game) to file
· another that expresses the user having the option to reload that state from file and resume exactly where they left off at some earlier time
Note that "having the option" means automatic save/load with no user interaction is insufficient. Your program may autosave and autoload if you wish, but autosave and autoload do not fulfill the Phase 2 requirements.
Commit and push the revised README.md file to GitHub.
Task 3
There are many different ways in which we can perform data persistence. For your personal project this term, you must store the entire state of your application, as represented in your model package, as JSON data. We have developed a simple application to illustrate how this is done. Clone the application from GitHub and run it. It allows the user to interact with a workroom to which a number of thingies/doohickies/thingamajigs can be added. Run the application, add a few thingies to your workroom and then select the save option from the menu. Now, from the Project view in IntelliJ, open the data folder and double-click the file workroom.json. You will see something like the following:
{
"thingies": [
{
"name": "needle",
"category": "STITCHING"
},
{
"name": "thread",
"category": "STITCHING"
},
{
"name": "wool",
"category": "KNITTING"
},
{
"name": "saw",
"category": "WOODWORK"
}
],
"name": "Alex's workroom"
}
In this particular case, the work room was named "Alex's workroom" and four thingies were added:
· a needle in the STITCHING category
· thread in the STITCHING category
· wool in the KNITTING category
· saw in the WOODWORK category
If you now quit the application, run it again and print the thingies in the workroom, nothing will be printed. This is because the application does not remember the state of your work room when you last ran it. Now select the option to the load the work room from file. This will construct a new work room from the JSON data stored in the file workroom.json. Select the option to print the thingies again and you should now see exactly the items that were in your work room when you previously saved it to file.
Most, but not all, of the code that is needed to achieve this can be found in the persistence package. Take time to study it carefully before moving on.
Task 4
There are a number of JSON libraries available in Java. You must use the one provided here. You can download the corresponding jar file using this link. Having downloaded this file, drag it to your project's lib/spec folder in IntelliJ. Right-click it and select "Add as library..." and then click OK. The documentation for this library is available here. Note that you will likely not need to use anything other than the JSONObject and JSONArray classes - be sure to take time to familiarize yourself with the methods provided by these classes.
Add a persistence package to your application at the same level as the existing model and ui packages. Most of the code needed to read and write the state of your application to file will be added to this package. You should feel free to model your code on the sample application that we've provided above but, if you do so, please remember to include a citation.
Test and implement the code necessary to realize the user story that loads data from a file. It is recommended that you generate sample data files specifically for this purpose. Take a look at the tests provided with the sample application for some examples and look at the sample JSON files provided in the ./data directory. Keep in mind that all data files must be stored in the ./data directory - including those used for testing. Also note that the path to those files must be relative to the root of your application directory. So it will look like:
"./data/myFile.json"
rather than an absolute path of the form:
"/Users/Sammy/Documents/CPSC210/PersonalProject/MyApp/data/myFile.json"
Note that if you use absolute paths to your data files, your tests will not run on AutoTest and this will result in a reduced code coverage score.
Task 5
Test and implement the code necessary to realize the user story that saves data to a file. Again, take a look at the tests provided with the sample application for some hints on how you might approach this.
Task 6
If you wish you may add more user stories to your README.md file and realize them in your code you may do so, but this step is optional. Please note that, if you add new user stories, all data is expected to be persisted, so that a user can restore all aspects of their application.
Grading
When you are ready, commit and push your code to GitHub. Request feedback from AutoTest by making the following comment on your commit:
@210-bot #project
As you are all working on individual projects, AutoTest will obviously not give feedback on the correctness of your code. However, it will check that your code adheres to the CPSC 210 coding style and will measure the degree to which your tests cover your code. The code coverage score that you receive from AutoTest will be used, in part, to determine your overall grade for this phase of the term project as follows:
o 20 pts - (code coverage score * 20) - so 100% code coverage yields a score of 20, whereas 0% code coverage yields a score of 0. These points will not be awarded unless a reasonable attempt has been made to realize the two required user stories for this phase of the term project.
o 10 pts - appropriate REQUIRES/MODIFIES/EFFECTS clauses for all methods added during Phase 2
o 70 pts - realization (includes implementation and testing) of two user stories, one for (at the user's option) saving data and another for (at the user's option) loading, that are relevant to the proposed application (35 marks for each)
Note:
o any attempt to "fake" the code coverage score (e.g. calling a method but not using appropriate assertEquals, assertTrue and/or assertFalse statements to verify the expected behaviour) will result in an automatic zero for code coverage
o if any of your tests fails, a penalty will be applied to your code coverage score
o you must get at least 50% on this phase of the term project. If you don't achieve that grade, you will have to continue to work on this phase of the term project and request a regrade at your next lab for a maximum score of 50% on this phase of the term project
o we recommend you check the "General Requirements" section above to make sure that they have been met
During your demo for this phase of the term project, you should be prepared to
o checkout a copy of the code that you pushed to GitHub prior to the deadline
o show your TA the code coverage score received from AutoTest
o run your tests and demonstrate that they all pass
o run your application to demonstrate that your user stories have been realized and/or explain to your TA how to run your application
Phase 1 Teller App example: https://github.students.cs.ubc.ca/CPSC210/TellerApp.git
The starter code for your project will have the following structure:
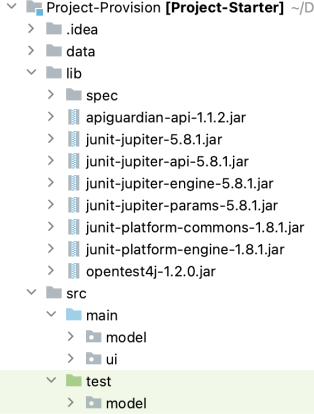
It is essential that you maintain this structure throughout the term to ensure that your work is correctly graded on AutoTest. As you add code to the project, you must ensure that the corresponding files are added to appropriate folders/packages. In particular:
§ all your user interface code must be in a class or classes located in the ./src/main/ui package
§ code that is not related to the user interface must not be located in the ./src/main/ui package
§ all your test classes must be in a package located in the ./src/test/ folder
§ if you add a new test class, the name of the class must end with Test - for example, a class that contains unit tests of the ToDoList class would be called ToDoListTest
§ any data files that your test or application code depends on must be located in the ./data folder
§ any external libraries that your code depends on must be included in the lib/spec folder
§ you may add additional packages to the main and test folders as needed
Note that the jar files provided to you in the lib folder may have different version numbers.
2023-07-27