Engineering Applications, Practice and Design Practical 1 2022 – 2023
Hello, dear friend, you can consult us at any time if you have any questions, add WeChat: daixieit
SBC YEAR 2 Engineering and Computing
2022 – 2023
Engineering Applications, Practice and Design
Practical 1
Semester 1
Introduction to assignment
LED display is widely used for marketing and advertising. This coursework is to develop an Arduino project to control LEDs to function as an Attention-Grabbing device. You will blink 4 LEDs in a looping sequence, then modify to enhance this design.
Part I
Q1. Select parts for the design [10 marks]
Figure 1 is the circuit to blink a LED with Arduino. When Arduino pin is high (5V),
the LED will be on. When Arduino pin is low (0V), the LED will be off.

a) Explain the purpose of resistor R in the circuit . [2 marks]
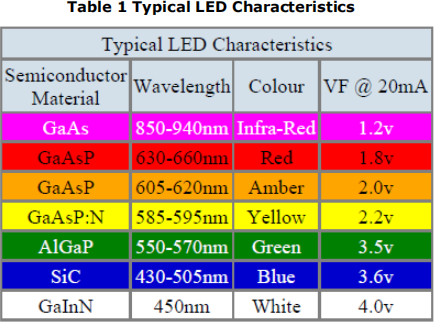
b) Select resistor R (specify its value and power rating) for this design base on the Typical LED Characteristics (Table 1) and Arduino UNO specs (Table 2). You can choose any kind of color for your design. (Include analyses, equation, and intermediate steps) [8 marks]

Q2. Build and verify the design [25 marks]
a) Following is the code to blink 4 LEDs in a looping sequence.
int DelayTime = 200;
int ledPin;
void setup() {
for (ledPin=2; ledPin<6; ledPin++)
{
pinMode(ledPin, OUTPUT);
}
}
void loop() {
for (ledPin=2; ledPin<6; ledPin++)
{
digitalWrite(ledPin, HIGH);
delay(DelayTime);
digitalWrite(ledPin, LOW);
delay(DelayTime);
}
}
b) Base on the code, connect the circuit in online simulator wokwi.com, and type in the code.
• Verify the design: The LEDs will blink in sequence.
• Save your design in wokwi.com
• Screenshot of your design including code, connection, and url address.
• Copy and save the url address of your design.
Q3. Enhance the effect of the design [20 marks]
a) Add another two LEDs to the circuit .
• Modify the code to blink 6 LEDs in a looping sequence .
• Save and screenshot of your design including code, connection, and url address .
b) Modify the code to enhance the effect by blinking the LEDs in back and forth sequences.
• Save and screenshot of your design including code and connection.
• Copy and save the url address of your design.
Part II
Drawing
Use Fritzing to draw the breadboard view and schematic view of your design in Q2. Export the images and put in your digital report. [ 20 ]
Results and Discussion
1. In Part I Q2, explain how the blink sequence for the LED’s has been developed in the design.
2. Compare and explain the two drawings you made with Fritzing, i.e. in terms of purpose, when to use… [ 10 ]
Conclusion
List what you learned in this coursework from the aspects of design, coding, building with simulator, and testing. Your list could include possible reasons for failures and unexpected results. [ 10 ]
Report Quality
Report has good quality. It should be neat, clear and clean. [ 5 ]
2023-07-17