UFCFVK‑15‑2 Internet of Things 2023 An echo of a Python :: Worksheet(1)
Hello, dear friend, you can consult us at any time if you have any questions, add WeChat: daixieit
UFCFVK‑15‑2 Internet of Things
2023
An echo of a Python :: Worksheet(1)
No Marks are awarded for this worksheet, however, all tasks MUST be completed before preced‑ing.
All work is handed in via git/GitLab and will require the skills demonstrated in this worksheet.
If you have not already done so, complete the setup process for you choice of OS. Instructions for this are on Blackboard under Learning Materials.
Working with existing Projects
As we will use existing repositories for most of the tasks in this module, we will explore the process of forking a project in more detail.
A fork is a copy of a project that allows you to make changes without actually changing the original project. This makes it a good way of taking a project as a starting point to then go off and do your own thing.
We will explore this process by forking the example project found at the following url:
https://gitlab.uwe.ac.uk/br‑gaster/iot_starter
You will need to be logged in to see the fork option. You should see a page something like this:

Figure 1: gitlab page
The fork button is found in the top of the pages main body, marked below with a green square:
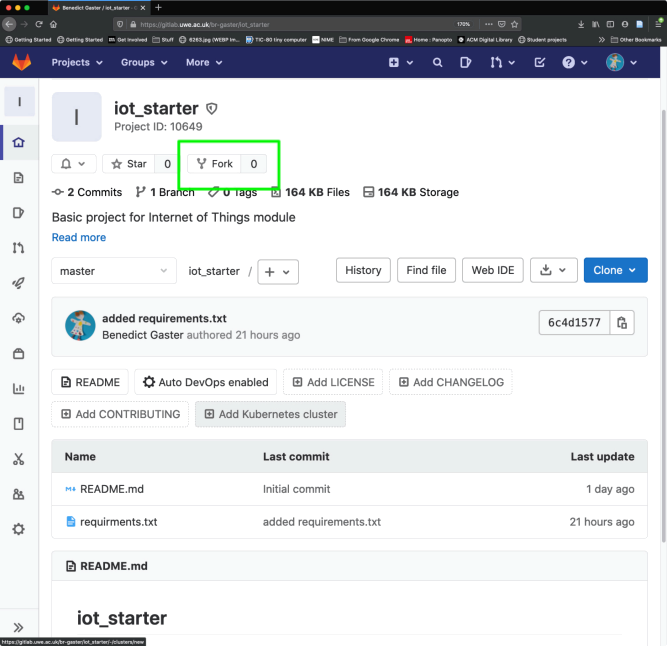
Figure 2: green square
When GitLab asks what namespace you wish to add the repo to, select your user account.
Once you have forked the project you should notice that you now have a repo that no longer uses
https://gitlab.uwe.ac.uk/br‑gaster/iot_starter.git but instead takes the form (where your‑username represents your personal gitlab username):
https://gitlab.uwe.ac.uk/your‑username/br‑gaster/iot_starter.git
Read these urls carefully, and ensure that you are using the correct one going forward.
With a version of the repo forked for your own use, you can clone the repo and edit it locally.
This is described in the ‘Git Submissions’ resource [here] which you should have read and can also be looked up in the ‘Git Reference’ resource sheet [here]. If you haven’t, go through those sheets (as well as the git intro) and you should be ready to tackle your first set of tasks.
Tasks
Before starting you must have completed the setup worksheets, depending on which OS you are us‑ ing:
• Windows
Through out the practical side of the module tasks will be implemented using Python 3.
Task 1
Connect to the remote server with VS Code, open a termial window, and change into your **projects* folder on the remote server. Now:
• Fork the repo at https://gitlab.uwe.ac.uk/br‑gaster/iot_starter.git
• Clone your newly forked project
Change into the folder iot_starter and activate the **iot_env* Python environment that you created during setup:
source ../iot_env/bin/activate
Now we can use pip, Python’s package manager, to install packages required for the IoT module. Run the command:
pip install -r requirments.txt
Depending on your setup, at this point you might get a warning to update pip to the latest version for your virtual environment. Feel free to go ahead and do this, but it is not required.
At this point you are ready to implement the task. Throughout the module we will be using Python to communicate with different servers that will support the different requirements of the worksheets. For this worksheet you are going to develop a client that talks to an “echo” server.
Server and Client A server is a program that implements a service, generally to client, which might be running on the same or a different computer. One of the most common examples, is a web server that responds to requests from clients via a web browser. Connections to server are often over a com‑ puter network, e.g. a local area network (LAN) or a wide area network (WAN). An example of a LAN are
machines connected on UWE’s campus, while a WAN is a network running over the wider area of the City of Bristol.
Later in the module we will be covering networking in more detail, but for now it enough to say that for a client to connect to a server, it needs to know a port number that the server socket is listening on. The socket is an end point that is used for coomnication between the client and server. Each port is a number that is associated with an IP address, which enables support for multiple servers
and services from a single IP address. Some common port numbers include 80 and 443, supporting insecure Hypertext Transport Protocol (HTTP) and over Transport Layer Security (HTTPS).
As the servers you will be accessing are running on the same development server, then you will con‑ nect to them using the loopback device. The Internet Protocol (IP) specifies a loopback network with the (IPv4) address of 127.0.0.0. Just like other network devices, the loopback device can be seen in the output of lfconfig. It has the name lo, so running the command:
ifconfig lo
reports the output something like:
lo: flags=73<UP,LOOPBACK,RUNNING> mtu 65536
inet 127.0.0.1 netmask 255.0.0.0
inet6 ::1 prefixlen 128 scopeid 0x10<host>
loop txqueuelen 1000 (Local Loopback)
RX packets 261715 bytes 236878470 (236.8 MB)
RX errors 0 dropped 0 overruns 0 frame 0
TX packets 261715 bytes 236878470 (236 .8 MB)
TX errors 0 dropped 0 overruns 0 carrier 0 collisions 0
It is common to use the synbolic name localhost in place of 127.0.0.0.
With the port number and IP address it is possible, for the client, to establish a connection to the server. For this worksheet you are going to implement a client for an Echo server. An Echo server allows a client to connect, send a message to the server and the server receives the message and
sends something back in response.
An example connection might be:
client: hello
server: hello
client: boo
server: boo
and so on.
An Echo server is running on localhost:6789, where 6789 is the port and : is used to seperate the IP address from the port. This server is running over a WebSocket, which is bi‑directional commication protocol that runs over a single TCP connection.
We will be covering the Internet Protocol, TCP, and UDP communications over the comming
weeks of the module, and so don’t worry if you are not sure what they are at this point.
Out Echo server is slightly different from above in that it comunicates using Javascript Object Notation (JSON), so the above session looks like:
{"type": "join_evt", "client_id": 94758807167913683162461420393068125894}
{ "client_id" : 94758807167913683162461420393068125894, "payload" : "hello"}
{"payload" : "hello"}
{ "client_id" : 94758807167913683162461420393068125894, "payload" : "boo"}
{"payload": "boo"}
On connecting the server the client receives a message that communicates its ID that it should use when corresponding with the server. The client then sends a payload* message, with its ID, and the server responds echoing the payload. You can test this using the command websocat**:
websocat ws://localhost:6789
You will see the connection message from the server and you can then type in a payload pack, don’t forget to include the client_id field that was returned.
Task 2
With task 1 you used the command websocat to communicate to the Echo server. For the the final task of this worksheet you will develop an Echo client in Python.
Communicating between different devices, even if they are the same device, can take a long time. In real terms a long time, might be a fraction of a second, but in computing terms this is a very long time. In general, a program could be do something else while waiting for a response and this notion is an example of the concept of concurrency. On previous modules you will have likely come across different forms of concurrency, including:
• parallelism is a form of concurrency where tasks are performed at the same time. For example, changing the hue of an image can be done by changing the hue of each corresponding pixel, independently of another, and thus in parallel.
• threading is a model of concurrency where multiple threads run independently of one another, but not necessaryly in parallel. Threads are useful for IO operations, including talking to a web‑ server, when one thread might be blocked waiting for an operation to complete.
Threads can be expensive, in terms of creation and destroying, and while a useful form of abstraction for IO operations, in many cases add an unecessary layer of complexity. Threads are created and managed by the operating system and add significant complexity to an application.
Over the last decade or so coroutines, an alternative for IO based concurrency, has gained in popu‑ larity and has become a staple of many languages. coroutines are a single threaded form of concur‑ rency that uses cooperative multitasking. Pieces of concurrent code, running with a single thread, and communicate with each other, each one giving up control to another piece to provide concurrent execution.
A key aspect of coroutines is that they support asynchronous execution. Like Javascript callbacks, coroutines are able to wait or pause execution, until an event causes them to begin from where they left of. In the mean time other code can execute. This means that a coroutine can wait on an external event, e.g. for a socket to receive data, while facilitating other parts of code within the same thread to execute.
It is worth noting that a key element of coroutines is that as they run within a single thread, they can execute completly within user space and thus require no interaction with the operating sys‑ tem. This means that they can be implemented very cheaply, using very little resources, enabling
1000, if not many hundred of thousands to run at the same time within the same single thread. Something that is not possible with traditional threading models and implementations.
Like most modern programming languages Python (since 3.4) supports coroutines as a first class fea‑ ture, including the keywords async and await, along with the library asyncio.
As you might have guessed by now we are going to use coroutines and in particlar async/await in the
Echo client, to handle communication with the Echo server.
For more information on Python and coroutines you should read the excellent tutorial.
Ok, let’s write an Echo client. Begin by opening a new Python file, client.py, in VS Code with the command:
code client.py
and add the follwing code and save it (CTRL/CMD‑S):
if __name__ == "__main__":
print("Echo client")
You can run your Python code with the command:
python client.py
you should simply see the output:
Echo client
As we are working with coroutines and we need to include the Python async library, add the following to the top of your Python code:
import asyncio
Any function that is going to use or be used asynchronously must be marked with the keyword async, so for now we can define a function, main, that is marked with this.
async def main():
print("main")
Unlike a standard function, which can be called directly, we must call a function marked with async with await or in this case as we simply what begin running the outermost coroutine (main in this case)
we can use the function asyncio.run to begin execution:
asyncio.run(main())
which can be placed on a newline, following the print("Echo client"). At this point you can run the program and the resulting output should be:
Echo client
main
Now that we have written out first asynchronous program we can now extend it to an echo client. As you saw when running the command websocat, on connection to a new client the Echo server responds with a join_evt message that includes an ID that the client then uses for all communication. Our client should first handle this connection message and get a copy of its ID. Before doing this we also need to include packages for work with WebSockets and JSON:
import websockets
import json
Now update the main function to be:
async def main():
uri = "ws://localhost:6789"
async with websockets .connect(uri) as websocket:
# After joining server will send client unique id.
message = json .loads(await websocket .recv())
print(message)
return 0
This definition simply trys to open a WebSocket connection to our Echo server with an async context, which allows asynchronous code to run within a block. Here the code trys to connect to the websocket and if successful begins execution of the code within the block, which in turn waits for a message from the server, prints it, and retuns with 0. The JSON package is used to decode (json.loads) the received
JSON string into Python type. A Python type can be encoded into a JSON string with json.dump. Running the resulting program should produce the output:
Echo client
{ 'type': 'join_evt', 'client_id': 295387106247857542202538950511734447814}
Note, the client ID will be different each time you call it.
Now that we have code to connect to the server all that is left is to read the ID and then send a message and wait for it to be echoed back.
First add the following code to read the ID:
# Get the client_id from the join message
if message[ 'type'] == 'join_evt' :
client_id = message[ 'client_id']
else :
# If first message is not the join message exit
print("Did not receive a correct join message")
return 0
This needs to go within the async with block, after reading the message. You can run this code to check there are no issues, it should behave has before.
Next you need to define two async functions, one to receive a message and one to send a message. Add the following two functions:
async def send_message(websocket, message, client_id):
outward_message = {
'client_id' : client_id,
'payload' : message
}
await websocket.send(json.dumps(outward_message))
async def recv_message(websocket):
message = json .loads(await websocket .recv())
return message[ 'payload']
Finally, we need to call, using async, send_message:
# Send a ping to the server
await send_message(websocket, 'ping', client_id)
and once this has completed we simply wait for a response, by using async to call rec_message:
# Wait for the 'ping' response from the server
response = await recv_message(websocket)
Finally, you can print out the response:
print("The Server Sent Back:")
print(response)
Running the resulting program should produce something like:
Echo client
{ 'type': 'join_evt', 'client_id': 30427659352171484766467145589245763270}
The Server Sent Back:
ping
At this point you should add and commit your client.py with **git* and then push the changes to
Gitlab.
Task 3
This task is more open ended and is for practice. You should be able to write this kind of Python code to complete the module.
• Extend you Echo client to continually send and receive messages.
• Extend your Echo client to ask the user to enter a string to send as the message payload to the server.
Can your program use async/await for terminal IO?
HINT you could use aioconsole, Google it. Or you could implement it direclty using async/await.
The later is slightly harder, but again Google it.
Can you program exit if the user enters the string “end”?
Don’t forget to push any changes to Gitlab.
2023-06-30