Assignment 2: An Online Car Rental System using AJAX and JSON
Hello, dear friend, you can consult us at any time if you have any questions, add WeChat: daixieit
Assignment 2:
An Online Car Rental System using AJAX and JSON
Due by Friday 19 May 2023, at 11:59 pm
Introduction
In this assignment, you are required to develop a simplified online business portal (website) for a Car Rental Company: “Hertz-UTS” . The website is a simulated online car rental system that aims to offer users a streamline browsing and operation experience.
The vehicles available for renting can be divided into multiple categories by brand, such as Sedan, Wagon and SUV. You may add or remove categories as you want when completing this assignment.
What does the website do?
![]() Customers can view a multitude of cars with detailed information as soon as they enter the website.
Customers can view a multitude of cars with detailed information as soon as they enter the website. ![]() Customers can add an available car to their reservation ‘shopping cart” .
Customers can add an available car to their reservation ‘shopping cart” .
![]() Customers can manipulate the items in the reservation shopping cart, such as changing the quantify
Customers can manipulate the items in the reservation shopping cart, such as changing the quantify
or removing a car.
![]() Customer can check out the cars that have been added to the shopping cart.
Customer can check out the cars that have been added to the shopping cart.
![]() Website should be able to handle various exceptions, such as a customer adding a car which is
Website should be able to handle various exceptions, such as a customer adding a car which is
unavailable or checking out without a car in the shopping cart.
You are required to work individually to complete all the functionalities of this project. This assignment counts as 35% towards your final assessment.
Objectives
![]() Learn how to design your own data structure, by which, you could form your own database using
Learn how to design your own data structure, by which, you could form your own database using
JSON Object.
![]() Learn how to use AJAX technique to send and retrieve data from the web server asynchronously
Learn how to use AJAX technique to send and retrieve data from the web server asynchronously
without interfering with the display and behaviour of the existing page.
![]() Learn how to load a JSON file using JavaScript.
Learn how to load a JSON file using JavaScript.
![]() Learn how to parse a JSON file, extract the node values/attributes and store them in session arrays
Learn how to parse a JSON file, extract the node values/attributes and store them in session arrays
of your DHTML pages.
![]() Learn the usage of Session: how to set, update, delete and destroy the session.
Learn the usage of Session: how to set, update, delete and destroy the session.
Assignment Requirements
1. The website should be dynamic which means all the data are loaded dynamically from the JSON file. If the contents in the JSON file change (e.g., the mileage changes to 12354 for id=1), the pages should change as well.
2. Each car to be stored in a JSON file is associated with the following 10 attributes:
|
Category |
Availability |
Brand |
Model |
Model year |
Mileage |
Fuel type |
Seats |
Price/day |
Description |
|
sedan |
True/False |
Toyota |
Camry |
2013 |
10000 |
petrol |
5 |
$120 |
xxxxxxx |
Window Layout
Examples for the webpage design are shown below. It is not required that you must follow the examples below. You can follow the examples or do your own designs.
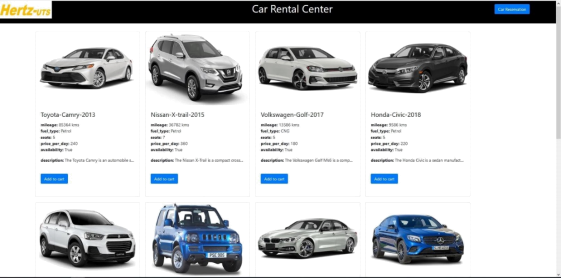
Figure 1: An example of the car selection page.
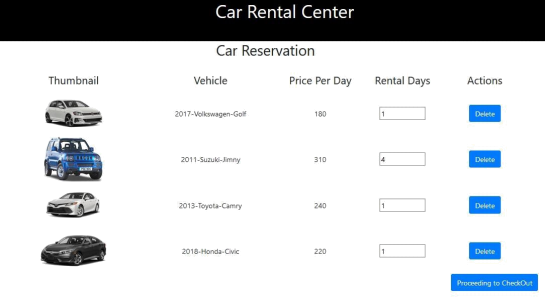
Figure 2: An example of the reservation shopping cart.
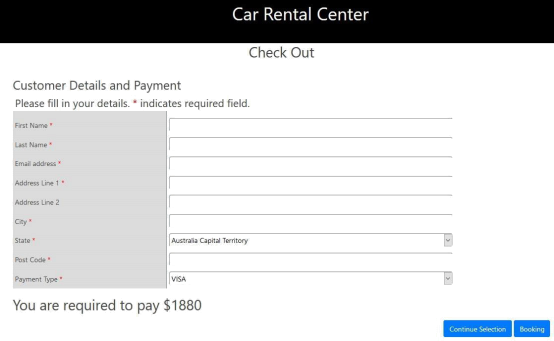
Figure 3: An example of the checkout page.
Functional Specification
Data Storage:
1. Design a JSON file “cars.json” to store information about cars. There should be at least 10 car
items in the JSON file. Each car should have at least 10 attributes as specified in the table on Page 1. For each car item, the availability can be either True or False.
2. Design a MySQL table named “Renting_History” to keep track of users’ renting history. The table should consist of at least three columns “user_email”, “rent_date”, and “bond_amount” . Each time a user rents a car through the website, a new record will be added to record the above information, where bond_amount refers to the deposit a user has to pay beforehand to rent the car.
Car Browsing:
1. Use AJAX to load the JSON file “cars.json” and then extract the data to be shown on your webpage.
2. Display the cars in a nice tabular format for users to browse.
3. Provide a button beside each car item to allow users to add the car to the reservation “shopping cart” .
Car Selection:
1. Upon clicking the “Add to cart” button, use AJAX to check whether the car is available. If the availability is True/1, add the car to the shopping cart and prompt success. Otherwise, the car is current unavailable, and users cannot add it to the shopping cart; user will be alert that “Sorry, the car is not available now. Please try other cars.”
2. Use Session to store information about items in the shopping cart.
Shopping cart:
1. Provide a button/link or floating window through which users can view the reservation shopping cart, which displays the cars which have been added.
2. Users can set “Rental Days” or delete cars from the shopping cart.
3. Provide a checkout button through which users can proceed to the checkout page.
Checkout:
1. Upon clicking the “checkout” button, check whether there are cars in the shopping cart. If not, alert “No car has been reserved.” and jump to the browsing page. If yes, validate the “Rental Days” (should be an integer greater than zero) using JavaScript and navigate to the checkout page.
2. Design the checkout page which displays a purchase form requesting the user to fill in their delivery details (name, email, address, payment type).
3. Users can either proceed with filling in the form to complete the booking (click “Booking”) or jump back to the browsing page to continue selecting cars (click “Continue Selection”).
4. All these fields must be completed for the order to go ahead. All user’s input to the form should be validated for correctness whenever possible.
5. The renting history should be retrieved from the “Renting_History” table according to the email address. If the user used to rent a car within the past three months, the rental cost will show as the sum of the car items in the shopping cart. If the user hasn’t rented in the past three months, a bond amount of $200 will be added to the rental cost and show on the checkout page.
6. Once the information has been validated to be correct on the checkout page, whenever user clicks “Booking”, information about this new booking will be inserted into the “Renting_History” table, where the bond_amount is either 0 or 200. Besides, the booked items should be updated to be unavailable in the “cars.json” file. Once the above changes are done, the checkout process is completed, and user will be alerted of the success.
Development and Test
![]() You may use your local environment (e.g., XAMPP and Visual Studio Code) for development.
You may use your local environment (e.g., XAMPP and Visual Studio Code) for development. ![]() To obtain an AWS URL for your website, you must deploy your website through Elastic Beanstalk.
To obtain an AWS URL for your website, you must deploy your website through Elastic Beanstalk.
Submission:
The submission procedure is essentially the same as the procedure for Assignment 1.
You will submit your source code (e.g., in terms of a .zip file) and an AWS URL of your website through the assignment homepage in Canvas.
2023-06-03