IFN666 Web and Mobile Application Development Assessment 3
Hello, dear friend, you can consult us at any time if you have any questions, add WeChat: daixieit
IFN666 Web and Mobile Application Development
Assessment 3 – Capstone Project
Release Date: Monday 8/5/2023
Submission Due Date: Tuesday 6/6/2023
Weighting: 50% of Unit Assessment
Group or Individual: Individual or Group of 2 people
Task: Capstone Project: Client Side Mobile Application Development with React Native/Expo and Server Side Development with Node and Express
1. Every student needs to complete the coding project.
2. You are encouraged to study together with fellow students but you cannot copy each other’s code directly.
Section 1: Change History
|
Date |
Change Detail |
Version |
|
07/05/2023 |
Initial version |
1.0.0 |
|
|
|
|
Section 2: Synopsis
This project will require you to develop a Mobile application to allow users to view and analyse data available through online APIs.
Section 3: Tasks
Introduction:
In this assignment, your task is to use React Native and Expo to develop a Mobile Application (that can run on both iOS and Android). This app is powered by Node and Express.
By default, you will port the front end web application you developed for Assessment 2 to a front-end mobile application, then add the backend server support to make it a full application. You may reuse some code from the web application you developed for Assessment 2 in your mobile application. Alternatively, if you prefer, you may also develop your mobile app that utilizes other data available through free online APIs such as Stocks, Cryptocurrency, Environment, Food etc. You may check here for free APIs available for developers:
https://rapidapi.com/collection/list-of-free-apis
The Data:
The dataset is drawn from online APIs directly. You can use the same API(s) you have used for your Assessment2 , or you may choose to use different APIs if you prefer. Please record in the report which online API(s) you have used for developing your mobile application.
In this specification, we will not be too prescriptive, but we necessarily have to focus around some technologies.
The key technologies to use and skills you need to demonstrate include:
· React Native and Expo
· Components
· Navigation
· API
· Style sheets
· Node.js and Express [only required for Grade 6 or 7)
· MySQL Database [only required for Grade 6 or 7)
Note: Each component’s render method should be short and simple, each component should do just one thing.
Your main requirement is to build a mobile application using React Native and Expo. The main tasks are listed below.
Task highlights
1. Landing screen
2. Show watch list
3. Show items in current watch list
4. Search items of interest
5. Navigation
6. User Interface Styling
7. Table [or List, if table is not suitable]
8. Chart
9. User management (register/login/logout)
10. Server functions (for Grade 6 and 7)
The User Interface
You can design your own mobile user interface to fit the functionalities of your mobile app.
The user interface and functionality can also be based on an existing application e.g. the Apple’s Stocks Mobile App (available from the Apple App store), Australian Bureau of Meteorology’s BOM Weather from Google Play Store, Real Estate mobile application Rent, cooking and recipe mobile apps like SuperCook, Cookpad etc.
The application consists of at least two main interactive screens, e.g. a Search screen for searching items of interest and a MyList screen for overviewing information of items of interest. See below the two screens of a Stock application as an example.

The application maintains a ‘watch list’ which is a list of items that the user is interested in following. This watch list must be stored in persistent local storage on the mobile device, so that if the user shuts down the application and comes back the next day, their watch list will still be available. The Search screen is designed to allow the user to add items to the Watchlist. It does this by providing a search text box. As the user types in the search text box, a list of items which match the search text in item attributes e.g. item name is presented to the user. The user can then click on an item to add it to their watch list. Once a user adds an item to their watch list, they are automatically taken to the screen which lists all the items currently in their Watch list. After an item is added to the watch list, the user can remove it from the list later.
To minimise storage size, in the mobile application, only the key information is stored in the Watch List (not any other data such as current price, or specific amount of certain items etc). Due to limited space on mobile screens, this MyList screen shows only key information like item name, symbol etc. For example, in the Stocks application, this list shows only the stock symbol, most recent closing price and percentage gain or loss since the open. The user can then select any of those items in order to view more detailed information about the item.
Users can navigate between Screens at any time via the bottom tab navigation bar.
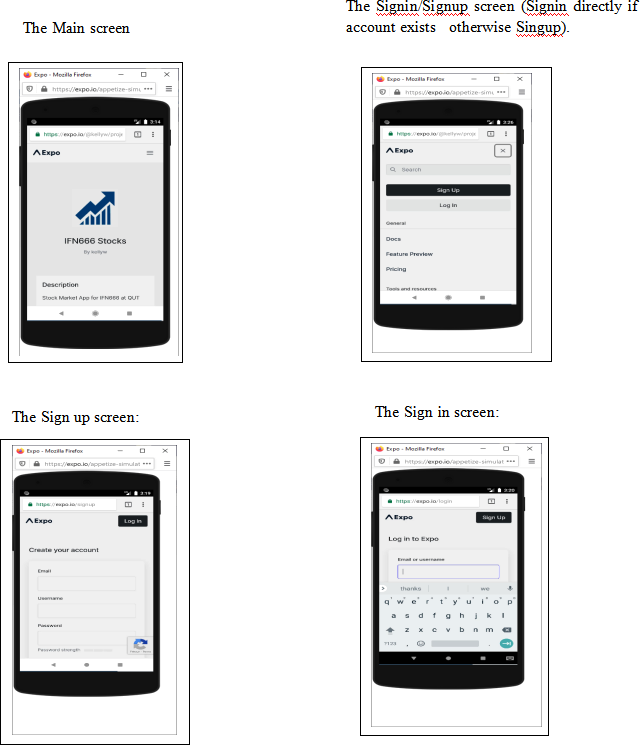
The Launch Screen (Main screen/Landing page)
Users see the Launch screen first when they use the app. This is where the app can show users what it can do and shows them how to get started using it.
Below we take a Stock app as an example.

Charting: You can toggle between showing a graph at the bottom of the screen instead of the detailed data and can toggle between different display formats of your data e.g. percentage versus absolute values. You can add that additional functionality if you aim to get Grade 5 or above. If you decide to implement graphing then you may make use of whichever third-party react native modules that you desire to do so.
Watch list management: You may have a separate Screen or button to remove items from the watch list. You can implement that function if you wish to achieve Grade 6 or above.
You can import whatever components you like from the “react” and “react-native” modules or from third-party modules.
You may start with the practical code which you have completed during the practical classes or reuse some code from the lecture slides. You do not have to use these files if you do not want to.
We have provided you with a Skeleton project of a Stock application as an example. You may refer to the code structure of the Skeleton project, learn how to use Context and Scale your application to different screen sizes. The skeleton files are very useful, especially if you have used the IFN666 Stock API to implement a Stock application in your Assessment 2. You do not have to use these files if you do not want to.
1. screens/StocksScreen.js
2. screens/SearchScreen.js
3. contexts/StocksContext.js
The sections marked with a /* FixMe comment */ are meant to be completed by students, especially if they have implemented a Stock application.
The Stocks Context has a Stocks Provider that wraps both the Stocks Screen and the Search Screen (in App.js). It is designed to encapsulate the watch list and to share and maintain its state. The Stocks Context uses Asynchronous storage to save and retrieve the watch list on the local device. The Search screen and Stocks screen will each maintain their own private state so that we don’t need to repeatedly query the server for stock prices or lists of stock symbols. The Stocks screen and Search screen should be implemented using a number of functional sub-components (implemented inside StockScreen.js and SearchScreen.js respectively). All but the top level StockScreen and SearchScreen components should be pure (stateless) functional components.
The ScaleSize function implemented in constants/Layout.js is designed to assist you in creating an interface that appears the same on smaller phones and larger tablets. All numeric properties in your style sheets could be set using this function. You may write your own scale function to make your mobile application scalable to different screen sizes.
Style sheets should be used to style your interface.
You should aim for your app to not produce any warning when running in debug mode.
You may use the same APIs as you used for Assessment two.
Note: If you use a server that is inside the QUT firewall, so you will need to install the CISCO AnyConnect app on your mobile device (available from both the Apple App store and Google Play) and connect to remote.qut.edu.au with your QUT username and password.
Grading
The marking for this assignment will be governed by the CRA rubric, and this will take account of a number of aspects of the assignment process. These will include:
1. The overall level of functionality successfully implemented
2. The usability of the application
3. The robustness of the application
4. Evidence of a professional approach to design
5. Evidence of a professional approach to development and code quality
6. The quality of the professional report and demonstration video
Full details of this split will be found in the CRA document, which will also be made available in the assessment section of Canvas. Here we are concerned only with the marks for functionality, application usability and robustness. The precise marks awarded may be reduced as a result of features which are only partially implemented or error prone and so on. But as an approximate guide, these are our expectations:
[Grade of 4 level]: A simple mobile app with limited styling that implements the main functions – Search and Show information about items listed in watch list. Navigation is handled properly.
[Grade of 5 level]: At this level we will expect you to present the data cleanly using table [or list if table is not suitable] and charts.
[Grade of 6 and 7 level]: Here the expectation is that you have exceeded the grade of 5 level in that all of the basics are there and working smoothly. At the higher grade levels, we will expect that you are able to implement some back-end functions, and allow users to add/delete items to/from the watch list. For Grade 6, back up your Watch list to backend database so that you can change to another device and continue to use the app as usual. For Grade 7, we expect you to implement basic user management including Sign in /Sign out functions, and protect your personal information using password. Alternatively you can also expose your own API, which will be a much simplified API than the real online APIs you have used, for your front-end to consume.
A reminder that these are guides only, and that the mark levels are based on successful implementation of the features mentioned. If unsure, please get in touch and discuss them with us.
Submission:
Your submission needs to be in 3 parts.
The Code:
Organise your files well: To a large extent the structure of your applications within these directories is up to you, but we will expect an appropriate separation and organisation of resources. This is to some extent prescribed for you by the express generator and by the usual structure of a client app.
Delete node_modules in all folders before submission. Now, you might have noticed that Node apps involve installation of packages, and that this leads to the installation of node_modules, and that eventually these take up a certain amount of space. Please delete them. And then look around through the directory structures again, and delete any other node_modules folder that you missed the first time. The marker should be able to just unzip your code, run npm install, npm start, expo start and then run your app on either an iOS or Android device or emulator.
Report:
We will expect a short report and user guide, generally running to 10 pages or so, including screenshots but excluding references and appendices. Your report must include the following sections:
1. Publish a Production Mode version of your project to the Expo cloud and include a link to the project URL on the front page of your report [Note: You only need to do this if you aim to achieve Grade 5 or above].
2. Introduction – telling us what was implemented and what wasn’t, showing a few screenshots to illustrate the functionality. This will probably occupy a page or a bit more.
3. Technical description of the application. This section is to allow you to talk about the APIs used for graphing, to show us any tricky data flows, and to discuss technical issues that caused you problems. This is especially important if something doesn’t actually work.
4. Testing and limitations – test plan, results, compromises. Clearly list bugs or limitations that need to be fixed. What might we need to change on the server-side?
5. Discussion – Briefly discuss each the following questions:
If we wanted to make this App available on the Apple App store and Google Play.
· Discuss whether using Expo React Native was a good choice for this application. What are the pros and cons?
· Is the current application accessible from devices with various screen sizes e.g. a mobile phone or a tablet? If not, how could it be improved?
· Is the current application accessible to people with various disabilities? If not, how could it be improved?
· Are there any social, ethical or legal issues that we would need to consider in releasing this application?
6. References
7. Appendix: brief user guide
8. Appendix: self-checking against CRA
The report should be entitled report.doc
Video Demonstration:
You will need to record a video demonstration of your app, showing all of the actions outlined in this document. In particular you need to:
1. Go to the main screen
2. Show all the items in your Watch list
3. Show the ability to perform a Search
4. Show the ability to store your Watch list locally.
5. Show the ability to display information in table (or list) and chart (if implemented)
6. Show the ability to save your Watch list on the server (if implemented)
7. Show the ability to manage users and secure your information on the server (if implemented)
8. Show some edge cases to demonstrate the reliability of your application
The video is normally 2-5 minutes long.
The video should be entitled such as video.mpg
If time allows, upload the video to YouTube (or other media services) and include a link to the video on the front page of your report.
Final Submission:
Create a directory called Assessment3 which should include:
• The application code directory
• The report
• The video demonstration
You should then zip up the assignment, name it nxxxxxxxx_Assessment3.zip where nxxxxxxxx is your student number. Finally upload your zip file to canvas. We will mark the last attempt received and we will ignore all the others.
The CRA rubric will be released as a separate file.
2023-05-26