CMPT 120 Pixel Art Generator
CMPT 120
Pixel Art Generator
Introduction
In this project, you will create a tool that lets users create poster images using simple pixel color data. With this project you will be working with:
● Image processing, creation of images
● Functions
● List manipulation and multi-dimensional lists
● For loops and while loops, simple and nested
● Variables and data types
● Reading data from CSV files
● Using functions from other python files and libraries
● Working with Hexadecimal numbers
Pixel art is a form of digital art created using software. In this project, we want to build a tool that enables us to create digital art given the hex color information in a CSV file. (See the image next)
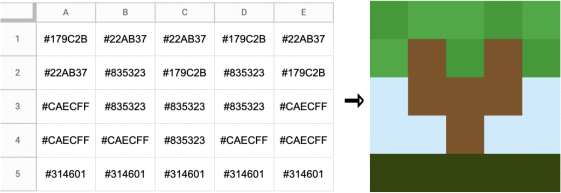
Terminology and data structures: In this project we will use the following terms. The term “Hex Data” will be used for the input data. This data will be provided to you as a CSV file containing strings representing hex colors. The term “Poster Image” will be used as the output produced by the tool (program). The poster image will have to be represented by a 3D list (a 2D list of RGB pixels, represented as a list of three red green blue decimal values). This project will use the same internal structure for images as the one seen in class and used in the “Image Processing (week #10)” assignment. Further, the poster image will have to be saved to a jpg file using the previously provided helper functions in the image_helpers module file.
Tool general description
The Pixel Art Generator tool offers a number of functionalities or options to a user. The functionalities are explained in detail below. The dialog with the user is text based. For each functionality or option the user is prompted to provide proper data to get their desired result.
Using each functionality in the tool will cost the user some money (although there are some free posters!). The costs are explained below for each functionality. When the user requests to exit the tool (enters 0 as functionality), the program calculates the total amount that they have to pay, shows that to the user, shows a lucky number (details explained below) and terminates.
The tool will offer the user to produce a variety of poster image creations from different (provided) hex data csv files. Some options will additionally apply visual effects to the generated poster image. One special option will provide to the user the opportunity to type one single hexadecimal color code and the tool will show the corresponding list of three RGB decimal values. The tool functionalities are independent. The user will be able to choose any number of functionalities before exiting, possibly repeated. Each request will cost some money regardless of whether the request is repeated.
* IMPORTANT! *
-- The description of this project is complemented with sample runs. Read this whole description (9 pages) and check the sample runs before you start designing and implementing this project!!
-- Your tool does not have to have exactly the same dialog as in the sample runs, but should contain the same information, and provide the same options.
--You are highly recommended to implement this tool in stages aiming to have at least some functionalities executing completely.
-- FURTHER HINTS AND MATERIALS are provided below.
Description of each functionality
Functionality 0. Show total cost, the lucky number, and exit the tool.
The user indicates that they do not want to use the tool any longer by choosing functionality 0. The program then calculates a lucky number and shows to the user both the total cost and the lucky number, and terminates. The total cost should have been accumulated as the user requested various functionalities. The total cost may be 0, if the user did not use the tool at all or if the user only requested free options. See the details and example of the lucky number calculation below, after the functionalities descriptions.
Functionality 1. Converting a hex-coded color to RGB format.
The user will be asked to enter a valid hex coded color, the exact format is explained next. Then the program calculates and returns a list, which is the R, G, B value of that hex coded color.
COST: Each conversion costs $0.25.
A valid hex coded color starts with the number sign character ‘#’ followed by 6 characters, each of which are either a number between 0-9 or A,B,C,D,E,F. (Recall that these represent hexadecimal digits. Here the user is typing them and should be captured as strings). For instance, “#DD009A” is a valid hex coded color string.
If the user types an invalid code the program needs to inform the user and ask again. Note that wrong input will not cost additionally to the user.
To calculate the RGB value from a hex coded number, notice that each two characters in the hex color code correspond to one color in the RGB format. For example, if the user types “#FF000A” the program should show to the user the RGB color code list [255,0,10], since FF16 is equivalent to 25510, 0016 is equivalent to 010 and 0A16 is equivalent to 1010. See sample runs 1 and 7.
Functionality 2. Basic Pixel Art poster (1 line csv file as input data)
For this functionality, you are provided with a single file “basic.csv”. The file has one line only, with comma separated hex coded colors. The hex codes have the same format as described in functionality 1 . This line of colors represents the colors in a ROW in the image to be generated. There is one hex color code per pixel in the row. For this basic poster, all rows have the same colors, and there should be as many rows as columns (that is, the image will be a square).
The file with this image should be saved in the folder where the tool is executing, with the name “poster-basic.jpg”. See sample runs 2 and 7.
COST: $1 for each basic poster request (the user is charged every time they make this request)
 The basic poster
Functionality 3. Pixel Art Poster (multiline csv file as input data)
For this functionality, you are provided with different CSV files. For each pixel art, there are a number of poster sizes available. Below is the list of available pixel art CSV data files. Files names reflect the art name and the size.
|
50x50
|
100x100
|
200x200
|
400x400
|
800x800
|
|
cactus-50.csv
|
cactus-100.csv
|
cactus-200.csv
|
cactus-400.csv
|
cactus-800.csv
|
|
giraffe-50.csv
|
giraffe-100.csv
|
giraffe-200.csv
|
giraffe-400.csv
|
giraffe-800.csv
|
|
house-50.csv
|
house-100.csv
|
house-200.csv
|
house-400.csv
|
house-800.csv
|
|
parrot-50.csv
|
parrot-100.csv
|
parrot-200.csv
|
parrot-400.csv
|
parrot-800.csv
|
|
flamingo-50.csv
|
flamingo-100.csv
|
flamingo-200.csv
|
flamingo-400.csv
|
flamingo-800.csv
|
|
tree-50.csv
|
tree-100.csv
|
tree-200.csv
|
tree-400.csv
|
tree-800.csv
|
For instance, parrot-200.csv contains hex color codes for a 200x200 pixels image to generate a parrot pixel poster art. This CSV contains 200 lines, each line containing 200 comma separated hex code values that will be used to generate a ROW of pixels in the poster image. Each hex value in these CSV files corresponds to exactly one pixel in the final poster image.
When users select this functionality, they are first shown the list of available arts (cactus, giraffe, house, parrot, flamingo, tree), and asked to enter which art they want. Then they are asked about the size of the poster, they need to choose from the available sizes (50, 100, 200, 400, 800). Then, the program will generate and save the poster using the proper CSV file and inform the user about the name of the generated image (and the cost). The name of the resulting poster image should use the format “poster-original-{artName}-{artSize}.jpg". For example, if the user asks for pixel art “parrot” with the size of 200, the poster image should be saved with the name “poster-original-parrot-200.jpg”.
 A 400x400 giraffe poster: (the size is minimized here)
COST: 50x50 posters are free. The cost of creating larger posters is calculated using the requested size of the poster. Each square pixel is considered to cost $0.01, this means that a 100x100 poster costs $1, a 400x400 image costs $4 and so on. See sample runs 3 and 7.
Functionality 4. Greyscale Pixel Art Poster (multiline csv file as input data)
This functionality provides the same possibilities as the functionality (#3), with a difference that the generated image will be greyscale.
COST: The cost of a greyscale poster is calculated the same way as an original pixel art poster.
The name of the resulting poster image file should use the format “poster-grey-{artName}-{artSize}.jpg". For example, if the user asks for pixel art “parrot” with the size of 200, the greyscale poster image should be saved with the name “poster-grey-parrot-200.jpg”. See sample runs 4 and 7.
 A 400x400 greyscale giraffe poster: (the size is minimized here)
NOTE: If you define your functions properly, you can reuse the code you wrote for the previous part to create the original image data first, and you can also apply the greyscale effect function that you created for the previous assignment (Image processing, week #10).
Functionality 5. Pixel Art Poster, red shade bars (multiline csv file as input data)
This functionality provides the same possibilities as the functionality (#3), with the difference that the generated image will contain vertical red shade bars. Two different variants or red shade bars effect will be available, ‘narrow’ and ‘wide’ bars.
COST: The cost of generating a poster with red shade bars effect is twice as much as original posters in functionality #3 (independent of the bars width).
The name of the resulting poster image should use the format “poster-bars-{bar width}-{artName}-{artSize}.jpg". For example, if the user asks for pixel art “parrot” with the size of 200 and “wide” bars (wide is 75 pixels) the poster image should be saved with the name “poster-bars-75-parrot-200.jpg”.
The red shade bars effect looks as if vertical bars with shades of red with equal distance from each other appear on the image. The user can select between narrow and wide bars. The ‘narrow’ bars have a width of 15 pixels and the ‘wide’ bars width is 75 pixels.
How to create the “red shade bars” effect: Assume that the user requests narrow bars (width 15 pixels). Once the original poster image is obtained, the red bars effect would be done as follows.
For each ROW in the original image, the first 15 pixels (from 0 to 14) will be “shaded red” (as explained below), the next 15 pixels (from 15 to 29) will stay the same as in the original image, then the next 15 pixels (from 30 to 45) will be “shaded red” and so on.
Red shading: To modify a pixel to obtain the red shade, change a pixel with [R, G, B] color values into [R+100, G-100, B-100]. Note that when you add or subtract values from pixel colors, they may exceed 255 or fall below 0; in these cases you should set them as the maximum or minimum value. For instance, starting from [200, 40, 150] , adding and subtracting 100 to each color would result in [300,-60, 50], but instead this pixel should be [255, 0, 50].
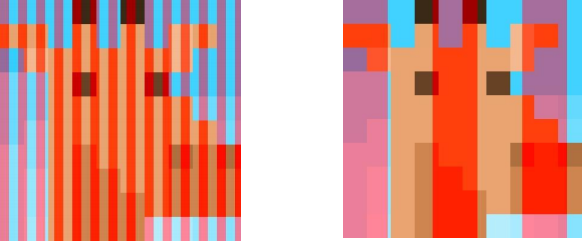
Image posters with narrow and wide bars in a 400x400 giraffe image. Sample runs 5 and 7
Functionality 6. Horizontal bar scaled poster (one csv file only) -- BONUS points
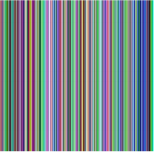
For this functionality, there is only one CSV file available, named “color-bar.csv”, containing a single line of data. When the user selects this functionality, the program creates a poster image using the colors in this CSV file, saves it, and informs the user of the name of the saved image and the cost. The image should be saved with the name “poster-color-bar.jpg”.
For this functionality one hex value in the input data csv file corresponds to MANY pixels in the poster image. Hence the name “scaled”. The CSV file for this functionality looks like this:
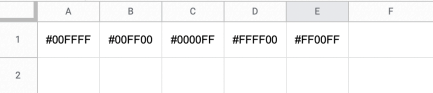
The program should read the hex colors from the CSV file and generate a scaled image. To create the scaled image, each cell in the CSV should be mapped into 100x100 pixels in the image. So for instance, the resulting scaled image from this CSV file will look like this:
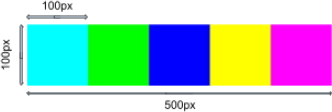 The scaled bar poster. Sample runs 6 and 7
COST: The cost of creating this scaled bar poster is $1.
How to calculate the lucky number (provided when the user exits the tool)
The lucky number is calculated based on the user’s name (considered in lower case) and the total cost from using the tool. Calculating the lucky number does not cost anything to the user.
To calculate the lucky number first obtain what we refer to as the “weighted ascii sum” of all vowels in the name. Vowels are “a’,’e’,’i’,’o’,’u’. The ‘weights’ will be the positions where those vowels are in the name (the string). The lucky number is the result of: first: adding the weighted ascii sum plus the total cost, and then, obtaining the modulo or remainder of dividing this sum by the name’s length. (Hence the lucky number will be an integer, always less than the name’s length).
For example, assume that the user’s name is “Morgan” and the total cost is 3. All sample runs include lucky numbers.
|
|
m
|
o
|
r
|
g
|
a
|
n
|
|
positions
|
0
|
1
|
2
|
3
|
4
|
5
|
|
Decimal ascii values
|
|
111
|
|
|
97
|
|
|
Decimal ascii values weighted by position
|
|
111*1 = 111
|
|
|
97*4 = 388
|
|
Weighted ascii sum = 111+ 388 → 499. Assume the total cost is 3. The length of ‘Morgan’ is 6.
The lucky number is the remainder from dividing (499 + 3) by 6 , which is 4.
What you are provided
You are provided with:
● This description
● The file “basic.csv” for functionality #2
● The file “color-bar.csv” for functionality #6
● 30 CSV files containing 6 pixel arts with 5 different sizes each. The names of the files are explained under Functionality #3
● An “image_helper.py” file containing the same functions as in assignment week #10.
● Sample runs 0 to 7 illustrating the dialog for each of the functionalities
NOTE: make sure that you include all provided files in the same folder where you develop your program (if using a local editor such as mu), or you upload the files in the replit environment if you work there.
Requirements
1. Create and submit in Canvas a program that implements the “Pixel Art Generator tool” as described in this document and in the sample runs. Call this program main.py.
2. For functionality#1, you should validate that the user types a hex code according to the specified format, and the program would keep asking the user to re-type if the format is incorrect. See sample run 1.
3. For functionalities# 3,4, and 5, you should check the requested art name and poster size are available. If the user types an unavailable option the user is provided again the general menu. See sample runs 3,4,5 and 7
4. Functionality #6 is for bonus points
5. Your tool does not have to have exactly the same dialog as in the sample runs, but it should contain the same information, and provide the same options.
6. Create your solution with functions, both productive and non-productive, aiming to minimize duplication of code.
7. Your code should have defined (and use) at least 4 productive functions, with parameters.
8. Keep the provided image_helpers.py file as a separate module which you import in the main.py file
9. You do not need to include your functions in separate files or modules; all functions could be in the main.py file, However it is recommended that you include image effects functions in a separate file, or in general, image related functions in a separate file (for example name it myImgFunctions.py.)
10. Include a header comment in the program including the official names and student numbers of both group members, date, and brief description of program. If you worked individually, explicitly indicate so in the header.
11. Name your functions and variables reasonably so that their purpose is evident
12. Partial points will be provided if you do not implement all the functionalities or features.
Hints
1. Read the whole description as soon as possible. Understand what you are asked to do. Consult if you have doubts.
2. Implement this project gradually, in stages, aiming to have at least some functionalities executing completely.
3. You may want to combine bottom up and top down development:
a. Bottom up: implement some functions and test them independently before putting the whole program together
b. Top down: plan your whole main program, possibly calling functions which you do not yet implement (but which you will implement later), and in the meantime those functions just return some reasonable fake value, and/or print some temporary message indicating that you will implement this later.
4. You may want to leave validation of user input to a later stage after your tool executes some functionality correctly (i.e. assuming at the beginning that the user types correctly)
5. Pay attention that each LINE in the CSV input files corresponds to a ROW in the image. At the same time, given how the provided saveImage(...) function (in image_helpers) works, your pixels 2D image list needs to be organized as described in class: so that the image is composed of columns, which in turn is composed of many pixels lists of 3 values.
6. Depending on how you manage the coordinates in your program and loops, it may be useful for you to transpose an image (exchange columns and rows)
What you need to submit
A. Both members of the group need to JOIN A PRE-EXISTING CANVAS GROUP, ‘project-group-n’ (where n is your group number)
B. Both members of the group need to join the same project number
C. The same group applies to both, the project and the associated reflection assignments
D. PYTHON FILES: main.py . IF you use a separate python file to include some function definitions you need to provide such file/s as well. ONE SUBMISSION per group.
E. You do NOT need to submit the input csv data files nor images poster files with you produce nor sample runs. NOTE: The markers may use files which have different content than what you were provided, but with the same file names as described here).
F. If you decide to work on your own (although not necessarily recommended) you do NOT have to join a Canvas group to submit your project
G. The associated REFLECTION survey in Canvas. INDIVIDUAL SUBMISSION.
If you have any questions consult with the Teaching Team. Make sure that you check class and Canvas announcements in case that additional clarifications are provided. Use also the Discussion Forum if you have general questions.
End of project description
2021-07-29