BUS 440 Database Management
Hello, dear friend, you can consult us at any time if you have any questions, add WeChat: daixieit
BUS 440 Database Management
Creating an ERD in MySQL Workbench
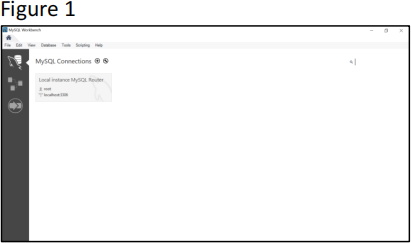
1. Launch MySQL Workbench (Figure 1).
2. Launch your connection.
3. Choose File-> New Model.
4. Double-click the default schema name mydb. Name your schema CustomerOrder.
5. From the Models Overview screen, double-click Add Diagram (Figure 2) . Figure 2
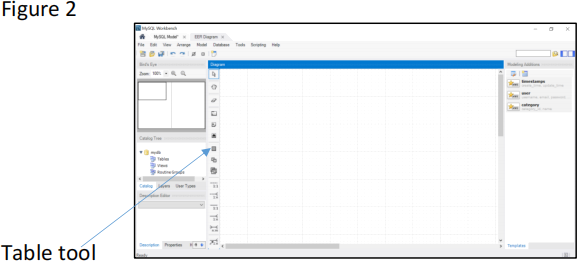
6. From here, you can create an EER Diagram. Click the Table tool (or press the letter “T” on your keyboard) and click anywhere on the grid to add a table. Create three more tables on the grid (Figure 3).

7. Double-click each table to name it. Name the tables: customer, order, orderline, and product.
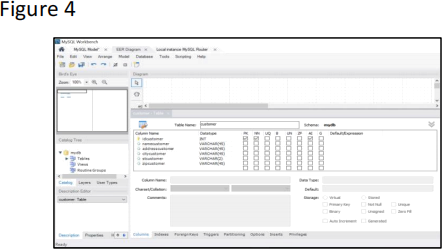
8. Add columns to the customer table. To do so:
![]() Change one of the defaults for column names. Select Edit-
Change one of the defaults for column names. Select Edit-
>Preferences->Modeling ->Defaults. Under Column Defaults, change the PK Column Name preference to %table%_id. Change the column name preference to %table%_col. Under Foreign Key/Relationship Defaults, drop down the ON UPDATE list and choose Cascade. Do the same for the ON DELETE drop-down list. Click OK.
![]() Double-click the customer table.
Double-click the customer table.
![]() Double-click in the area immediately under Column Name. MySQL
Double-click in the area immediately under Column Name. MySQL
Workbench should automatically create a field name, customer_id with a data type of INT (integer). Leave the default name.
![]() This field will serve as the primary key, so check the PK check box.
This field will serve as the primary key, so check the PK check box. ![]() Be sure the NN (Not Null) check box is checked, as a primary key may
Be sure the NN (Not Null) check box is checked, as a primary key may
not be null.
![]() We will let the DBMS automatically increment the PK, so check the AI
We will let the DBMS automatically increment the PK, so check the AI
(Auto Increment) checkbox.
![]() Double-click in the area immediately under customer_id. MySQL
Double-click in the area immediately under customer_id. MySQL
Workbench should automatically create a new field name, customer_col with a data type of VARCHAR and a length of 45. Change the default name to customer_name. Check the NN checkbox.
![]() Add another field, customer_address with a datatype of VARCHAR and
Add another field, customer_address with a datatype of VARCHAR and
the default length. Check NN.
![]() Add another field, customer_city with a datatype of VARCHAR and the
Add another field, customer_city with a datatype of VARCHAR and the
default length. Check NN.
![]() Add another field, customer_state with a datatype of VARCHAR and a
Add another field, customer_state with a datatype of VARCHAR and a
length of 2. Check NN.
![]() Add another field, customer_zip with a datatype of VARCHAR and a
Add another field, customer_zip with a datatype of VARCHAR and a
length of 10. Check NN.
9. Add columns to the product table. To do so:
![]() Double-click the product table.
Double-click the product table.
![]() Click in the area immediately under Column Name. MySQL
Click in the area immediately under Column Name. MySQL
Workbench should automatically create a field name, product_id with a data type of INT (integer). Leave the default name.
![]() This field will serve as the primary key, so check the PK check box. Be
This field will serve as the primary key, so check the PK check box. Be
sure the NN (Not Null) check box is check, as a primary key may not be null. We will let the DBMS automatically increment the PK, so check the AI (Auto Increment) check box.
![]() Click in the area immediately under product_id. MySQL Workbench
Click in the area immediately under product_id. MySQL Workbench
should automatically create a new field name, productcol with a data type of VARCHAR and a length of 45. Change the default name to product_descr. Check NN.
![]() Add another column for product_price as double. Check NN.
Add another column for product_price as double. Check NN. ![]() Add another column for product_cost as double. Check NN.
Add another column for product_cost as double. Check NN.
10. Add columns to the order table. To do so:
![]() Double-click the order table.
Double-click the order table.
![]() Click in the area immediately under Column Name. MySQL
Click in the area immediately under Column Name. MySQL
Workbench should automatically create a field name, order_id with a data type of INT (integer). Leave the default name.
![]() This field will serve as the primary key, so check the PK check box.
This field will serve as the primary key, so check the PK check box. ![]() Be sure the NN (Not Null) check box is checked, as a primary key may
Be sure the NN (Not Null) check box is checked, as a primary key may
not be null.
![]() We will let the DBMS automatically increment the PK, so check the AI
We will let the DBMS automatically increment the PK, so check the AI
(Auto Increment) check box.
![]() Click in the area immediately under order_id. MySQL Workbench
Click in the area immediately under order_id. MySQL Workbench
should automatically create a new field name, order_col with a data type of DATE. Change the default name to order_date. Check NN.
11. Add columns to the orderline table. To do so:
![]() Double-click the orderline table.
Double-click the orderline table.
![]() Click in the area immediately under Column Name. MySQL
Click in the area immediately under Column Name. MySQL
Workbench should automatically create a field name, orderline_id with a data type of INT (integer). Leave the default name.
![]() This field will serve as the primary key, so check the PK check box. Be
This field will serve as the primary key, so check the PK check box. Be
sure the NN (Not Null) check box is checked, as a primary key may not be null. We will let the DBMS automatically increment the PK, so check the AI (Auto Increment) check box.
![]() Add another column for orderline_qty as integer. Check NN.
Add another column for orderline_qty as integer. Check NN. ![]() Add another column for orderline_price as double. Check NN.
Add another column for orderline_price as double. Check NN.
12. Build a non-identifying relationship between customer and order. To do so:
![]() Click the non-identifying 1:n (one-to-many) relationship button. (This
Click the non-identifying 1:n (one-to-many) relationship button. (This
is the one with the dashed line.) Recall that a non-identifying relationship is one where the child table can stand alone without the parent table. In practice, this means that the customer number will not be part of the primary key of the order table.
![]() Click the order table.
Click the order table.
![]() Click the customer table.
Click the customer table.
![]() Notice that by building the relationship, MySQL Workbench adds the
Notice that by building the relationship, MySQL Workbench adds the
foreign key automatically.
13. Build the relationship between order and orderline. To do so:
![]() Click the identifying 1:n (one-to-many) relationship button. (This is
Click the identifying 1:n (one-to-many) relationship button. (This is
the one with the solid line.) Recall that an identifying relationship is one where the child table cannot stand alone without the parent table. In practice, this means that the order number will be part of the primary key of the order table, along with the order line item number. This is because an order line item cannot exist without an order header (order table row).
![]() Click the orderline table.
Click the orderline table.
![]() Click the order table.
Click the order table.
![]() Notice that by building the relationship, MySQL Workbench adds the
Notice that by building the relationship, MySQL Workbench adds the
foreign key automatically.
14. Build the non-identifying relationship between orderline and product. To do so:
![]() Click the non-identifying1:n (one-to-many) relationship button.
Click the non-identifying1:n (one-to-many) relationship button. ![]() Click the orderline table.
Click the orderline table.
![]() Click the product table.
Click the product table.
![]() In this business, products are allowed to exist without an order, so we
In this business, products are allowed to exist without an order, so we
would to edit the relationship. To do so:
o Right-click it and choose Edit Relationship.
o Click Foreign Key.
o Deselect the Mandatory checkbox.
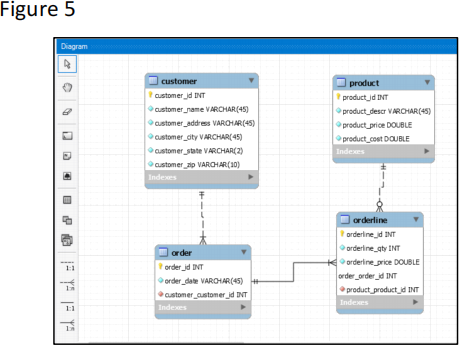
![]() Save your work and review the EER (Figure 5).
Save your work and review the EER (Figure 5).
15. We now are ready to build and synchronize the database from the design model. To do so:
![]() Choose Database->Synchronize Model.
Choose Database->Synchronize Model.
![]() Choose Next on the following three screens.
Choose Next on the following three screens.
![]() Check the checkbox with the schema name. Choose Next on the
Check the checkbox with the schema name. Choose Next on the
following screens and Finish.
![]() Click File -> Save Model to save your work as Customer Order Model.
Click File -> Save Model to save your work as Customer Order Model. ![]() Click the Home icon and open the server where your database was
Click the Home icon and open the server where your database was
synchronized from the model.
![]() You may then open your newly-created database and begin to populate
You may then open your newly-created database and begin to populate
the tables with data.
16. To populate a table with data in grid view:
![]() Hover over the table name and click the Table Grid button to display the
Hover over the table name and click the Table Grid button to display the
table in grid view.
![]() Key your values (Figure 6). Be sure to key any date values in YYYYMMDD
Key your values (Figure 6). Be sure to key any date values in YYYYMMDD
format.
![]() Click the Apply button in the lower right of the screen.
Click the Apply button in the lower right of the screen.
17. Run a couple of queries over the data.
a. For example, try to select the extended line item amounts of all orders for all customers in Asheville, NC.
SELECT customer_name, order_id, product_product_id, format((orderline_qty * orderline_price),2) as ExtendedAmount
FROM customer,customerorder.order, customerorder.orderline
WHERE customer.customer_id = customerorder.order.customer_customer_id AND customerorder.order.order_id = customerorder.orderline.order_order_id AND customer.customer_city = 'Asheville';
b. Create another query of your choosing.

2023-04-06
Creating an ERD in MySQL Workbench