ER1731 - Lab 2
Hello, dear friend, you can consult us at any time if you have any questions, add WeChat: daixieit
ER1731 - Lab 2
Introduction to Visual Studio and C.
For our second lab session we are going to concentrate on learning how to setup a C project in Visual Studio and the getting our first Hello World program to run and compile.
As explained in the lecture Microsoft’s Visual Studio (VS) is an Integrated Development Environment (IDE), it is Microsoft’s official platform for developing applications in Windows and is a standard application available across the Universities network. It is available for free both generally as a community version directly from Microsoft and as the full Pro version as part of the University’s Imagine agreement with Microsoft.
As a platform for developing C programs it isn’t the best available, this is because Microsoft do not particularly consider C to be a key Windows development language. This doesn’t mean that we can’t develop C programs in VS (obviously we are going to) it just means we have a bit of work to do first. VS is setup for development in the following languages :
· Visual Basic
· Visual C++
· Visual C#
· Visual F#
· Javascript
· Python
Although C isn’t part of that list Visual C++ is. One of the features of C++ is that it contains the entirety of the C language. So what we are going to do is setup a Visual C++ project and use it to write C. One drawback of this is that the C++ compiler used by Microsoft is only C89 compliant, this won’t be a problem for us on this course but it’s something to remember if you go on to use C on Windows in the future.
If VS is so bad why are we using it ?
Several reasons :
· VS is a very good IDE that offers a lot of support for errors and debugging features.
· It’s available for free to all students.
· It’s available on any university network machine (not just our specialist labs).
· C89 is perfectly good for the work we’ll be doing.
· You’ll be using VS next year with C# so it’s a good opportunity to get to know it.
Why aren’t we using Keil straight away ?
We’ll be using Keil eventually but Keil is an IDE for developing on embedded boards, it is a subset of normal C and for the first few weeks at least we need to see more usual aspects of the language and programming.
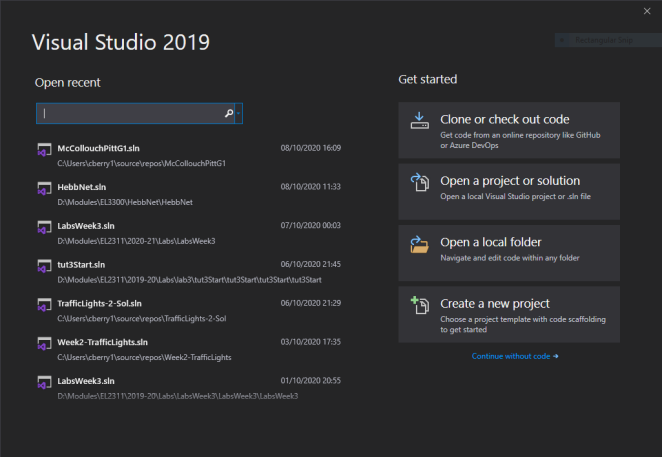
First thing is to load up VS. You will be presented with a screen similar to the one below (the projects on the left are recently opened projects so yours may be empty), from here select “Create a new project” at the bottom of the right hand side menu.
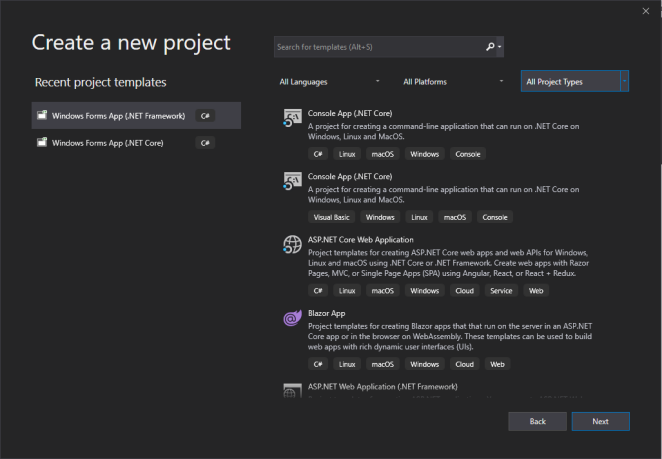
Clicking on this will bring up a new screen asking what type of project we want. Be careful on this screen and follow the following instructions carefully.
Look at the screenshot below.
To begin with the range of options will depend on what was installed when VS was setup, to make it easier to see the option we want change the 3 options on the right hand side from “All Languages” -> “C++” this should reduce the number of possible options (we could further reduce it further by selecting “console” instead of “All project types”)
We are going to select Empty Project. To begin with our programs are going to run in a text console window, it isn’t very exciting but we can see what is going on and it won’t get too confusing. Graphical programming in C is hard, if we were interested in creating fancy graphics and pretty graphical user interfaces (GUIs) we probably wouldn’t be using C in the first place.
Once we’ve selected Empty Project look down at the section at the bottom, here is where we give the project a name (by default it will probably be Project1). You can can it whatever you like but I suggest you create a new project for each lab session and call them something like lab01-exercise01. There is also a box that says location this should point to where you want to save the project, use either your network space or the desktop, do not save and work directly from a removable drive as this can cause problems (you can always copy the project to the drive after.
After you have given the project a name and a location click on OK (leave Create directory for solution ticked and Create new Git Repository unticked).
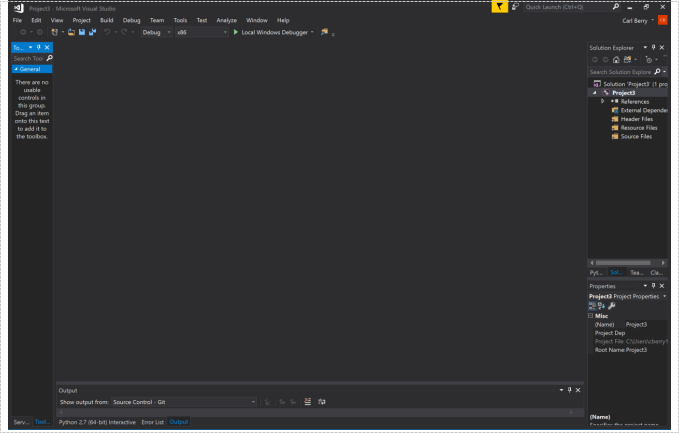
You should get a screen like the one Above.
Next, right click Source files and select Add the New Item, you’ll get the window below :
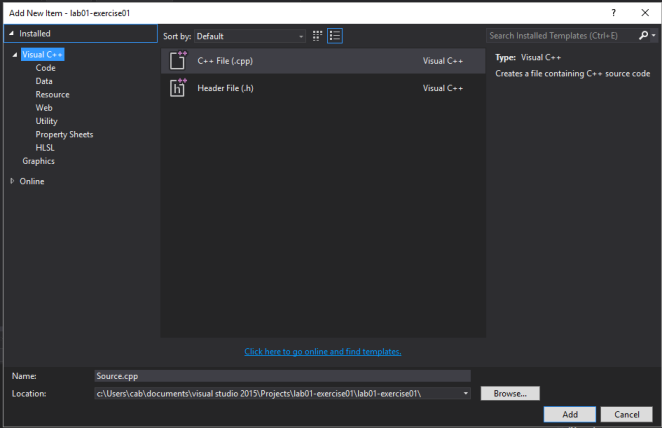
Click on Code (on the left hand side), select C++ File(.cpp) and down at the bottom of the screen where it says name change the file extension from Source.cpp to Source.c
Now click Add.
This will add a file to the directory tree in your main window called Source.c if you double click to open this file you’ll see that it is empty. We can now, at last, start writing some C.
Let’s start with the Hello World code from the lecture slides. Type in the following carefully :
#include <stdio.h>
main()
{
printf(“Hello World!\n”);
getchar();
}
You’ll notice a small change to the program that’s in the notes or last times lab.
Hang on, what’s this last line?
Correct, the final line here is getchar(); , this wasn’t in the example in the lecture. So why is it here ? Well if we ran the program in the lecture slides the program would compile, run but VS would bring up a console window run the line and then shut the window down so fast you’d never see it, so in order to stop it we add the line getchar();
What this line does is force the program to wait for you to press a key on the keyboard, we never do anything with the key you press but the program will pause until you do it. We’ll look more at input later in the module.
For now type in the code and run the program by either pressing f5 on the keyboard or clicking on the green arrow in the menu (that says Local Windows Debugger) or clicking debug in the menu and start with debugging. If you typed the code in correctly you should see Hello World appear on the screen.
Variables
This week we are going to look at variables.
First off we need to look at the printf command. Last week we used it to print out text and some escape characters, this week we’ll need it to print out variables, but how do we get it to print out something we don’t know the value of ?
printf sends formatted output to a device, by default it sends it to the screen (but it can send it elsewhere). We didn’t need to use formatting previously as we were only outputting text now printf needs to know what it is outputting, here is an example :
int a=6;
printf(“The value of a is : %d \n”, a);
The code here defines an integer variable called a with the value 6, we then get to the printf statement. The first part we’ve seen before, any text in between (“”) is printed as it’s written but there is an odd formatting code in the middle , %d, this tells printf that in this position we want to print an integer type variable. Once we close the quotation marks we have to tell printf what that variable is so we list the variables in order using commas. In our first example there is only one variable but we can use as many as we like EG.
int a = 6;
int b = 9;
int c = 2;
printf(“Value of a is %d , value of b is %d , value of a again %d and finally value of c is %d”,a,b,a,c);
There are a number of options for printf as well as %d the most common ones are below :
%d print as decimal integer.
%6d print as decimal integer, at least 6 characters wide.
%f print as floating point.
%6f print as floating point, at least 6 characters wide.
%.2f print as floating point, 2 characters after the decimal point.
%6.2 print as floating point, at least 6 characters wide and 2 after decimal point.
%o print as octal (base 8).
%x print as hexadecimal (base 16).
%c print character.
%s print string.
Like the escape characters last time if we want to print an actual % character then we can use %%.
Exercises.
a ) Write a simple program to investigate the difference between %d and %7d.
b) Write a simple program to investigate the difference between single and double precision reals.
c) Write a simple program that print out the value of pi to :
i) Nearest integer value.
ii) Two decimal places.
iii) Five decimal places.
iv) Ten decimal places.
We’ll look at operators properly in a couple of weeks but C has a number of mathematical operators, two of the most common are + and – , so we can do things like :
int a = 5;
int b = 7;
int c;
c = a + b;
d) Write a simple program that uses three variables a , b and c.
a = 8.9;
b = 6.7;
c = a + b
Output the value of c :
i) To the nearest integer value.
ii) To one decimal place.
iii) To two decimal places.
2023-03-16