COMP1721 Object-Oriented Programming Coursework 1
Hello, dear friend, you can consult us at any time if you have any questions, add WeChat: daixieit
COMP1721 Object-Oriented Programming
Coursework 1: Creating & Using Classes
1 Introduction
This assignment assesses your ability to implement classes and use them in a small program.
Consider the GPS data generated by a device such as a mobile phone. Your current location is represented
as a point, consisting of a timestamp, a longitude (in degrees), a latitude (in degrees) and an elevation above sea level (in metres). Movement while GPS is enabled generates a track: a sequence of points representing
successive samples from the GPS sensor.
Your main task is to implement classes named Point and Track that can be used to represent points and tracks, along with a small program that demonstrates the use of these classes. Figure 1 is a UML class diagram showing the required features of, and relationship between, the two classes.
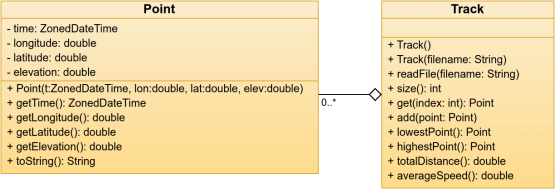
Figure 1: Classes used in Coursework 1
2 Preparation
2.1 Files Needed
Download cwk1files .zip from Minerva and unzip it. The best way of doing this on a SoC Linux machine is in a terminal window, via the command
unzip cwk1files .zip
This will give you a directory named cwk1, containing all of the files you need.
Remove the Zip archive, then study the files in cwk1. In particular, examine the file README .md, as this provides guidance on how to run the tests on which your mark will be largely based.
Note: all code should be written in the .java files provided in the src/main/java subdirectory.
2.2 Method Stubs
A suite of unit tests is provided with the files for this coursework. These tests are used to verify that the methods of the two classes have been implemented correctly. You will be awarded one mark for each test that passes. The starting point for the coursework is to make sure that the tests compile and run. This means
that it is necessary to begin by creating method stubs: dummy versions of each method that do just enough that the tests will compile successfully.
Refer to Figure 1for details of the stubs that are required, and note the following:
◆ All stubs should have the parameter lists and return types shown in the UML diagram
◆ Constructors should be implemented as empty methods (nothing inside the braces)
◆ Any method that returns a numeric value should just return a value of zero
◆ Any method that returns an object should just return the value null
Note also that the Point class references a class from the Java standard library named ZonedDateTime. This is part of Java’s standard Date/Time API, defined in the package java .time—see the API documentation for further details. To use it, you will need to add an import statement to the start of Point .java:
import java .time .ZonedDateTime;
When you have created stubs for all the methods shown in Figure 1, you can attempt to compile and run the tests using Gradle. See README .md for full details of how Gradle can be used. We simply note here that you
can run the tests from a Linux or macOS command line with
./gradlew test
Omit the ./ from the start of this command if you are working from the Windows command prompt, or use .\gradlew .bat to invoke Gradle if you are using Windows Powershell.
3 Basic Solution
This is worth 18 marks.
Please read all of the subsections below before starting work. We also recommend that you gain some experience of implementing classes by doing the relevant formative exercises before you start.
3.1 Point Class
To complete the implementation of the Point class, make the following changes to Point .java:
◆ Add a field to represent the timestamp, of type ZonedDateTime (see below).
◆ Add fields to represent longitude, latitude and elevation, all of type double.
◆ Add code to the constructor that initialises the fields to the values supplied as method parameters, with validation done for longitude and latitude (see below).
◆ Modify the ‘getter’ methods (getTime(), getLongitude(), etc) so that they return the relevant field values, instead of the defaults like 0 or null that were returned by the stubs.
◆ Change toString() so that it returns a string representation of a Point looking like this:
(-1 .54853, 53 .80462), 72 .5 m
(The values here are longitude, then latitude, then elevation. The string should be formatted exactly as shown here. Note the specific number of decimal places being used for each number!)
Make sure that it is not possible to create a Point object with an invalid latitude or longitude. Use the constants provided in the class to help you with this, and throw an instance of the provided exception class, GPSException, if inappropriate coordinates are supplied.
As you replace each method stub with its correct implementation, rerun the tests. You should see a growing number of tests changing in status from FAILED to PASSED.
3.2 Track Class
For the basic solution, make the following changes to Track.java:
◆ Add a field suitable for storing a sequence of Point objects.
◆ Modify the constructor that take a string as its parameter, so that it initialises the field used to store the Point objects and then calls the readFile() method.
◆ Add to readFile() some code that will read data from the file with the given filename, create Point objects from this data and then store those Point objects as a sequence (see below).
◆ Modify the size() method so that it returns the number of points currently stored in the track.
◆ Modift the get() method so that it returns the Point object stored at a given position in the sequence. Position is specified as an int parameter and should be validated (see below).
◆ Modify the add() method so that it adds a new point, supplied as a method parameter, to the end of the track.
The readFile() method will need to read CSV files, examples of which can be found in the data directory. It should use a Scanner to do this. A good approach here would be to read the file line-by-line, split up the line on commas, then parse each item separately. The lectures discuss how a file can be read in this manner. You can use the static method parse() of the ZonedDateTime class to parse the timestamp.
readFile() should NOT catch any exceptions that might occur during reading of the file. It will need an
exception specification, declaring that an IOException could happen if the named file cannot be accessed. Your implementation should also explicitly throw a GPSException if any record within the file doesn’t contain the exact number of values needed to create a Point object. Note that you do not need to include
GPSException as part of the method’s exception specification, because this exception class is not one of Java’s ‘checked exception’ types.
The get() method should use the int value passed to it as an index into the sequence of Point objects, but before doing that the method should check this int value and throw an instance of GPSException if it is not within the allowed range. Once again, note that there is no need to include an exception specification for this.
As you replace each method stub with its correct implementation, rerun the tests. You should see a growing number of tests changing in status from FAILED to PASSED.
4 Full Solution
This is worth a further 12 marks. It involves completing the implementation of the Track class and then writing a small program that uses the two classes.
4.1 Track Class
If you’ve completed the basic solution, there should be four remaining method stubs in Track.java, which should be modified as indicated below.
◆ Modify lowestPoint() and highestPoint() so that they return the Point objects having the lowest and highest elevations, respectively.
◆ Modify totalDistance() so that it returns the total distance travelled in metres when moving from point to point along the entire length of the track (see below).
◆ Modify averageSpeed() so that it returns the average speed along the track, in metres per second (see below)
All four of these methods should throw a GPSException if the track doesn’t contain enough points to do the necessary computation.
To implement totalDistance(), you will need to compute-‘greatcircle distance’ between adjacent points on the track. A method to do this already exists in the Point class. Given two Point objects, p and q, the great-circle distance in metres between them (ignoring elevation) will be given by
double distance = Point .greatCircleDistance(p, q);
To implement averageSpeed() you will need to compute the amount of time that has passed between measurements for the first and last points on the track. You can use the ChronoUnit type for this: specifically, the between() method, which can be called on the object ChronoUnit .SECONDS to yield the time interval in seconds between two ZonedDateTime objects.
Note: the ChronoUnit class is part of Java’s standard Date/Time API. To use it, you will need to add an import statement to Track .java:
import java .time .temporal .ChronoUnit;
As you replace each method stub with its correct implementation, rerun the tests. Your goal here is to end up with all 26 tests passing. If you achieve this, you can be assured of getting at least 26 marks for the coursework.
4.2 TrackInfo Program
Edit the file TrackInfo.java. In this file, create a small program that creates a Track object from data in a file whose name is provided as a command line argument. You program should display: the number of points in the track; its lowest and highest points; the total distance travelled; and the average speed.
Requiring the filename as a command line argument means that it has to be supplied as part of the command that runs the program; the program should not be prompting for input of the filename once it has started running!
For example, if running the program directly within a terminal window, you would need to enter
java TrackInfo walk .csv
Note that you can run the program with a suitable command line argument via Gradle:
./gradlew run
This will run the program on the file data/walk .csv.
You can also check whether your program behaves correctly when no filename has been supplied on the command line, by doing
./gradlew runNoFile
When your program is run on walk .csv, it should generate output very similar to this:
194 points in track
Lowest point is (-1 .53637, 53 .79680), 35 .0 m
Highest point is (-1 .54835, 53 .80438), 73 .6 m
Total distance = 1 .904 km
Average speed = 1 .441 m/s
Your output doesn’t need to be identical in layout, but it should provide all the data shown here, and numbers should be formatted with the number of decimal places shown in this example.
If no filename is supplied on the command line, your program should print a helpful error message and then use System .exit() to terminate, with a value of zero for exit status.
The program should intercept any exceptions that occur when reading from the file or performing computa- tion. The program should print the error message associated with the exception and then use System .exit() to terminate, with a non-zero value for exit status.
5 Advanced Tasks
For a few extra marks, implement ONE of two options suggested below.
These tasks are more challenging and will require additional reading/research. They are also worth
relatively few marks. Attempt them only if you manage to complete the previous work fairly quickly and easily.
5.1 Option 1: KML Files
This is worth an additional 2 marks.
1. Add to the Track class a new method named writeKML. This should have a single String parameter, representing a filename. It should write track data to the given file, using Google’s Keyhole Markup Languageformat.
2. Edit ConvertToKML .java and add to it a program that converts a CSV file of track data into a KML file. The program should expect filenames for these two files as command line arguments, with the CSV file as the first argument and the KML file as the second argument. It should deal with missing arguments and exceptions in the same way as TrackInfo.
3. Generate a KML file for the track represented by walk .csv. You can do this with Gradle, using
./gradlew runKML
This will generate its output in a file walk .kml, in the build subdirectory.
Visualise the file by uploading it to Google Maps (see Figure2) or by importing it into Google Earth. Grab a screenshot of the result and place it in the cwk1 directory so that it will be included in your submission.
5.2 Option 2: Elevation Plot
This is worth an additional 4 marks.
1. Investigate JavaFX by reading David Eck’s online Java Notes and other online sources. In particular, you will need to research how charts can be drawn in JavaFX.
2. Edit build .gradle and uncomment the various commented-out parts relating to JavaFX.
3. Edit the file PlotApplication .java and implement in this file a JavaFX application that plots elevation as a function of distance along a track. As with TrackInfo, the file of track data should be specified as a command line argument.
You can run your application on walk .csv via Gradle, with this command:
./gradlew runPlot
Figure 3 shows an example of what the plot could look like.
6 Submission
Use Gradle to generate a Zip archive containing all the files that need to be submitted:
./gradlew submission
This produces a file named cwk1 .zip. Submit this file to Minerva, via link provided for this purpose. You can find this link in the ‘Assessment and Feedback’ section, under ‘Submit My Work’.
Note: be careful to submit the correct Zip archive here! Make sure you do not accidentally submit the Zip archive of provided files . . .
The deadline for submissions is 10.00 on Thursday 9 March 2023. The standard university penalty of 5% of available marks per day will apply to late work, unless an extension has been arranged due to genuine extenuating circumstances.
Note that all submissions will be subject to automated plagiarism checking.
7 Marking
40 marks are available for this assignment.
A basic solution can earn up to 24 marks (60% of those available); a full solution can earn up to 36 marks (90% of those available).
Mark allocation breaks down as follows:
18 Tests for basic solution
8 Tests for full solution
4 TrackInfo program
4 Advanced task
6 Sensible use of Java and coding style
40
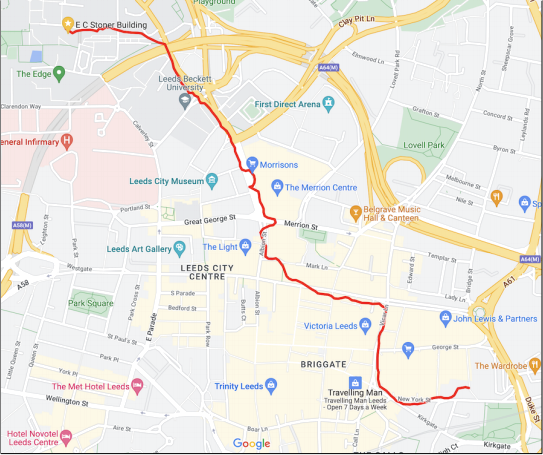
Figure 2: A track rendered by Google Maps
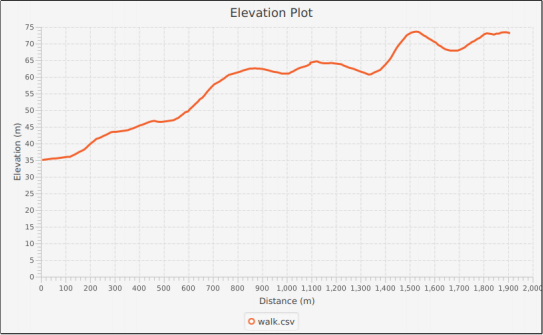
Figure 3: Elevation plot produced using Java FX
2023-03-06
Creating & Using Classes