Full Stack Development/Software Workshop 2
Full Stack Development/Software Workshop 2
Assignment 2
Marks available: 50% of the module mark
Introduction
For this assignment you will add the final components to the database server that was created for Assign-ment 1 to create a full stack application. There is a completed version of Assignment 1 available for you to download from Canvas. It has been enhanced from the version that you completed for Assignment 1 so you should download the new version rather than using your own. The enhancements are described below, where they are applicable.
There are two main components that you will build for Assignment 2. Since there are two people to each group, it makes sense for each student to complete one of the components. This will be discussed in more detail below.The two components you must create are the client and the server for the Jabber platform. The client will have a GUI developed using JavaFX and a controller. The server is a Java application that serves data to clients from the database. The client and server are connected to each other via sockets on localhost. You must use the port number that is specified below.
The client and server should be developed as two separate projects. Do not put the client and server code in the same project. It must be possible to run both the client and the server independently, i.e. not at the same time. Part of the testing of your submission will involve connecting a separate client (developed by Ian, not yours) to your server and connecting your client to a separate server (developed by Ian, not yours).
The next section of this document will specify the requirements for your application. You should try and ensure that all of the functionality described is present.
There is no specified look or layout required of your GUI. You can design it to look however you want. However, it must allow the functionality that is described below.
You must use the class JabberMessage and the protocol outlined below exactly as stated, and must use localhost and port 44444 for the connection. Apart from those, you may name your classes, etc. however you wish.
Make sure you have watched the final ‘wrap-up’ video before attempting this assignment.
The only person you can share your code with in any way at all is your other team member.
Requirements of the Jabber social media application
Your application should have the following functionality. Each GUI element that is referred to below has been given a code such as T1, B1, etc. Note that as long as your GUI has the required functionality, you don’t need to use these specific types of GUI controls. You can use any other GUI controls you want provided they allow for the following functionality. The marks available for each correctly implemented requirement are also shown.
■ RQ1. Users should be able to sign in to the application by entering their username in a text field T1 and by pressing a button B1 marked ‘Sign In’ to send the username to the server. Once the user is successfully signed in the GUI should somehow indicate this. [4 marks]
■ RQ2. If the user enters an invalid username, i.e. a username that does not already exist in the database, then the GUI should present an error dialog E1 advising the user that the username is invalid. The error dialog should be closable allowing the user further attempts to enter their username. [3 marks]
■ RQ3. The user should be able to register for the application by entering their new username in the text field T1 and by pressing a button B2 marked ‘Register’. The GUI should somehow indicate that the user has successfully registered. The new user should be signed in by the server without the user having to do this as a separate step. [4 marks]
■ RQ4. The user should be able to sign out by pressing button B3 (which could be the same button as B1). This should disconnect the user from the server and close the client application. [2 marks]
■ RQ5. Once the user is signed in, the application should present that user’s timeline in pane P1. This pane should have a header label saying ‘Timeline’. The format of each jab in the timeline should be as shown below (it doesn’t need to actually look like this. It just needs to contain this information). The ‘heart’ image you can see can look differently to that but some kind of image must be present there. The ‘heart’ here is the ‘like’ button (see RQ6). Note that in the enhanced version JabberDatabase on Canvas, there is a new method called getTimelineOfUserEx() which retrieves all of the information you need for each jab, i.e. it returns the username of the user who posted the jab, the jab text, and the number of likes that jab has in total. This method also returns the jabid of each jab in the timeline but you should not display that. [7 marks]

■ RQ6. The user should be able to click a button to ‘like’ a jab that is in their timeline. There is one button B4a, B4b, ... for each jab. In the image above the button uses a ‘heart’ icon. If a user clicked the heart button on the jab in figure 1 (and they have not already liked the jab1 ), the number shown next to the heart button should change to 3 because there is now one more ‘like’ of this jab. Users can’t ‘unlike’ a jab. [4 marks]
■ RQ7. Once the user is signed in, the application should also present a list of registered users who the signed-in user is not following in pane P2. This pane should have a header label saying ‘Who to follow’. There is a new method in the JabberDatabase class for this: getUsersNotFollowed(). The format of each user in this list should be as shown below (again, it doesn’t literally need to look like this). [7 marks]
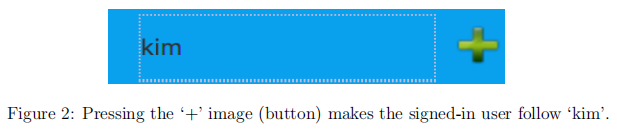
■ RQ8 Each line of the list of ‘who to follow’ in P2 has the username of the user that could be followed and a button B5a, B5b, ... (shown here with a ‘+’ image), one for each user, that when clicked makes the signed-in user follow the user listed. Once a user has been followed, their jabs should be immediately (or very quickly) added to the timeline that is being displayed in P1. [5 marks]
■ RQ9. Users should be able to post their own jab. For this there should be a text field T2 in which they enter the jab text and a button B6 that sends the jab to the server. Once posted the jab should appear in the user’s timeline2. [4 marks]
■ RQ10. Each of the actions above must be reflected in the client of any affected users. For example, if users A and B are signed in, and user A follows user B, when user B posts a new jab it must also appear in the timeline of user A. This applies to all other operations. Where actions affect other users they must be reflected in the client of those users3. [10 marks]
Items to download from Canvas
Make sure you download all of the following files from Canvas.
■ JabberDatabase.java. For Assignment 1, this file was called JabberServer.java. You should use this new version. You should not need to change this file. You may do so if you wish but make sure you don’t break it.
■ JabberMessage.java. You must use this class in order to transfer data across the network. Note that this class is supplied complete and does not need to be changed or added to. This class should be used in the client and the server. You can simply put copies of this file in each of the two projects.
■ The updated Jabber SQL files.
Implementation
The most important point to grasp in the first instance is that you and your partner must create two separate applications: the client and the server. These two applications must be developed in separate projects in your chosen IDE (Eclipse, IntelliJ, etc.).
The clients and the server will communicate with each other using sockets. The sockets must use the address ‘localhost’ and port 44444 for the connection.
You should use the class JabberDatabase as your database class. This has all the methods you need to get the data you need from the database. You may need to change the postgres password specified in the file for your own system. It is best to create an instance of JabberDatabase for each separate client that connects.
To exchange messages between client and server, both client and server must use the class JabberMessage that can be downloaded from Canvas (simply copy it into both projects). JabberMessage has a ‘message’ and ‘data’. The format of the messages required is specified in the section on the Jabber protocol below. You must use the protocol exactly as stated. No other messages are required. Make sure you have read and understood the final lecture (‘wrap up’ (under Week 11 on Canvas) before using this class).
You should use the Model-View-Controller pattern to implement your client. This means that your should have a class for your GUI (which is the view) and another class for a controller. The GUI class should not itself communicate directly with the server.
The server application should be threaded in such a way as to allow multiple clients to connect at the same time. Again, make sure you have read and understood the final lecture under Week 11 on Canvas.
The Jabber client/server protocol
Your client and server must adhere to the following protocol. All strings must be used exactly as shown.
Note that once the user is signed in the client does not need to send the username for other requests. The server will have established a connection to the client so will know which client the message is from.
■ P1a. Signing in (successful).
– Client message: signin[space]username (the string ‘username’ should be the username that the user entered in the GUI.)
– Server reply message: signedin
– Server reply data: NONE.
Example client message: “signin edballs”
Server reply (message): “signedin”
■ P1b. Signing in (unsuccessful).
– Client message: signin[space]username (the string ‘username’ should be the username that the user entered in the GUI.)
– Server reply message: unknown-user
– Server reply data: NONE.
Example client message: “signin blahblah” (a user not previously registered)
Server reply (message): “unknown-user”
■ P2. Registering.
– Client message: register[space]username (the string ‘username’ should be the username that the user entered in the GUI4 .)
– Server reply message: signedin
– Server reply data: NONE.
Example client message: “register todd” (a user not previously registered)
Server reply (message): “signedin”
■ P3. Signing out.
– Client message: signout
– Server reply: the server does not reply to this request.
■ P4. Getting the timeline
– Client message: timeline.
– Server reply message: timeline
– Server reply data: {username, jabtext, jabid, likes-count} (one row for each jab in the timeline)5.
Example client message: “timeline”
Server reply (message): “timeline”
Example Server reply (data): [{“ted”,“excellent”, “56”, “3”}{“bill”, “dude”, “58”, “2”}]
■ P5. Getting the users (who to follow)
– Client message: users
– Server reply message: users
– Server reply data: {username} (one row for each user who is not being followed by the user.)
Example client message: “users”
Server reply (message): “users”
Example Server reply (data): [{“todd”}{“wilma”}]
■ P6. Posting a jab.
– Client message: post[space]jabtext (where ‘jabtext’ is the text of the jab.)
– Server reply message: posted
Example client message: “post my first jab”
Server reply (message): “posted”
■ P7. Liking a jab.
– Client message: like[space]jabid (where ‘jabid’ is the id of the jab to like.6)
– Server reply message: posted
Example client message: “like 14”
Server reply (message): “posted”
■ P8. Following a user.
– Client message: follow[space]username (where ‘username’ is the user to follow.)
– Server reply message: posted
Example client message: “follow todd”
Server reply (message): “posted”
Working together
Because this project has two distinct parts, that are connected only by a predefined protocol, getting the code of the two team members to work together should be straightforward. Provided your client and server both understand the protocol above then they can work together.
One approach would be to work through the requirements in the order they are stated in. Get ‘signing in’ working on both client and server together, before moving on to the other requirements. This will give you a model to use for implementing the rest of the protocol. The only difference will be for some of the requirements is that data must also be returned to the client.
In terms of sharing your code with each other, you should agree a naming system so that you can match versions together so that you don’t get out of sync with each other. For example, in zip files named clientRQ1 and serverRQ1 for the versions that both implement signing in (RQ1), and so on.
You will both need both projects in your IDE so that you can test your work as you go along, but you as an individual will only be working on one of them. Your partner will have to send you their latest versions of the files (via email) to put into the relevant project.
If you choose to use some sort of version control system, e.g. Github, you must set your repository to private and grant access only to the two members. Failure to do this will result in a mark of zero for both members of the group. You will also receive zero if any other public means of communication is used, or if your files are uploaded to any third-party website that is public.
Submission
Each team member must submit all of the following in a single zip file.
■ Your client project (all files including Eclipse/IntelliJ files).
■ Your server project (all files including Eclipse/IntelliJ files).
■ A text file (.txt format) containing the following information:
– The name and ID of the student who created the server. This is very important. If we don’t know this, and something doesn’t work, both students will lose marks.
– The name and ID of the student who created the client. This is very important. If we don’t know this, and something doesn’t work, both students will lose marks.
– The main class name in the server, i.e. the one we need to run.
– The main class name in the client, i.e. the one we need to run.
– Notes about anything we should be aware of when marking, special instructions, etc.
Marking
All students will receive a mark out of 50.
The marks for each fully functioning requirement are shown in the requirements section above. If your application has the functionality described for a given requirement, and it works fully, both students will get the marks shown for that requirement.
If your functionality for a given requirement is not correct then you may receive partial marks for that requirement, depending on how far your functionality deviates from the required functionality.
If your functionality for a given requirement is not correct, we will try and ascertain if the problem is caused by your client or server or both. If it is caused by only one of those, and we know which student created each application (and there is no doubt about that) the marks will be awarded to the student whose func-tionality is correct. The other student in the pair will get zero marks for that requirement. This is why it is very important for us to know exactly who did what in each team. If we have any doubt over the author-ship of each application then both students will get the partial marks mentioned in the previous paragraph.
If the functionality for a requirement is missing then both students in the group will receive zero for that requirement.
If one of your applications does not work at all, e.g. it doesn’t compile or can’t be started, or when started does not function, then the student who created that application will receive a mark of zero for the whole assignment. The other application will be tested using either the client or server created by Ian.
If one of your applications does not work but the other does, and we do not know exactly who created which application, then both students will receive half of the marks that the working application would have received.
If both of your applications do not work at all, e.g. it don’t compile or can’t be started, or when started do not function, then both students in the group will get a mark of zero for the whole assignment.
2021-05-14